To begin, I want to share why I wanted to do an article that includes seat-fixing exercises. Early in my riding, I struggled with my upper-body position. My instructors were constantly reminding me to straighten up, but doing so was physically difficult. It wasn’t until I started working with FEI (International Equestrian Federation) rider and U.S. Dressage Federation Instructor Certification Program examiner Cindy Sydnor that I discovered the source of my problem wasn’t my upper body but rather my hip angle. I was tucking my seat underneath my body and tipping the top of my pelvis backward. That made it nearly impossible to sit straight. Cindy helped me find a more level pelvis position. Not only was I able to straighten my upper body, but I could also get my weight down better in my legs. As a result, my riding improved all around.
Since then, I’ve helped many riders enjoy similar breakthroughs. Sitting in the middle of the saddle with level hips allows you to relax your body and arms. Your hands can be independent with light contact. Your legs become secure without gripping and you have significantly more control over your horse.
Ideal Angles
So what exactly are the correct angles? In jumping disciplines, you must always ride in a position from which you could immediately jump a fence. This means there has to be some angle in your knees and hips. Stirrup length plays a role here. When you’re sitting in the saddle, your jumping length should create a knee angle of about 110 degrees. (I generally recommend it be a hole or two longer for flatwork.) As the fences get higher, sometimes you need more knee angle to absorb the concussion of the landing.
When you bring your seat in contact with the saddle, your weight needs to be evenly distributed over three points: your pubic bone in the front and your two seat bones in the back. Your legs need to stay down and around your horse, weighted in your heels. This good leg and seat base keeps you safely in the tack. As a result, your upper body can stretch up tall yet remain relaxed, akin to a puppet pulled up by strings. To follow your horse’s motion, allow your hips to swing in rhythm. Try to maintain this ideal position within each gait and throughout transitions between gaits.
Recently, I’ve noticed a lot of posting at the canter, which is incorrect. The canter needs to be ridden in either the three-point contact or in two-point/light-seat position. A proper hip angle enables you to do this.
When jumping, correct hip angle is critical. It keeps you from falling behind the motion during the approach to fences and helps balance your upper body over your base of support on landing . As a result, you are able to maintain maximum control of your horse without interfering with his jumping effort.
When you can’t rely on the balance of a correct position to stay in the saddle and follow the horse’s motion, you might:
• hold on to the reins for balance.
• move excessively (rock, pump) in the saddle.
• clench your buttock muscles, causing your horse to tighten and drop his back.
• grip your horse with your legs so you won’t be able to relax your knees, ankles and hips. Your “electric seat” will constantly drive your horse forward. If he is hot, you’re going to be in trouble.
Finding the ideal hip angle is a matter of body awareness, not strength building. Many riders require only a very minor change in angle to achieve a softer, more effective position. In fact, some riders try so hard to fix their seats that they overcorrect. So it’s important to continually reevaluate hip angle.
The best way to determine what modifications your hip angle needs is to take a lesson with an expert known to be effective on this topic. But even if you can’t find an instructor to help, there are many ways to analyze and correct your own position. I’ll go over some of my favorites in this article.
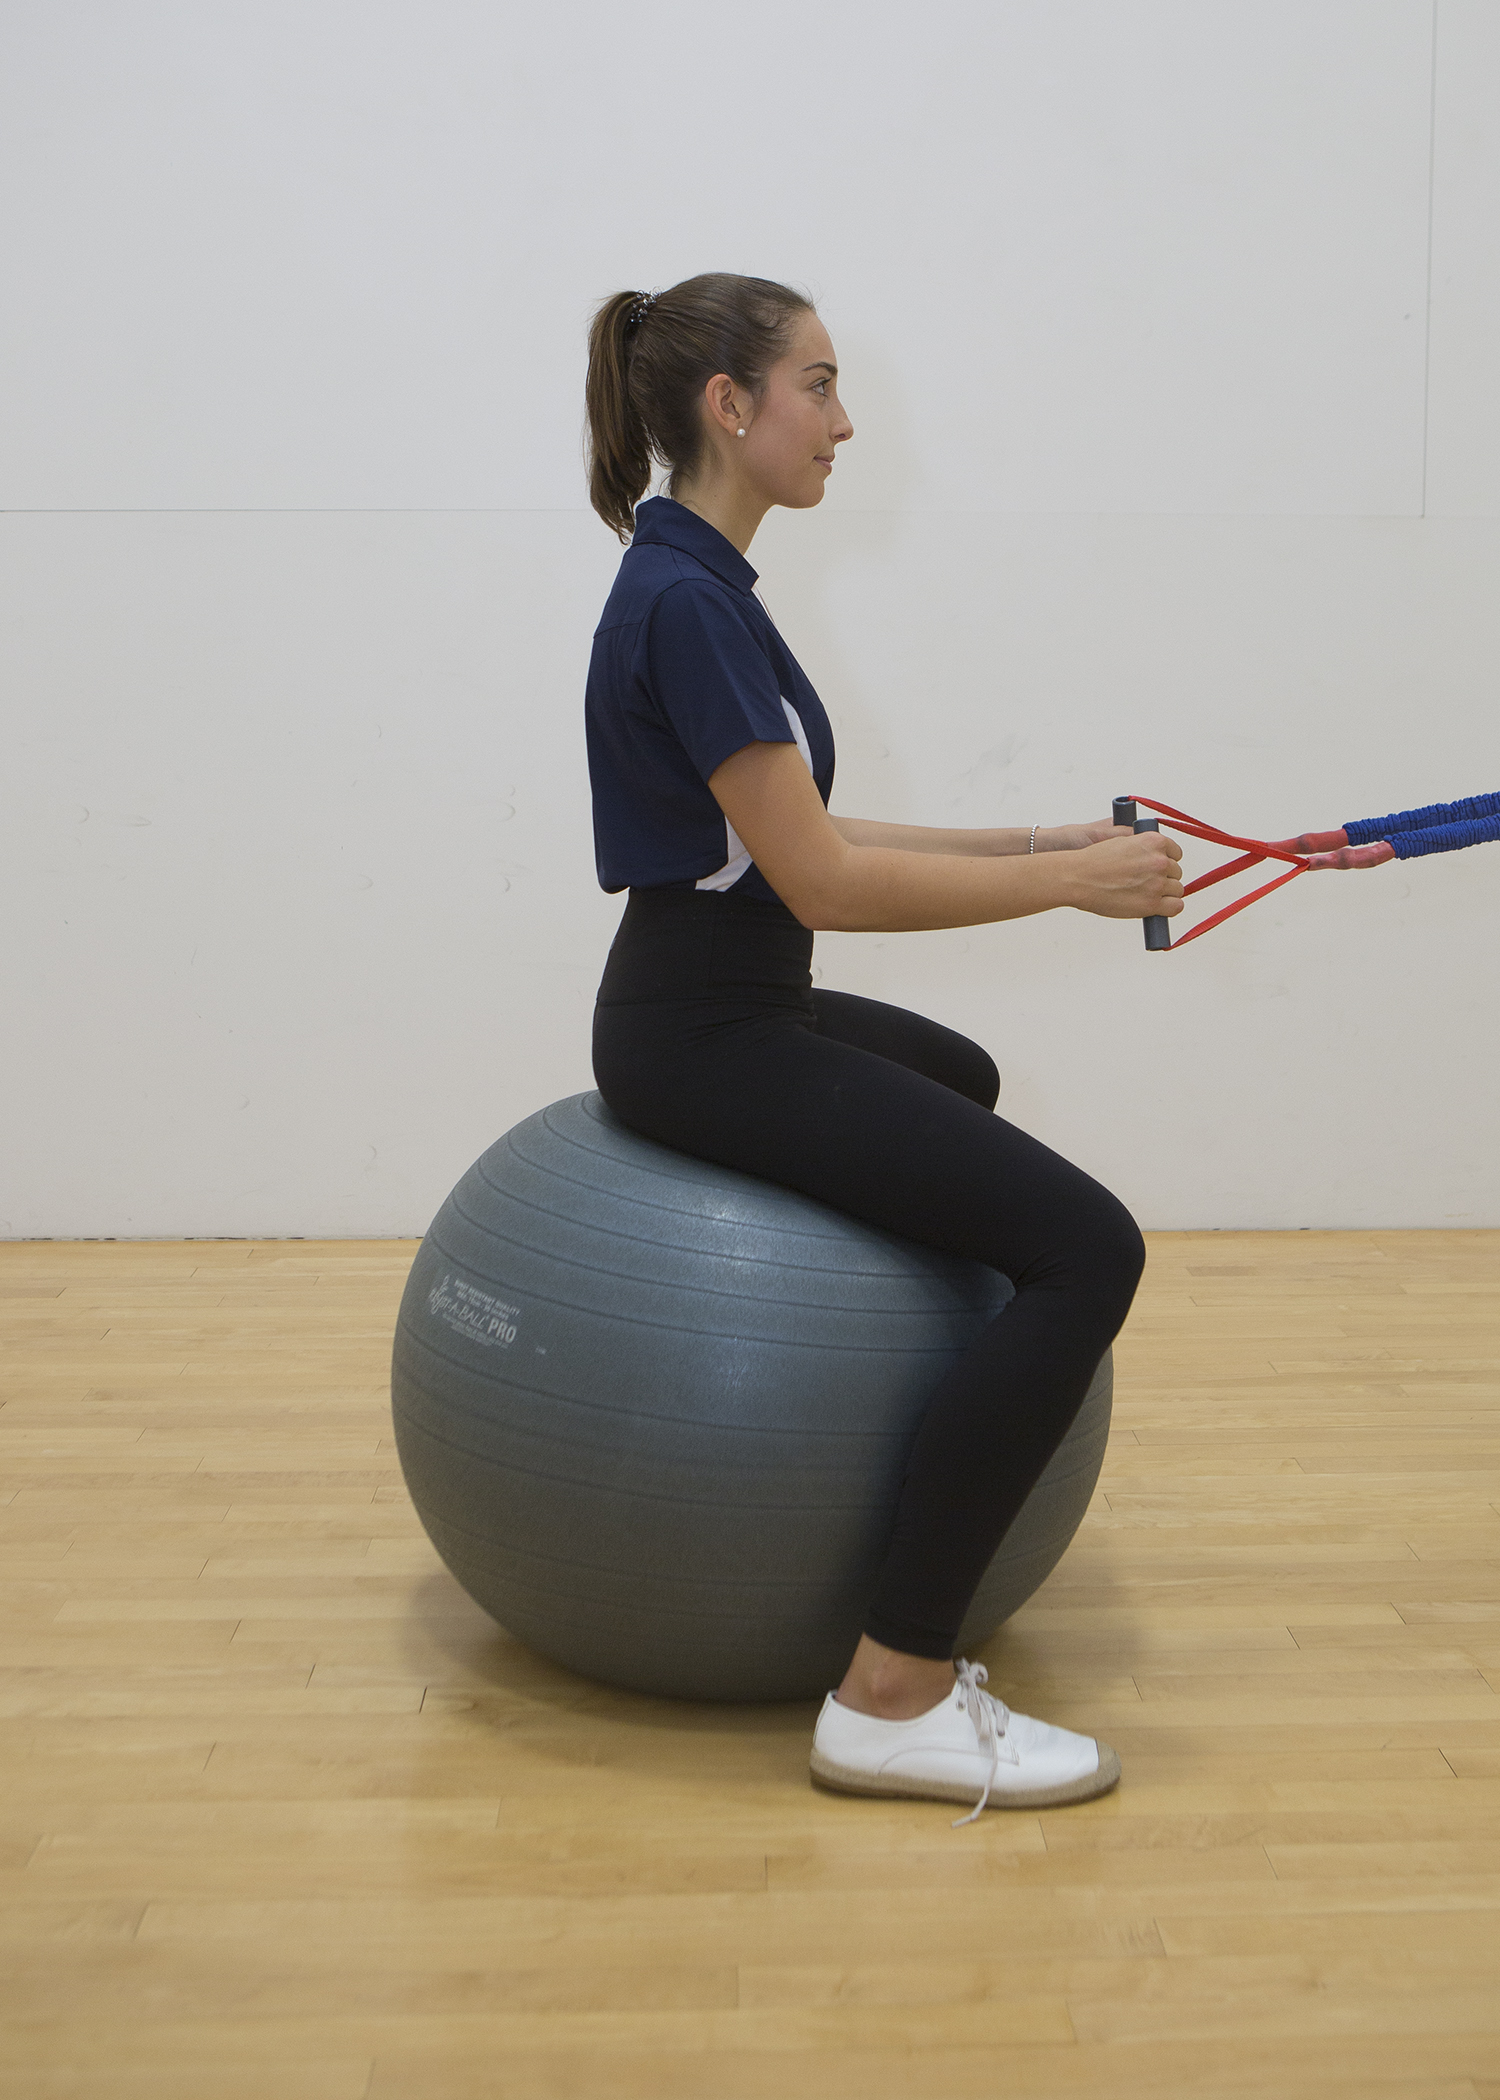
1. Stability Ball and Mirror
Find a stability or Swiss ball that’s small enough for you to sit on top of while resting your feet comfortably on the ground. Sit on it in front of a large mirror so you can view your position from the side. Imagining that you’re sitting on your horse, play with your hip angle.
To make this exercise more effective, hold a pair of reins or some sort of strap or band (like baling twine or the highest resistance level of Thera-band, used for physical therapy and fitness training) and ask a friend to hold the other end or attach them to a fixed object at about the height your horse’s mouth would be if you were mounted. Vary the pressure on the reins to practice holding different types of contact (heavier/lighter), all the while maintaining the position that keeps you properly balanced on top of the ball.
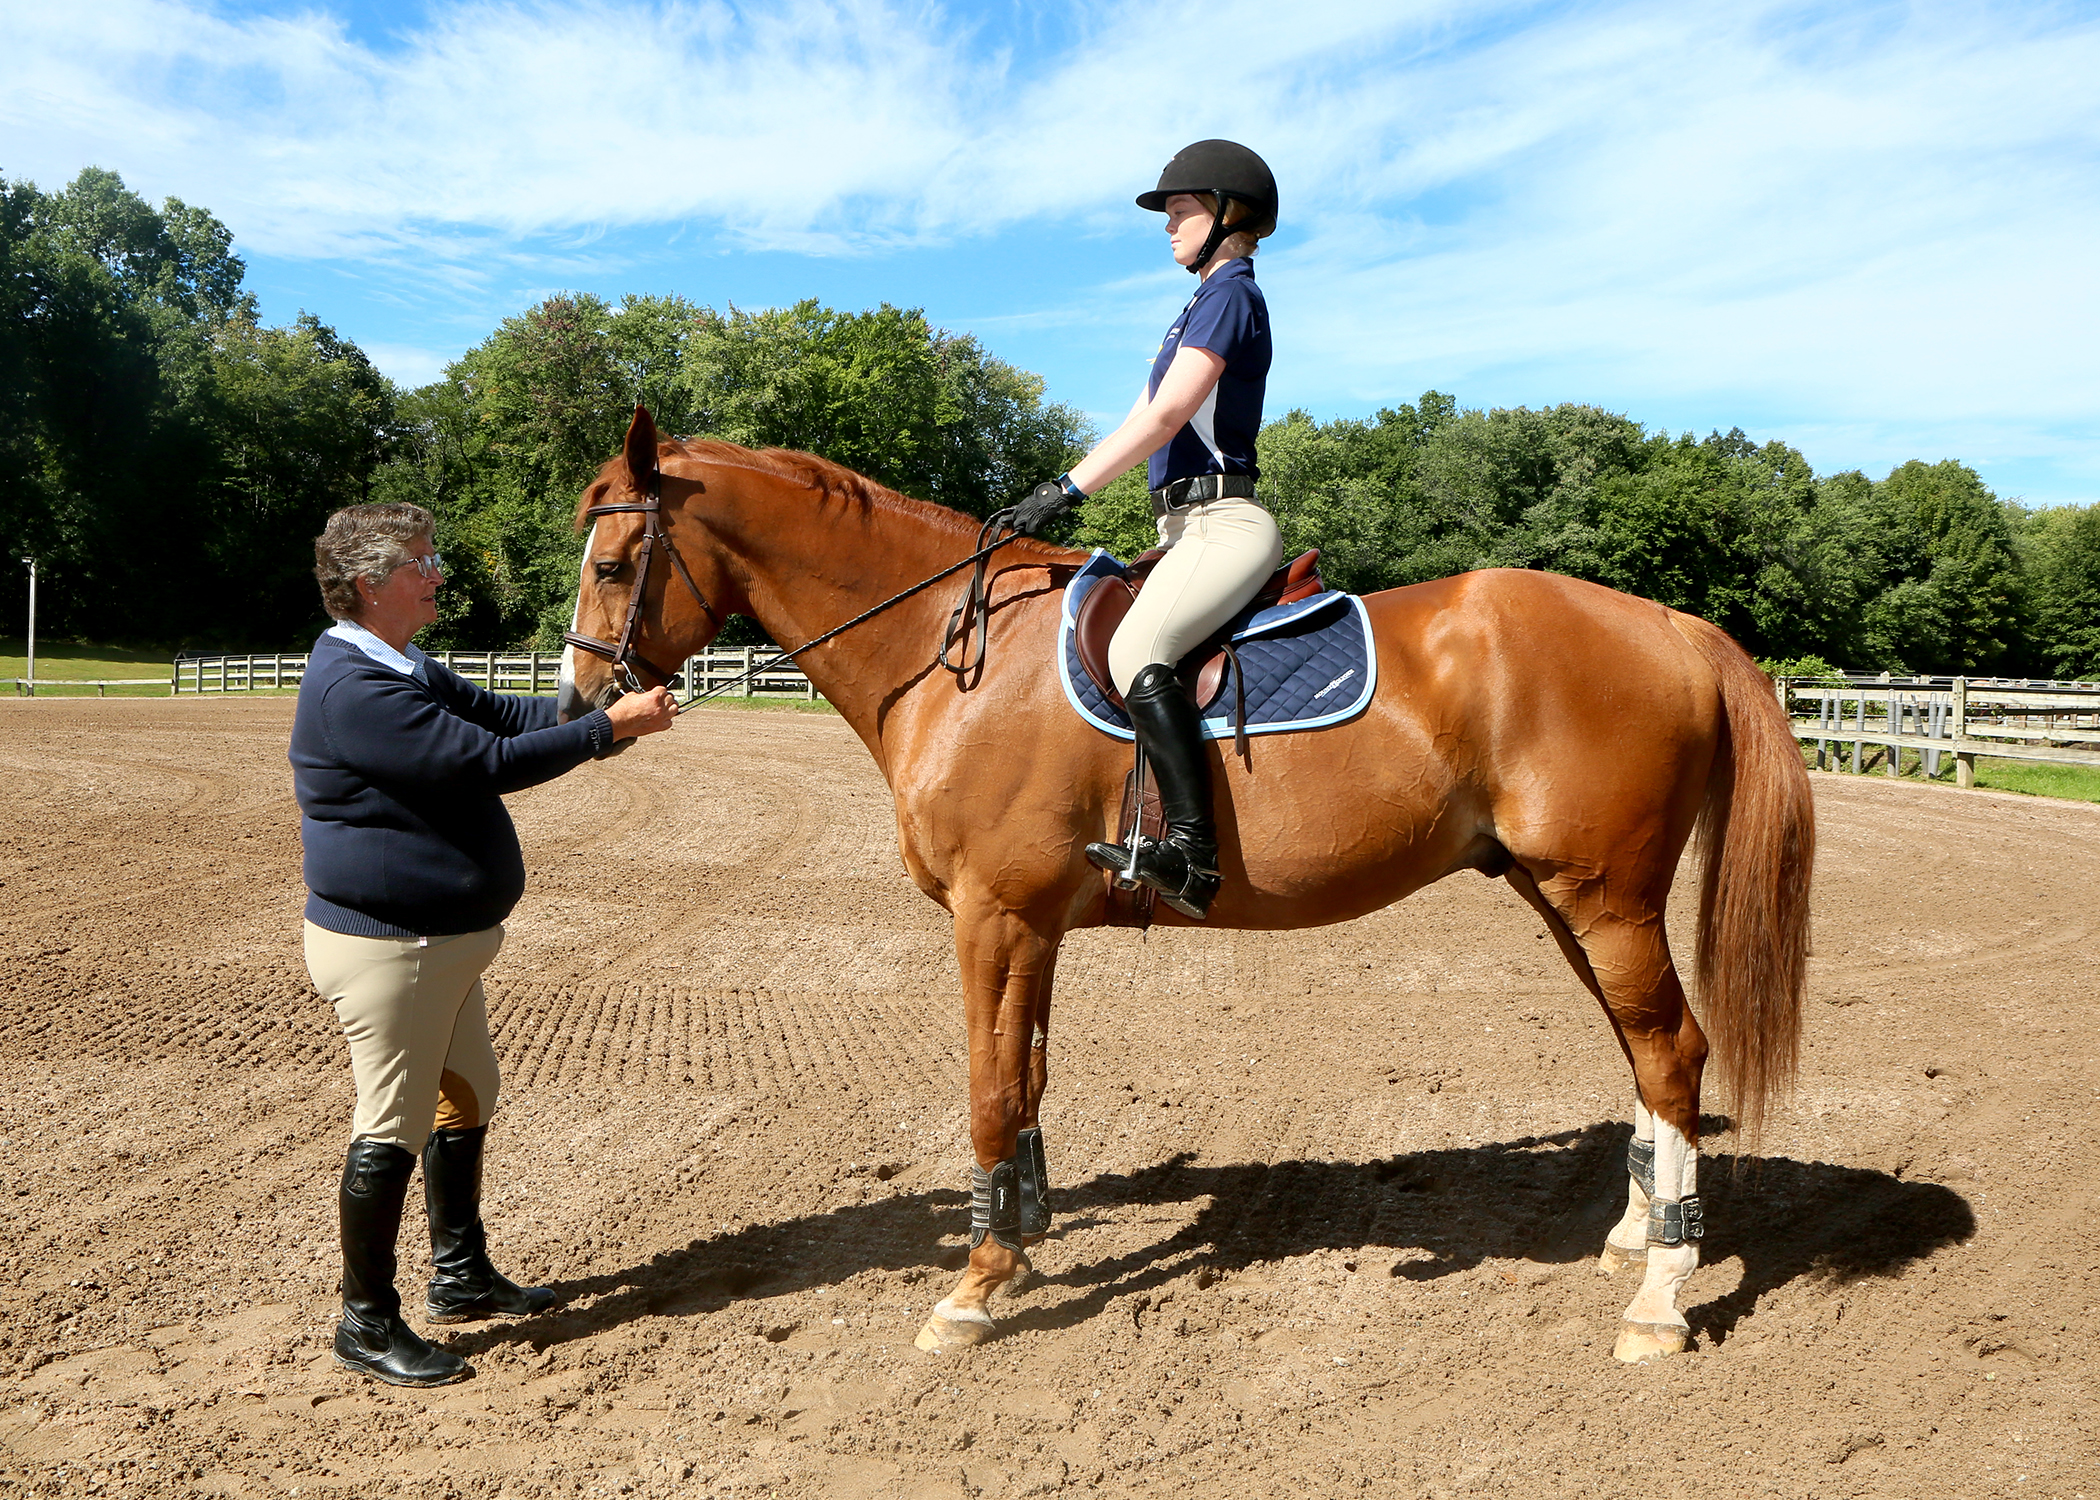
Below is a photo demonstrating a correct hip angle.
© Tracy Emanuel
But when your hip angle is incorrect, other components of your position fall out of place.
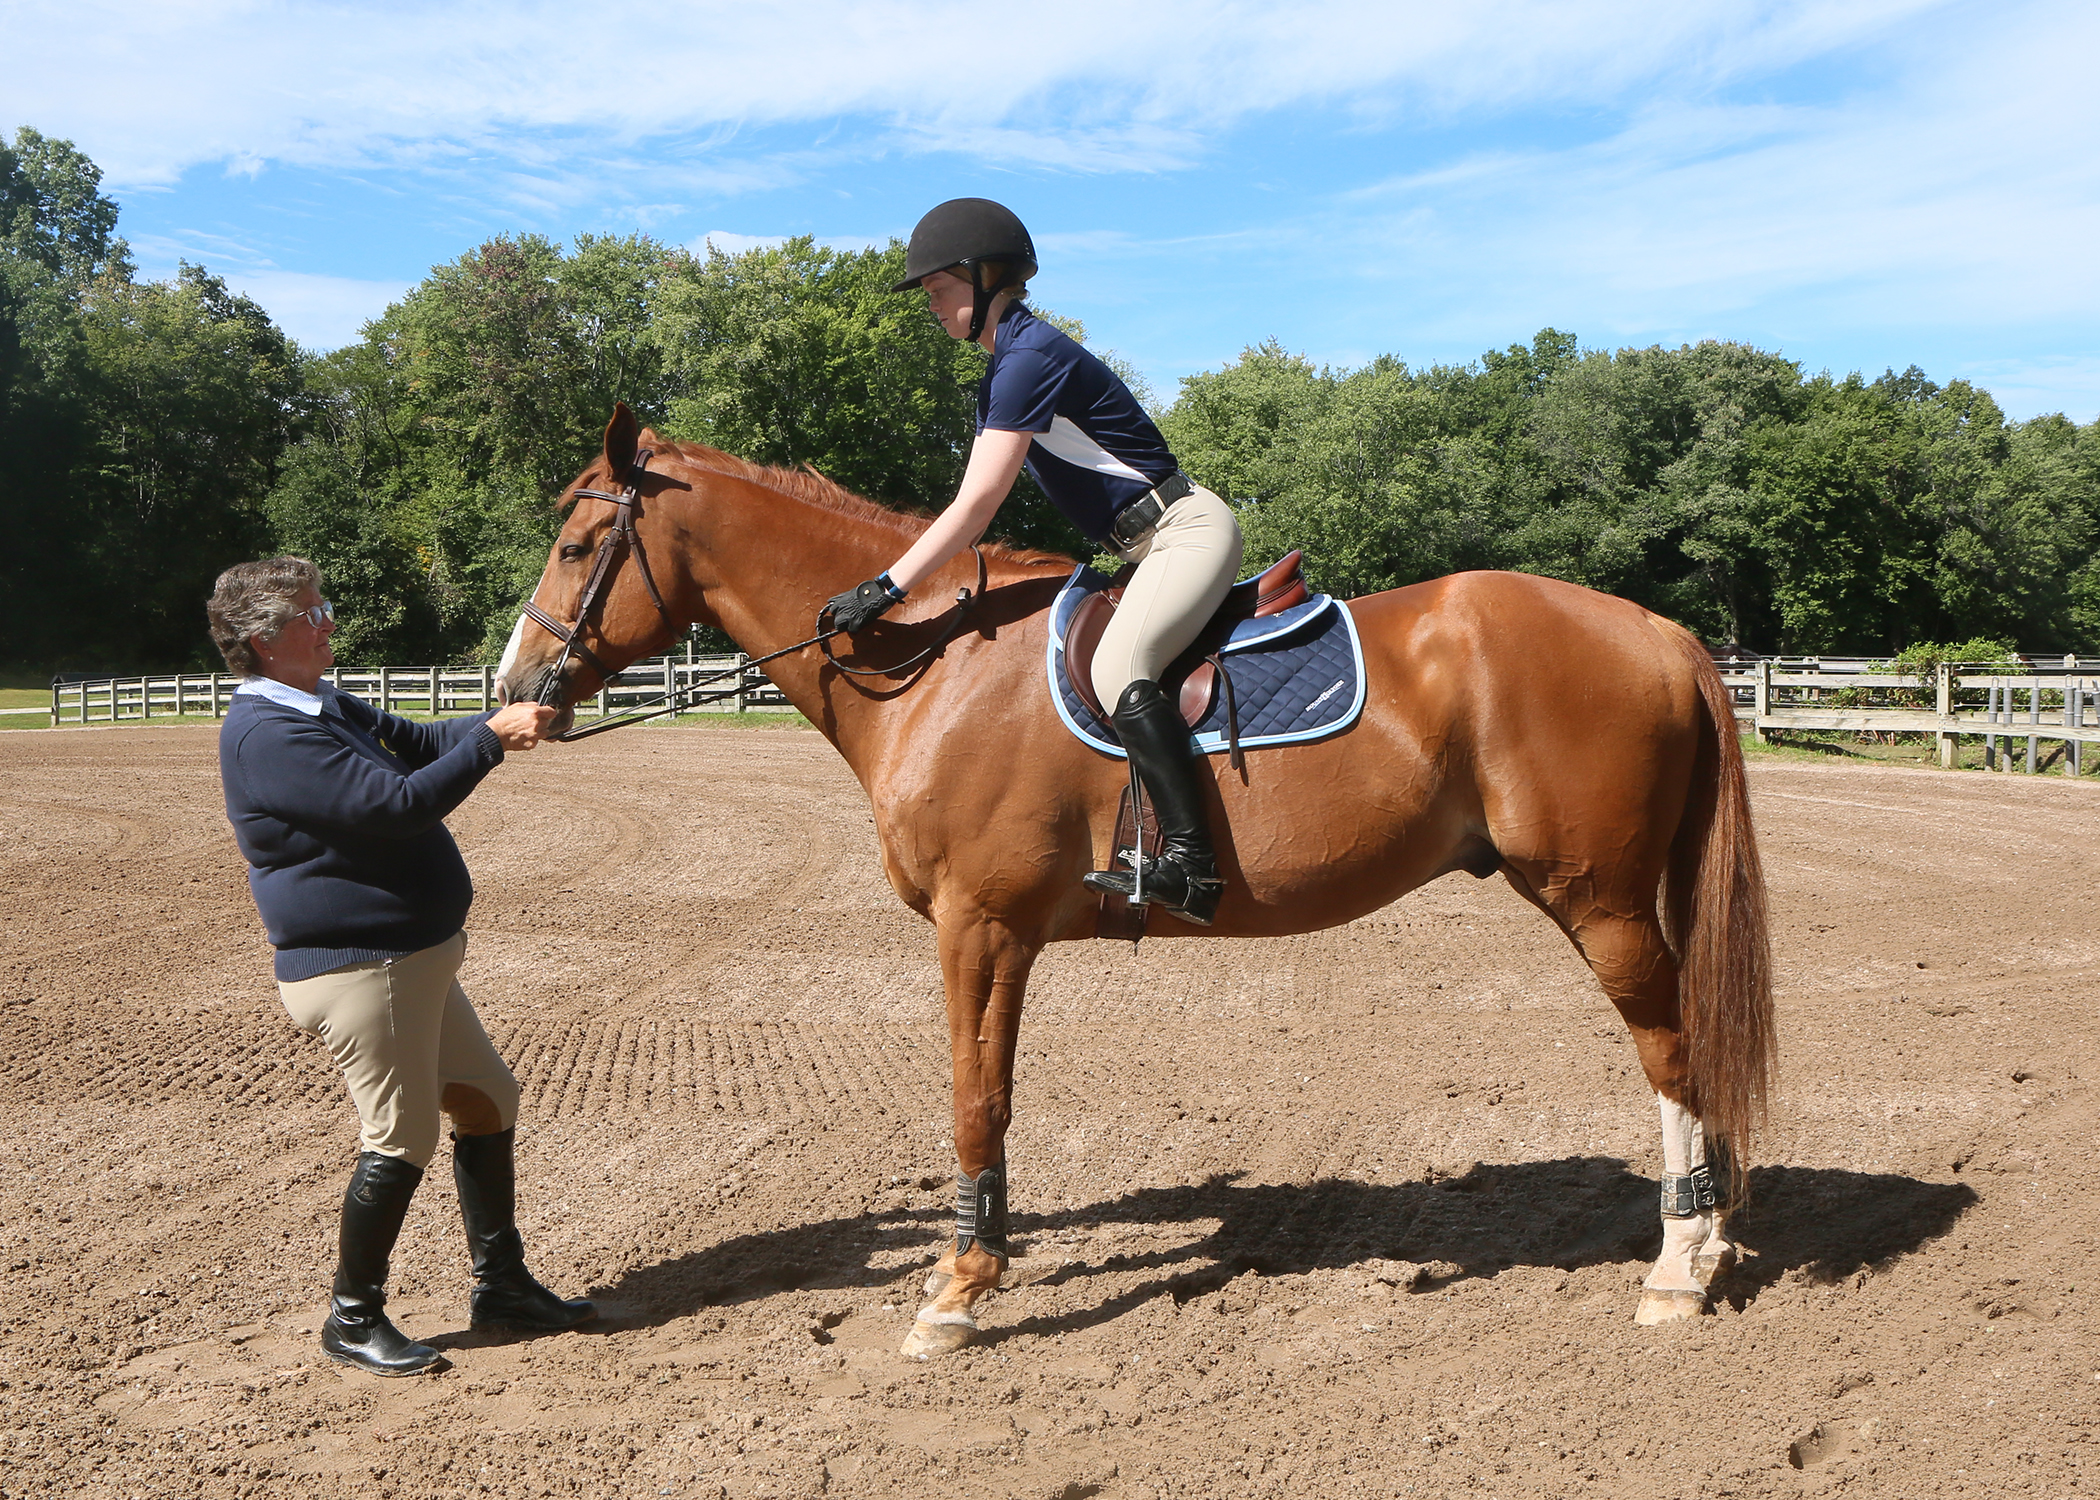
 TIPPED FORWARD: When Katerina tips the top of her pelvis forward, that overarches her back, bringing her elbows behind her body. This creates tension in her position, which she could correct by softening the hollow in the middle of her back. If she rocked the top of her pelvis forward far enough, the ball would scoot out behind her.
© Tracy Emanuel
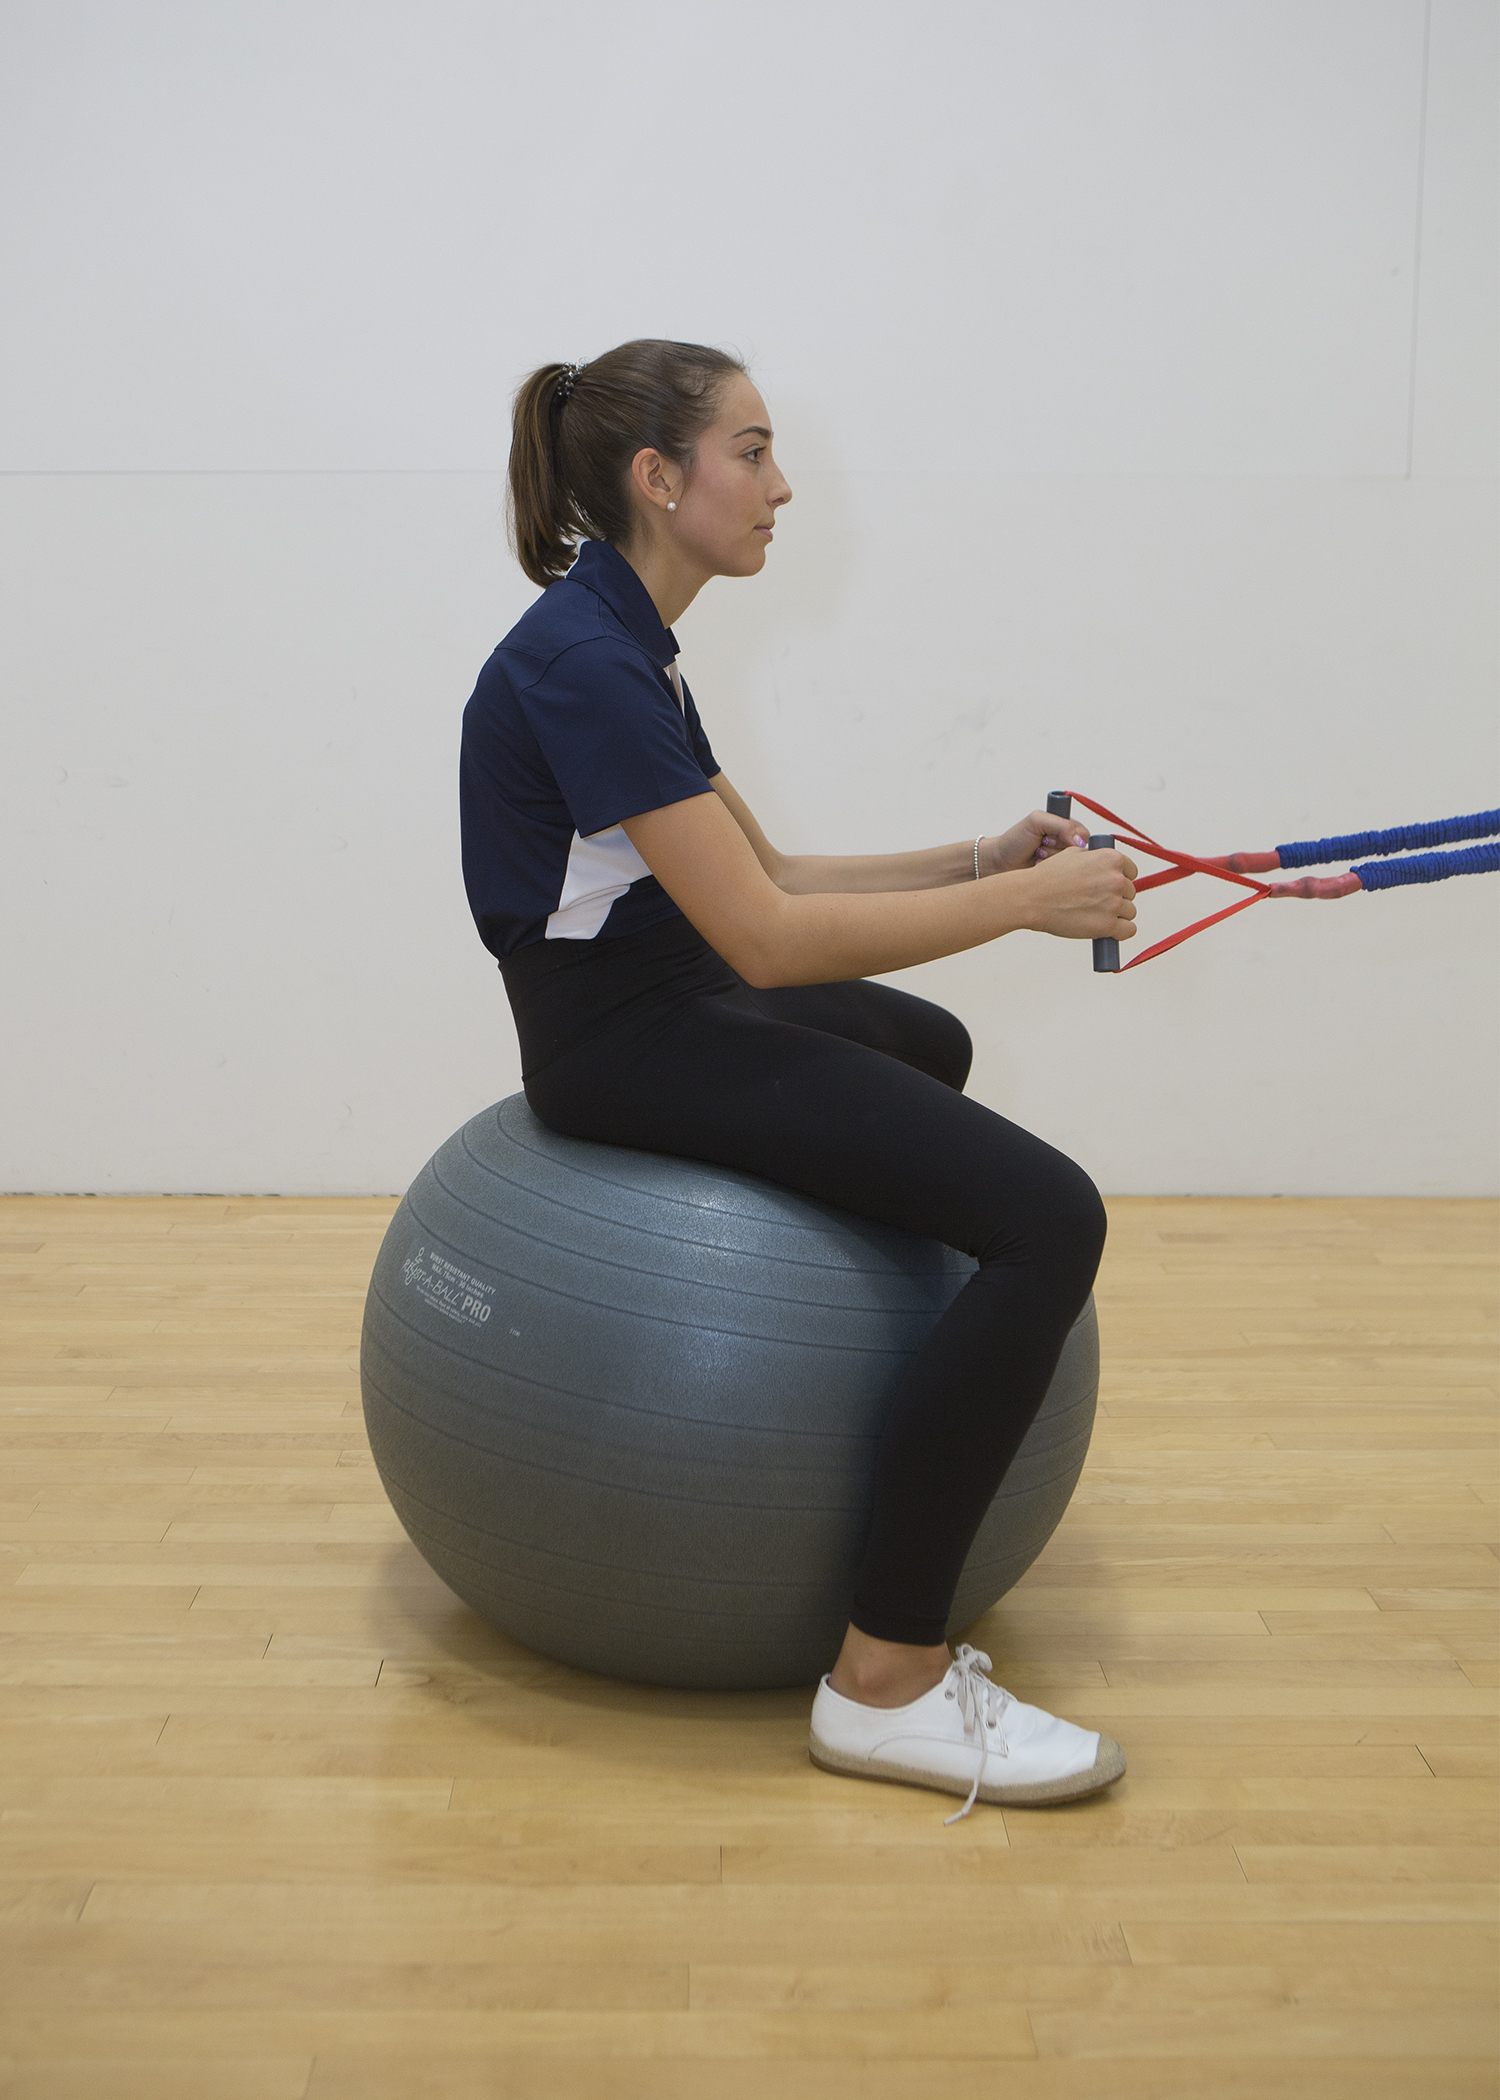 TIPPED BACKWARD: Katerina tips the top of her pelvis backward and rounds her back, something riders do mistakenly to absorb the bounce in the sitting trot or to attempt to stay with the canter motion. With her back rounded into a fetal position, she loses control of her valuable core (stomach and back) muscles. If she were riding, her legs would slip forward and upward—destroying her secure base—in turn causing her to fall behind the horse’s motion, grip with the back of her seat and pull on the reins for balance. Her locked hips wouldn’t be able to follow his motion, so her waist would have to move excessively to absorb it. This is common on really bouncy horses.
© Tracy Emanuel
Katerina continues to tip forward, back and side to side until she finds the position she can most comfortably maintain without getting stiff or collapsing her upper body.
Once you have achieved this optimum position on the stability ball, ingrain the image in your mind, then compare it to your actual position on your horse. When riding:
• Glance at mirrors in your arena, if you have them, to make sure your hip angle is the same comfortable one you discovered on the ball.
• Halt alongside a mirror and play with your position in the saddle—exaggerating the incorrect angles to feel the differences—just as you did on the ball.
• Ask a family member or friend to videotape your riding so you can review and solidify your position.
2. “Driving Reins”
Holding the reins the opposite way than you typically do, sometimes called “driving reins,” is another way to test that your core is properly positioned. It prevents you from locking your elbows and using the reins for balance. See the photo below for how to holding driving reins. Practice riding this way at all three gaits and over fences, if you’re comfortable. If your hip angle is wrong, you’ll know!
 To practice using driving reins, thread your reins between your thumb and forefinger, then down through your fist. This is opposite of how you typically hold your reins where you thread them through your ring and little finger and up between your thumb and forefinger.
© Tracy Emanuel
3. Stay Seated
Many trainers use the exercise I’m demonstrating below to show that a horse can’t pull on you if you’re not pulling back on the other end of the reins. But it’s also effective at revealing position flaws. A rider sitting in a correct position should not be able to be pulled out of the tack.
 Here, Mount Holyoke student Sara Hearn sits in the saddle, holding the reins as she normally would, resisting as I try to pull her out of the saddle. Her hip, knee and ankle angles are good, but she’s made a common mistake by straightening her elbows too much and allowing her hands to be pulled forward.
© Tracy Emanuel
 This allows me to pull Sara out of the saddle. Note the slight roundness in her lower back, slight collapsing of her hip angle and straight arms. This is how riders commonly lose control of horses who are on the forehand. The only way to stay firmly in the saddle is to keep your pelvis level, your legs underneath you and your elbows bent.
© Tracy Emanuel
When you try this exercise, make sure that your horse is amenable and that your ground person holds the reins with enough slack between her hands and the bit to avoid pulling on his mouth accidentally.
Another common mistake: rolling onto the back of your seat and trying to use your biceps to hold against the pressure. In this position, you can’t tap into the strength of your core muscles.
4. Cavalletti on a Circle
My students call this “Cavalletti on a Circle” exercise the “Circle of Death.” Perhaps it’s because I ask as many as three of them to do it at the same time, so there’s a lot of pressure to stay on track. Even doing it by yourself, you won’t be able to stay on track if your upper body collapses or your hips slide out. This exercise forces you to be in the right place without even thinking about it. It is for more experienced horses and riders.
SETUP: Place four cavalletti, set about 6 inches off the ground, on a large circle at 12 o’clock, 3 o’clock, 6 o’clock and 9 o’clock. A 60-foot distance on the curved line between each pair of jumps allows for four or five strides.
Establish a nice bend on a canter circle around the outside of the cavalletti. Stay in your three-point position. Use your inside leg at the girth to ask for the bend and impulsion in your horse’s inside hind leg. Use your outside leg behind the girth to keep his haunches from sliding out. Ask him to look in the direction you’re traveling with your inside rein—being careful not to pull his nose to the inside. And control the pace and size of the circle with your outside rein.
When the circle and bend feel good, turn him toward the center of one of the cavalletti. Maintain your three-point position over the cavalletti, staying connected to the saddle but still following the motion with your hips. This is a flat exercise, not a jumping exercise. The goal is for your horse to simply step over the cavalletti, so you never need to get into your jumping position. Meanwhile, continue looking ahead around the circle and applying your bending aids.
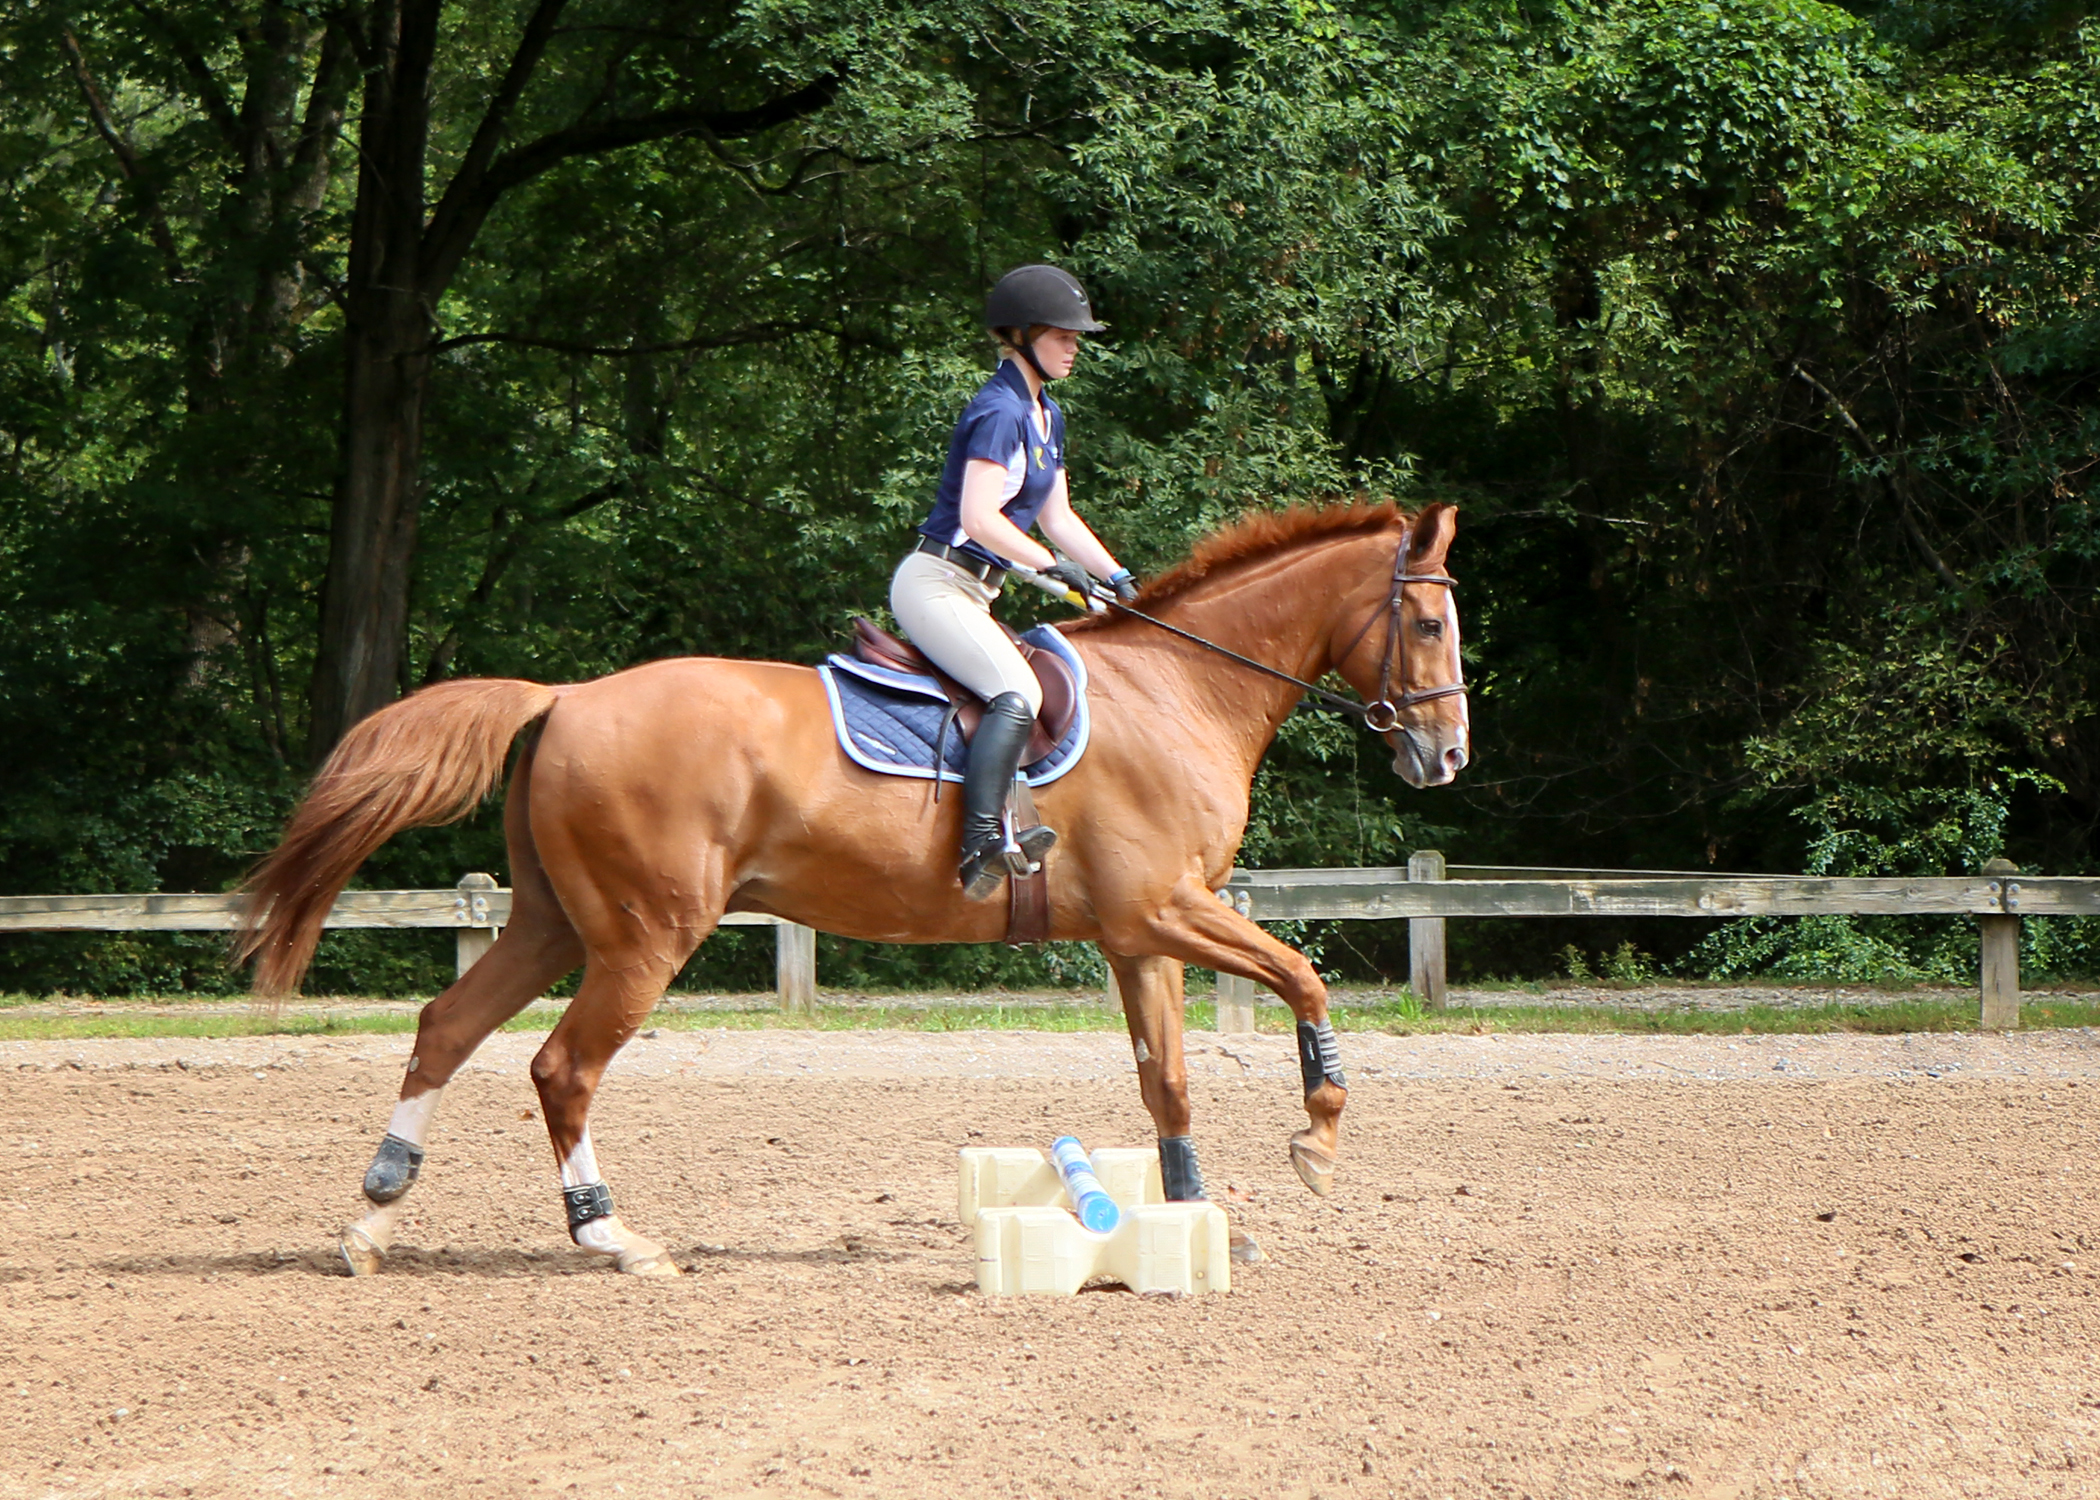 Sara canters Kari Fossum’s Astro over the first cavalletti, asking him to continue bending to the right. Although he is stepping over it, as she intended, rather than jumping, she’d have even better control if she dropped her seat down more into the tack.
© Tracy Emanuel
When your horse lands from the first cavalletti, turn your eyes to the center of the next cavalletti and ride the bending line to it. Keep your seat in the saddle and legs on his sides, using the muscles in your lower back to collect his canter (thinking “wait, wait” with each stride) as necessary without pulling on the reins.
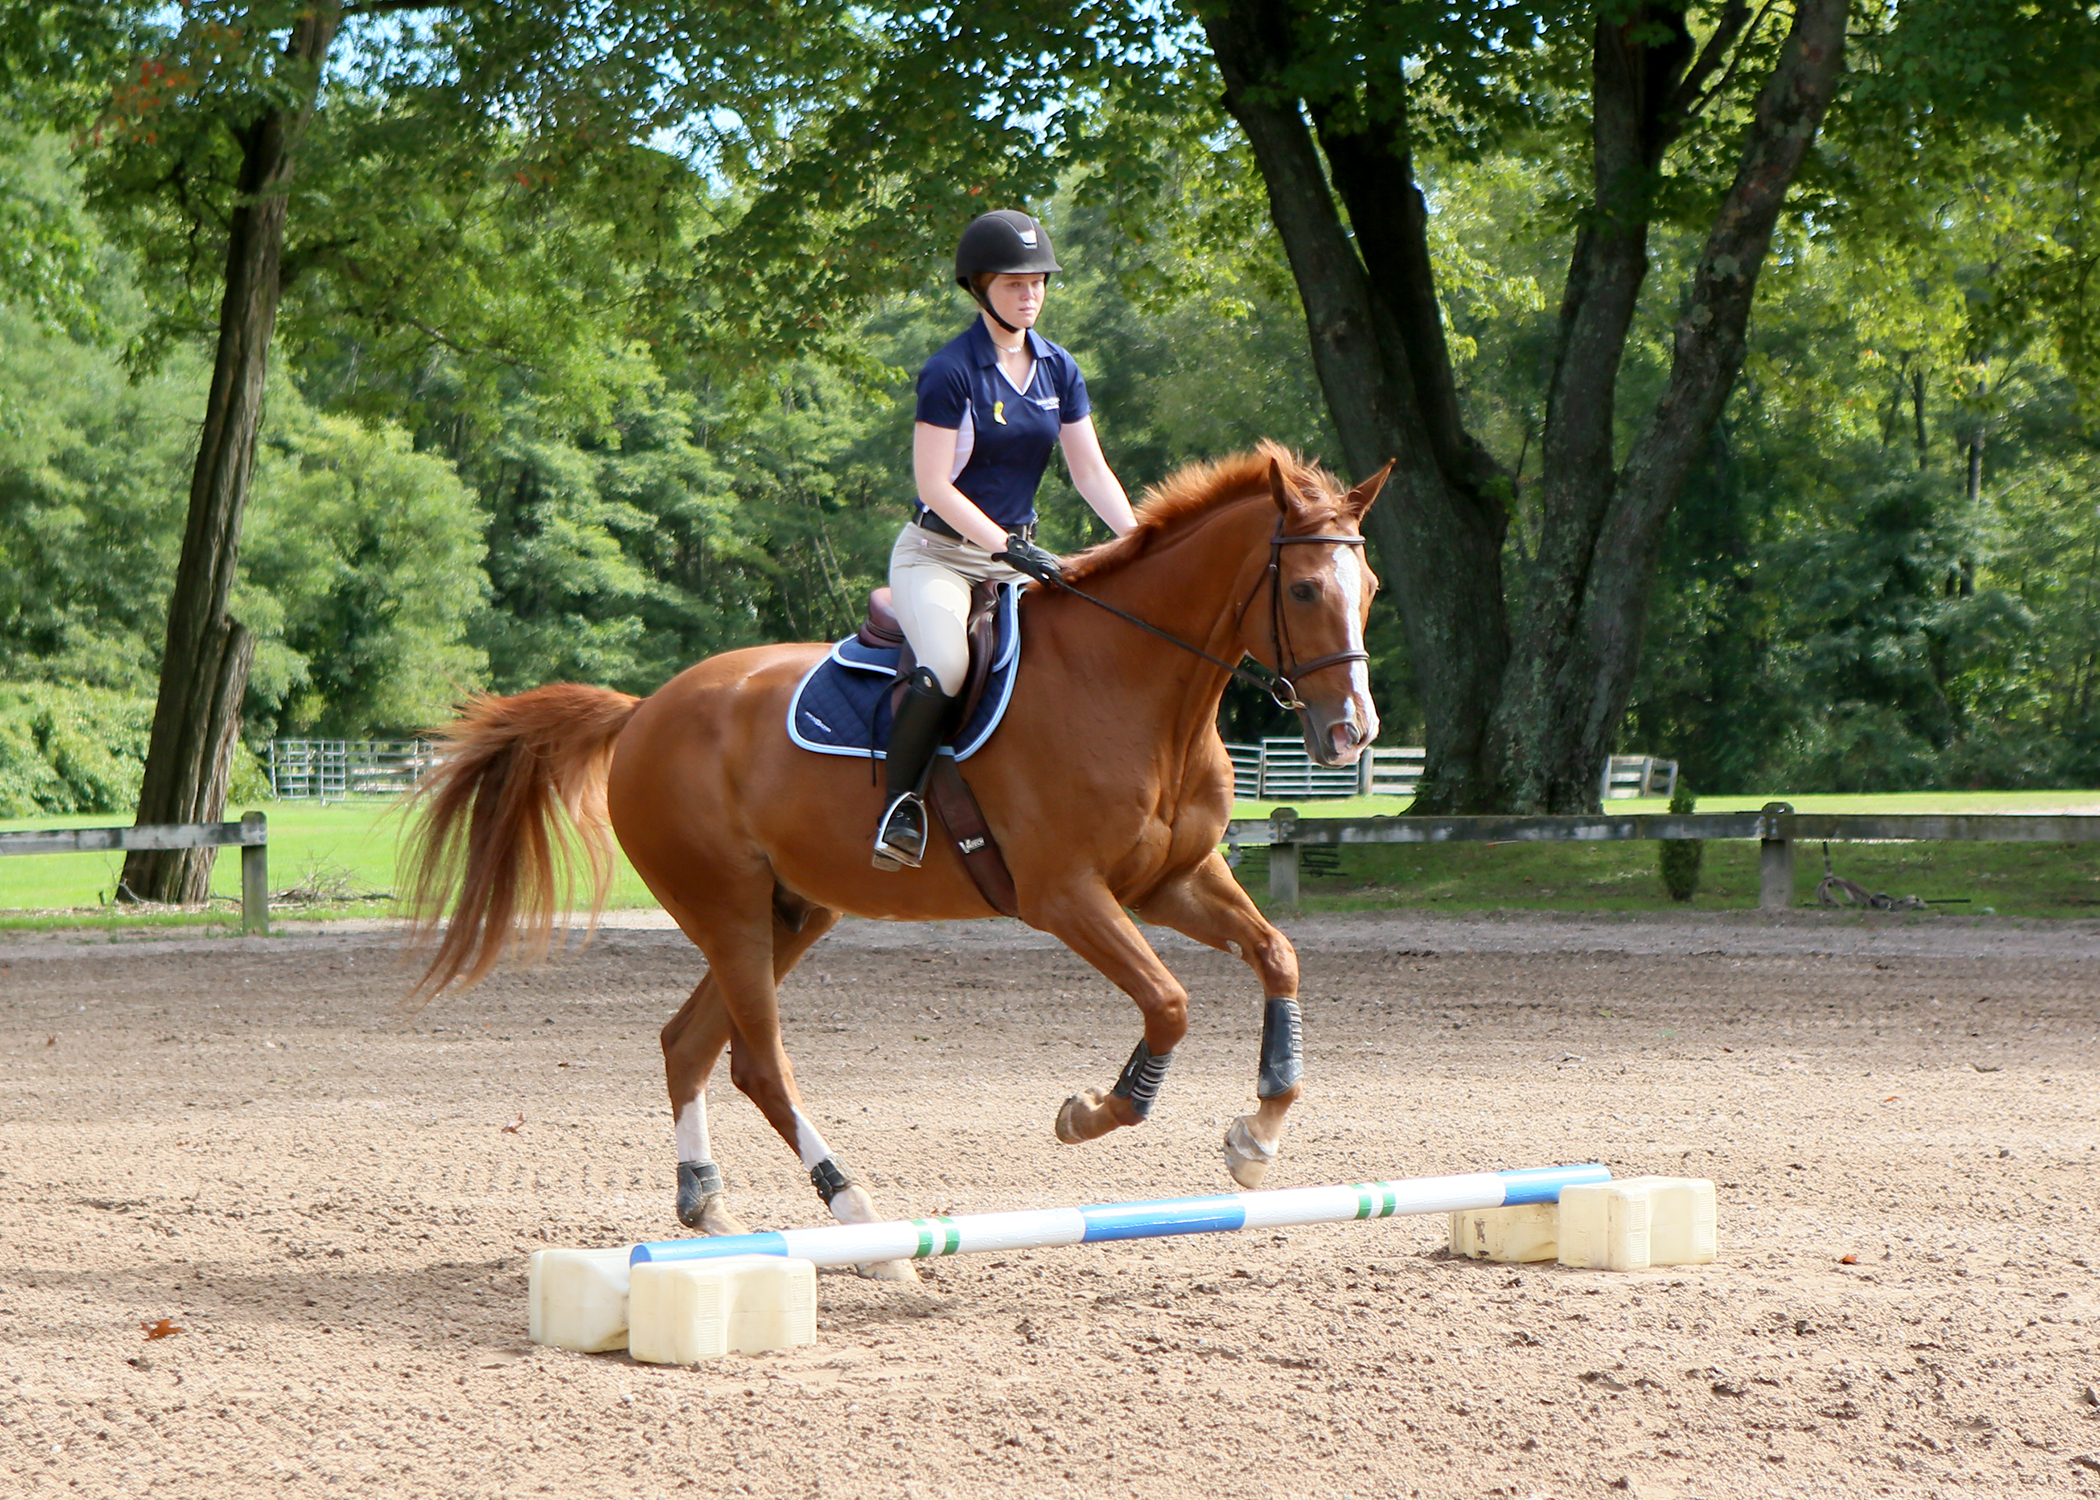 Over the second cavalletti, Astro is reaching his hind legs well underneath his body, which helps balance his canter step over the pole. Sara is riding with softer hands here, following his mouth nicely, though I’d still like to see her sit down more in a three-point flatting position.
© Tracy Emanuel
Proceed in the same manner to the third and fourth cavalletti.
If your horse lands on the wrong lead, do your best to bring him back to the trot and pick up the correct lead in time for the next cavalletti. If things really start to unravel, skip a cavalletti. Then regroup and re-enter the exercise when you’re ready.
If your horse is too strong and fast through the exercise, make a much smaller circle (about 10 meters in diameter) over a single cavalletti. The increased bend will encourage him to step under his body more with his inside hind leg, which will improve his balance and make him easier to control.
When you can ride all four cavalletti in a row successfully with a nice bend, take a break and then try the exercise riding from the other direction.
(For more cavalletti exercises, click here.)
5. One-handed Sitting Trot
If you have trouble sitting the trot, check that you’re not gripping with your knees or thighs. Then use this exercise to improve your balance and the independence of your hands:
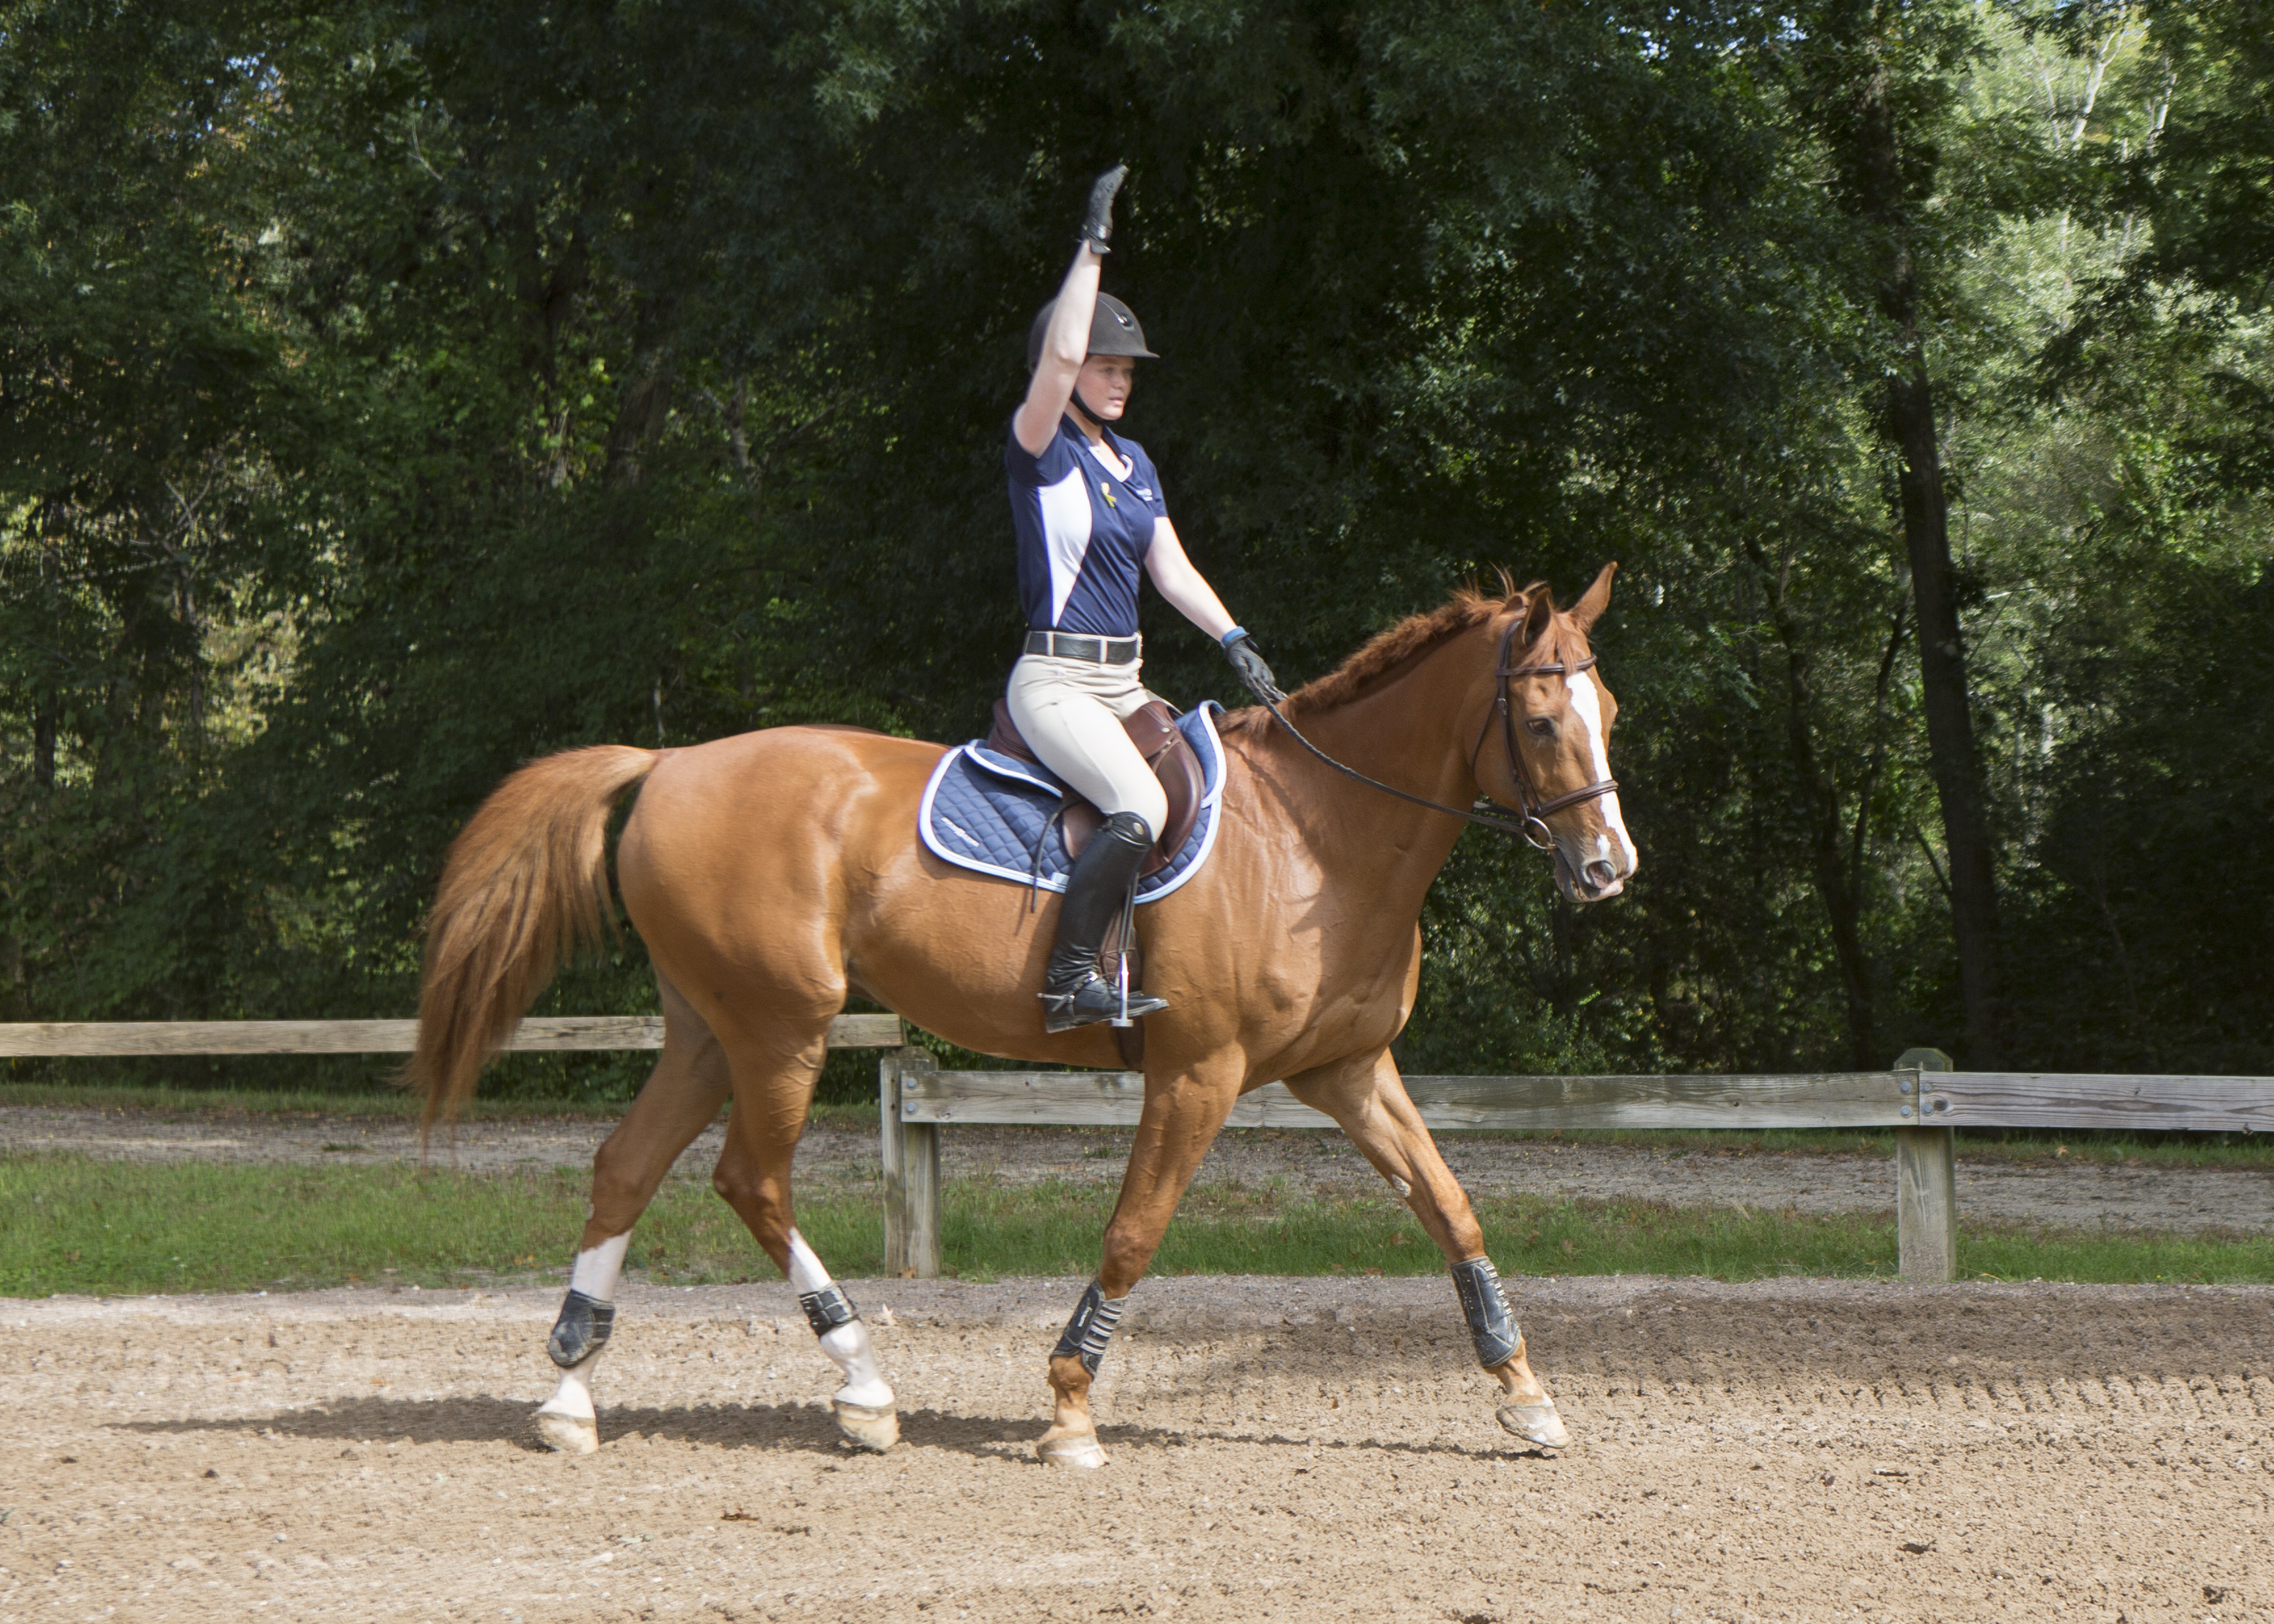 While sitting the trot, put both reins in one hand and hold the other arm straight up in the air. Then sit deep in the saddle while keeping your pelvis level and stretching your upper body tall, focusing on expanding the space between the top of your pelvis and your last rib. This will give your hips the freedom to follow your horse’s motion. It also will soften your rein contact, helping you to avoid holding on to the reins for balance.
© Tracy Emanuel
6. One-armed Jumping
Approach a vertical or oxer at the posting trot. Several strides from the jump, put both reins in one hand and reach the other arm straight out in front of you, at the height of your shoulder with the palm facing down and your fingers pointing between your horse’s ears. Try to focus on your balance rather than the distance, keeping your legs against his sides. Hold your arm straight and parallel to his neck throughout the entire jump, from takeoff to landing. This will prevent you from folding at the waist or dropping too far back in the saddle. Though Sara’s leg has slipped back slightly in the photo at left and she’s lost the ideal straightness in her arm, her excellent angles have kept her with the motion of Astro’s unexpectedly big jump.
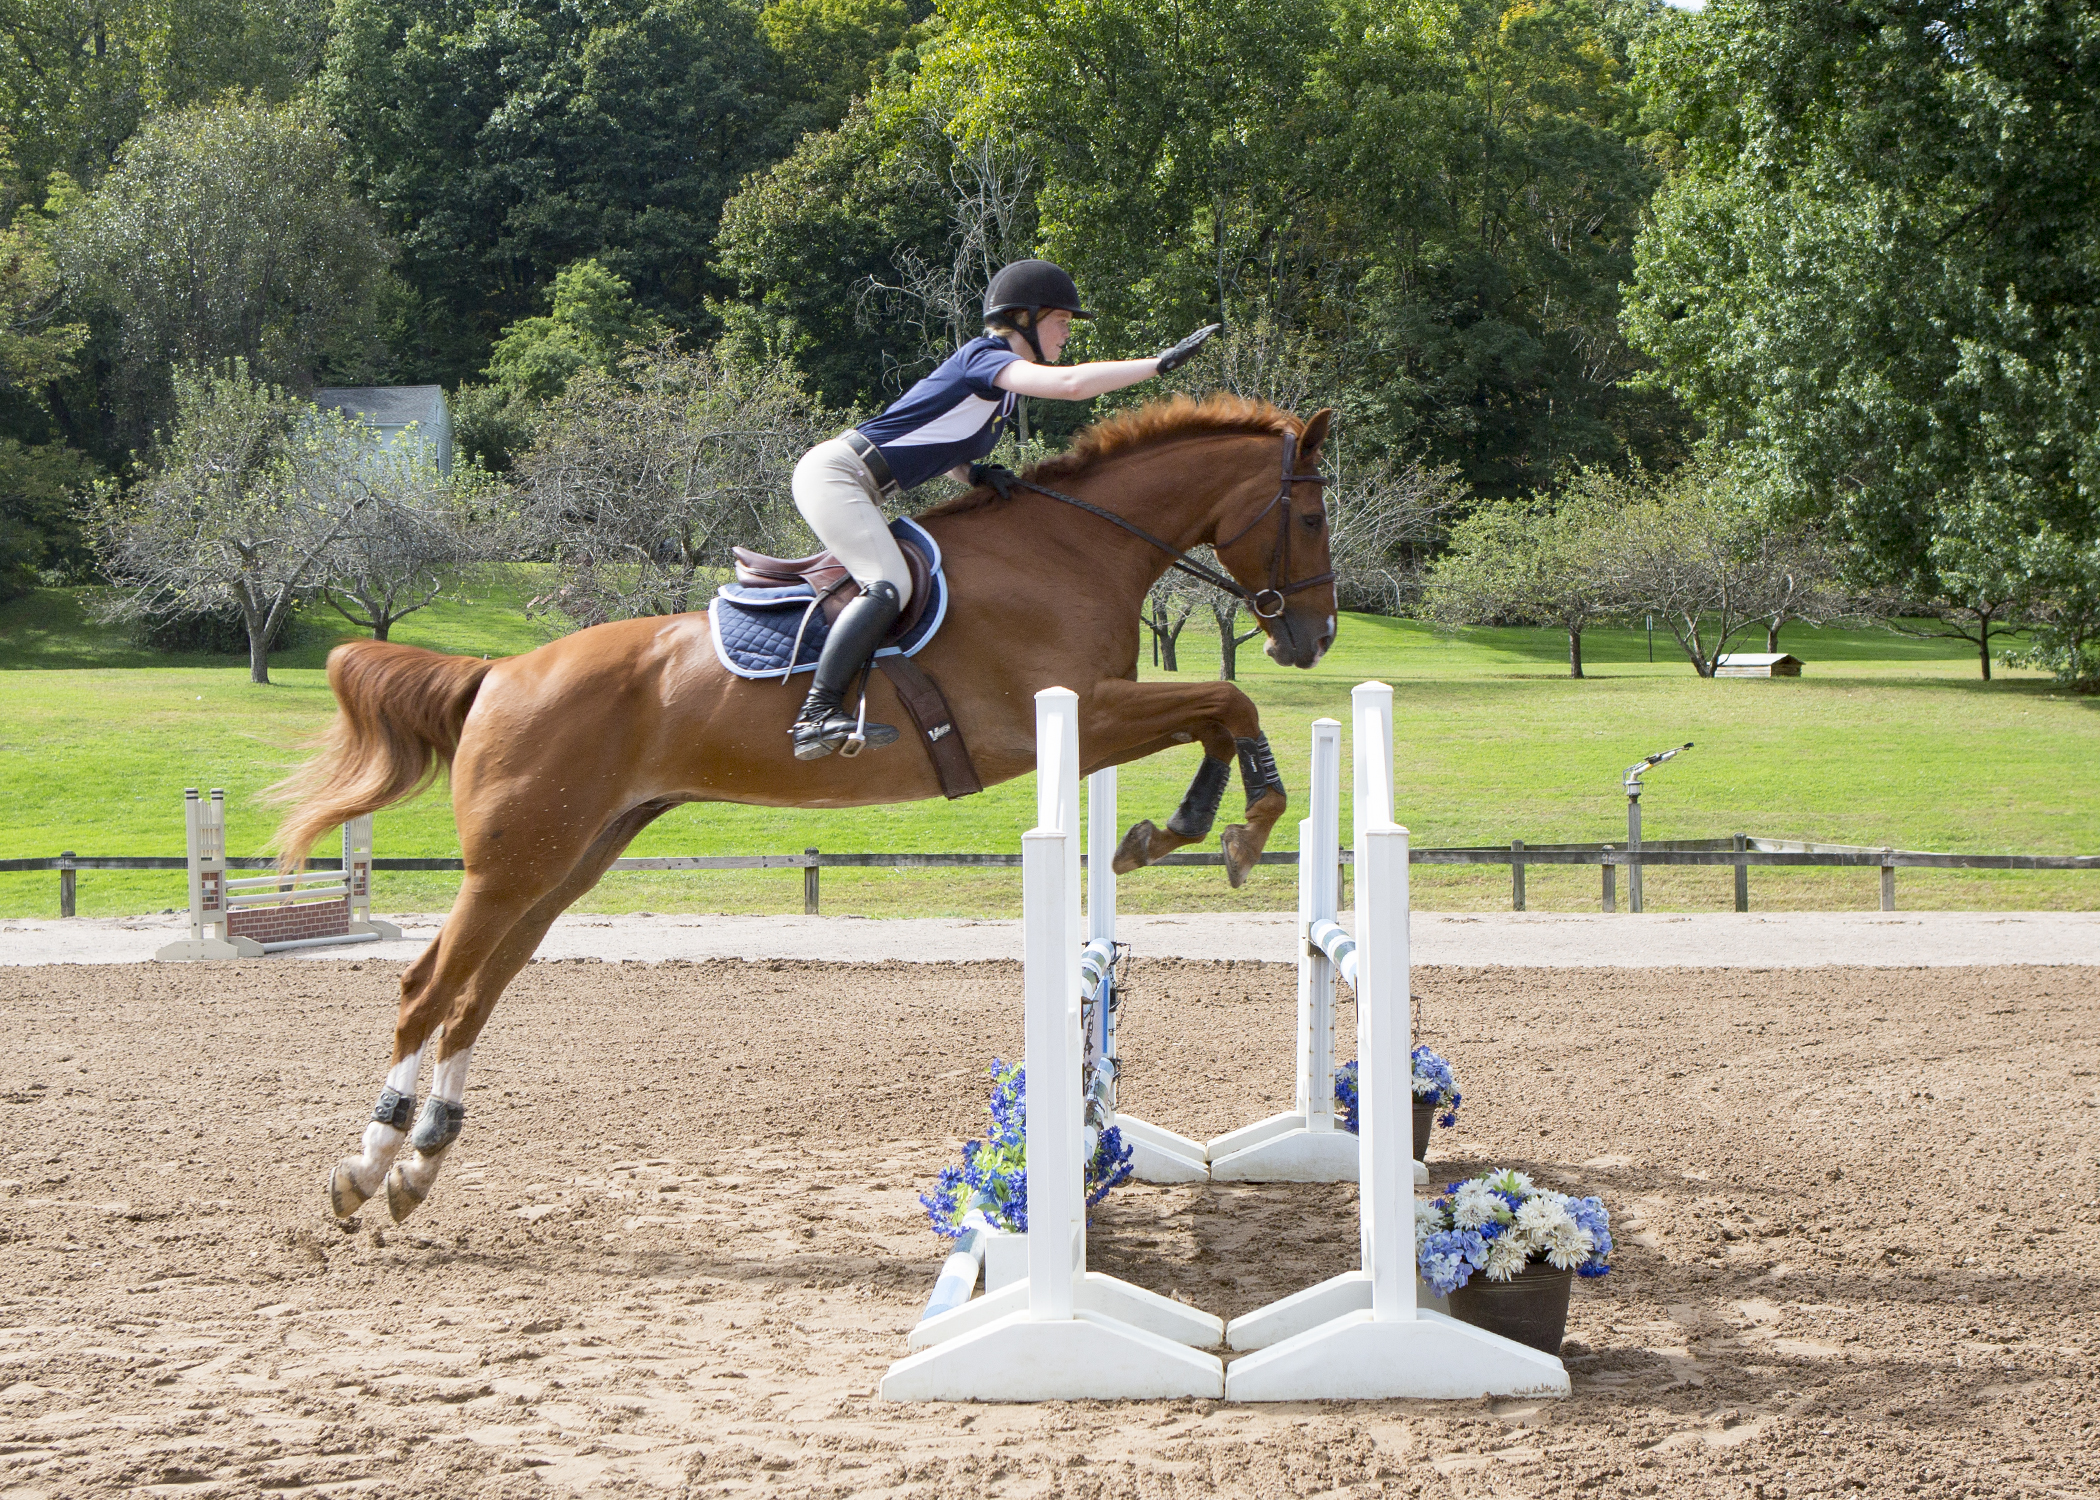 Though Sara’s leg has slipped back slightly here and she’s lost the ideal straightness in her arm, her excellent angles have kept her with the motion of Astro’s unexpectedly big jump.
© Tracy Emanuel
As you practice these exercises, be aware that it will take you time to fully eradicate old habits. Especially in stressful situations, like competitions, it’s easy to revert to a fetal position. With plenty of repetition and reinforcement, though, you’ll learn how to find the correct angles that will serve as the foundation of a strong position—and keep them!
Click here another unmounted position-strengthening exercise that you can do on a full-size trampoline.
In her 38 years coaching the Mount Holyoke College riding team, Carol (C.J.) Law has led it to three Intercollegiate Horse Shows Association national championships and six Tournament of Champions titles. She currently serves as the team’s Director of Intercollegiate Coaching and Varsity Hunt Seat Team Coach.
She received the IHSA Lifetime Achievement Award in 1998 and founded the IHSA Senior Academic Achievement and National Horse Show Sportsmanship awards. Law has served on the IHSA board of directors since 1986. Shehas organized the IHSA National Championship Horse Show three times and the IHSA Zone 1 Championship annually since 1989. She is also a member of the U.S. Hunter Jumper Association Zone 1 Committee. During the summer, she spends her summers as the director of riding at Camp Forest Acres in Fryeburg, Maine.
This article was originally published in the Winter 2018 issue.