A great mental challenge for both horses and riders, the exercise I’m describing here consists of an oxer with placing rails before and after it, followed by five strides to a vertical, then a wide turn to another oxer and a bending line to an angled in-and-out. Unless you and your horse are very experienced, introduce it one section at a time, repeating each step until it’s riding well before putting all the elements together.
Who Can Do It
Horses and riders of any level, from those just learning how to canter jumps to Advanced-level eventers and grand prix jumpers.
Benefits
This exercise:
• encourages your horse to become quicker on his feet and more agile while teaching him to always be looking for the next jump.
• gives him confidence and teaches him to become more adept at getting himself out of difficult situations. This is the result of the low fence heights—the fences are no bigger than 18 inches (see “Setup” at right). The low fence heights also help you to not worry about finding perfect distances to them every time.
• requires that he remain well-balanced and energetic with a consistent rhythm—the result of the shorter-than-standard distances.
• helps you improve your accuracy with plenty of practice holding your line to different types of jumping questions.
Setup
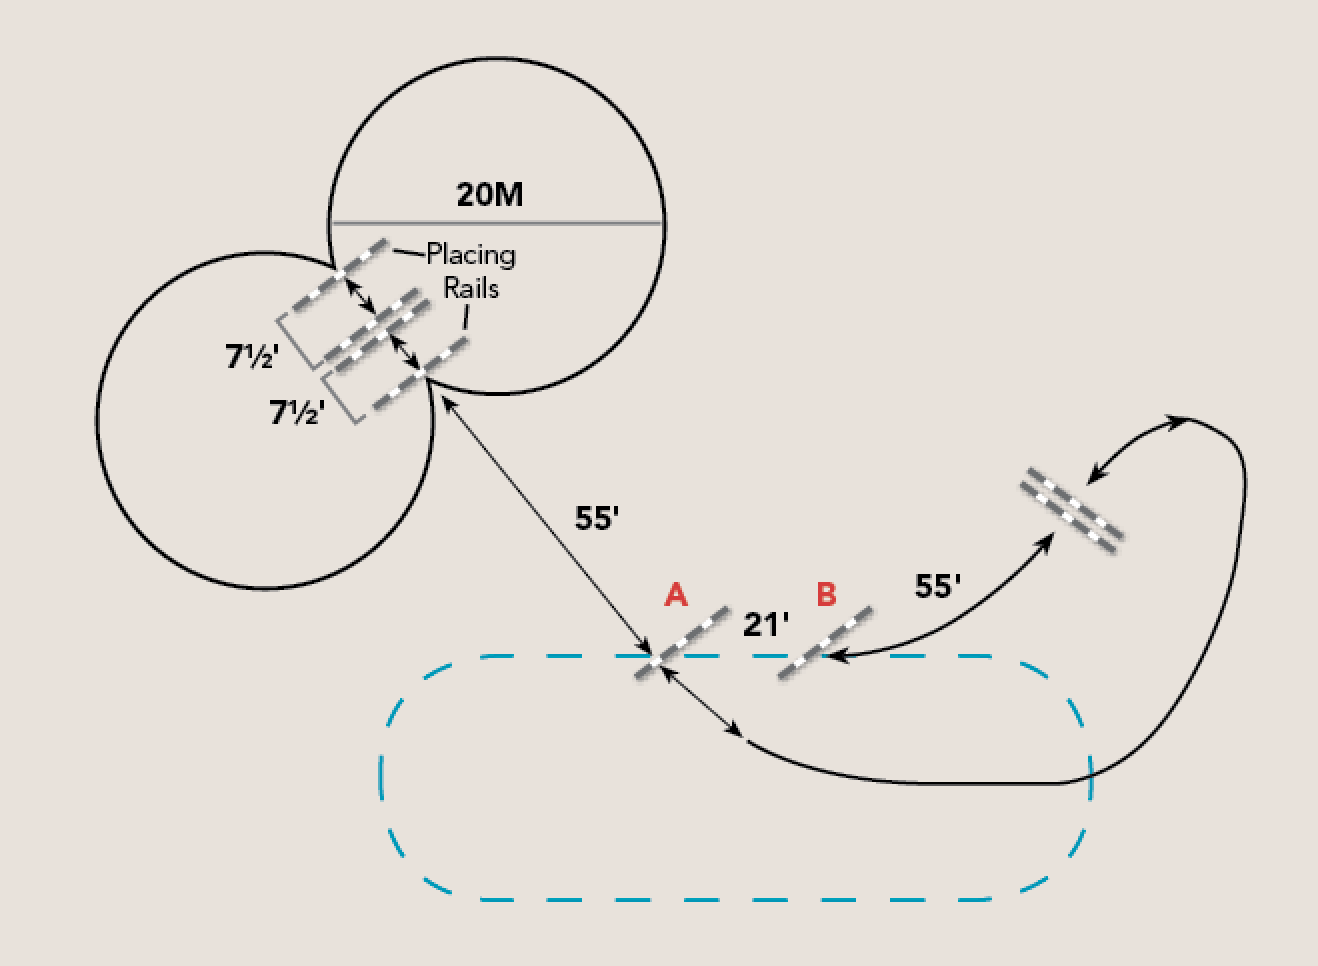
At one end of a diagonal line across your arena, build an 18-inch-high, 18-inch to 2-foot-wide square oxer, with placing rails on the ground 7½ feet from its base on either side, followed by a 12-inch vertical 55 feet from the second placing rail. This vertical will also serve as the “A” element of the one-stride angled in-and-out. Offset it relative to the oxer/placing rails so that the center of the oxer lines up with the right-hand side of “A.” Build the “B” element of the in-and-out at the same height and parallel to “A,” but substantially offset as well, so the straight track going through the centers of both verticals requires you to jump them at an angle and so that it’s easy to approach one side of “A” on a perpendicular track without having to swerve around the jump standard of “B.” Make the one-stride distance between the verticals 21 feet center to center. Finally, build another 18-inch square oxer 55 feet from “B” on a bending line to the left.
Make sure that all the fences can be safely jumped in both directions (either with ground lines on both sides or no ground lines at all). For the first run through the exercise, err on the side of too-small jumps, rather than too-high, so the consequence of any mistake your horse makes is minimal and he won’t lose his confidence if he gets into trouble.
How to Ride the Exercise
Plan to approach each element of the exercise in a collected canter with very light, even contact and your hands close together to support and guide your horse on the correct line.
Ideally, ride the entire exercise in a light, two-point position, especially if your horse is hot or sensitive. If he tends to be spooky, don’t hesitate to drop some weight into the saddle and bring your shoulders back. Start with a leg aid at an intensity of 3 or 4 on a scale of zero to 10. That way, you will always have another 60 or 70 percent of intensity left if your horse drops behind your leg. If you typically need more than a 3 or 4, use your whip or crop to remind him to be more responsive to your leg aid.
Meanwhile, use your eyes throughout the exercise. As soon as the top rail of the jump in front of you disappears between your horse’s ears, look to the next jump. Make your lines to the jumps your top priority and staying in the gait secondary. If your horse breaks to trot or even walk, instead of rushing immediately back to canter, give him time to think his way through the question. Then pick up the canter again when he feels ready. Knowing that he will never be rushed or pushed out of balance will help him gain confidence.
1. Warm up over the oxer and placing rails, starting with one circle (in whichever direction you prefer) about 20 meters (65–66 feet) in diameter. Instead of straightening in front of the oxer, continue bending around the circle as if there were no jump there. If your horse lands on the wrong lead (for example, lands on the left lead when you’re on the circle to the right), continue circling in that direction until he changes leads, trying not to let him break to trot. If he does not yet have his flying changes confirmed, use the jump on the next revolution to get the lead. If he worries and begins to rush, slow things down by stepping back into the trot.
When he gets the hang of the circle in this direction, introduce the circle in the other direction. Once that’s established, begin alternating them in a figure-eight pattern. Focus on maintaining the rhythm and balance while gradually bringing the circles smaller—to whatever size circle your horse can comfortably maintain.
2. Once that feels good, ride the straight, steady five-stride line from the oxer/placing rails to the first element of the in-and-out, following a perpendicular track to the right side of “A.”
3. Next, introduce the angled in-and-out. Starting on either your right or left lead, plan a track that will take you straight through the centers of “A” and “B,” jumping them both on an angle. This is the most critical aspect of this portion of the exercise. Keep your eye on that line and light contact on both reins as you approach “A” at the correct angle, being aware that your horse may try to straighten in the air and run past the right jump standard of “B.”
It’s very important to teach event horses that runouts are never acceptable. Your job is to make the only option be to finish on the other side of the jump without ever overfacing your horse with a question too challenging for his level of training. If he runs out at the second element, quickly stop him, push him laterally away from the direction of the runout, then turn back to face “B” and ask him to hop over it. Once you get the hang of this, try the in-and-out in the other direction (“B” to “A”), finding the same straight line through the centers of both verticals.
4. When that’s going well, jump the in-and-out in the original direction (“A” to “B”) and canter the left-hand bending line to the second oxer in five steady strides. Then try the bending line in the other direction (oxer to in-and-out).
5. When all these elements are riding well individually, put everything together. Ride the figure eight over the oxer/placing rails, then go straight over the right side of “A,” continue straight for a few strides before making a wide left turn to jump over the second oxer, heading back toward the other jumps. Finish by riding the steady five-stride, right-hand bending line to the in-and-out, “B” to “A,” center to center on the same angled line you practiced before.
As your horse gains confidence, try to use less and less rein contact to maintain straightness. “Hold his hand” as little as possible at home so that your support will have the most impact when you really need it in competition. He’ll start to look for the next fence and react much more quickly to changing conditions. These skills will pay off in competition, where you’ll seldom see questions of this difficulty—even at the upper levels!
Variations
• For beginner horses and riders, change the in-and-out verticals to ground poles and make the oxers about 6 inches high and 6 inches wide (low enough for your horse to walk over, if necessary). Roll the ground lines out several inches from the bases of the jumps and set the placing rails 8 feet from the oxer. Start with 30-meter (98-foot) circles in the figure eight. To make the straight line from the oxer/placing rails to “A” easier, initially approach it at a slow trot or even walk. Be sure you’re laser-accurate before, during and after each jump before progressing to cantering the exercise.
• For advanced horses and riders, tighten the placing-rail distances to 6 feet, raise the oxers with caution and gradually shrink the figure-eight circles to as small as 8 meters (26 feet) in diameter. Increase the difficulty of the in-and-out by setting the verticals on a more severe angle or raising them (to no higher than about 3-foot-3, even for four-star horses) commensurate with that angle—never increasing the height and angle severity at the same time. Whatever level you and your horse are, any question you tackle should be either mentally or physically challenging—but never both at the same time.
Four-star eventer Doug Payne also competes in grand prix show jumping and upper-level dressage. A frequent name on the U.S. Equestrian Federation’s High Performance List for Eventing, he won the Carolina International CIC*** last spring with his and Debi Crowley’s Vandiver. Author of The Riding Horse Repair Manual, he is also a USEF-licensed eventing judge and technical delegate. Doug lives in Aiken, South Carolina, with his wife and fellow four-star rider, Jessica, and their young son, Hudson.
This article was originally published in the Winter 2018 issue.