Most of the training horses get is negative: pressure in the mouth or against the ribs, say. If the horse obeys, the pressure lets up; his reward is to be left alone. My system works very differently: The horse learns he can get something he wants by choosing to give you something you want.
One important rule: Take your time. If you go slowly, you’ll progress faster–and the training will last. Besides, we’re not talking about a lot of time. You’ll need at most ten minutes a day, for about eight days, to teach the basics of clicker training. Then you’ll use those basics to turn other activities such as going forward under saddle, getting the correct canter lead, even trailer loading into something your horse will want to do.
Making the System Click
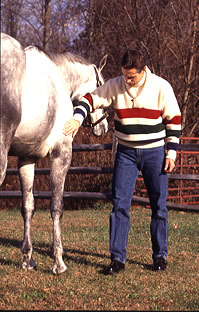
Start in a quiet place familiar to your horse. Equip yourself with a clicker like the one I’m holding in the photo, and a closed container of treats that he can’t get his nose into. (I use a “side bucket”: a plastic container with a hole in the lid, attached to a belt with webbing and Velcro? tape. A fanny pack also works well.)
- The first rule of clicker training: Click THE INSTANT your horse does what you want, telling him, “Yes! That’s right!” In this photo, I’m teaching Minty not to poke at me for treats; he’s just looked away, so I click and immediately feed. As he learns to “bridge”–to connect the clicker with rewards–the sound itself becomes a reward.
- When he’s got that down, introduce the hand-held target: mine is a 30-inch-long dowel with a little marine float at the end. Hold it low, about chest height, at first-it looks less threatening. With most horses, curiosity wins out.
- When your horse leans down to sniff the target, click immediately and then feed. If he’s really apprehensive, click as soon as he starts to reach, so he knows he’s on the right track. If he ignores the target, put it an inch in front of his nose, where he has to bump into it eventually, and click the instant he does.
- When your horse is comfortable with the basic idea of touching the target, ask him to follow it: lower, then side to side …
- … and then a little above where his nose normally is. That can be intimidating, so do it last.
- One last point to cover: holding on a stationary target. Begin with your hand-held target, wedging its float end between the bars of your horse’s stall. Say “target” and touch the float as you ask at first, just in case he doesn’t recognize it. Next, work on extending the time he’ll hold there: Click but don’t feed when he first touches; then, just before you think he’s going to come off, say “target” again. If he stays, or goes back on, click-and reward this time. Gradually work up to five or six seconds, then to where he holds until you click and reward–even if you’re on the far side of the stall.
Once you and your horse are comfortable with these basics, you can apply clicker training to many situations. Find out about some of the possibilities in these issues of Practical Horseman magazine: June 1999 (“Motivating Cibor”), May 2000 (“Click and Load”) and June 2002 (“Right-Lead Resistance”).
Updated from “Click and Load,” Practical Horseman, May 2000.