Five-time Olympian Anne Kursinski told riders at her Market Street stable in Frenchtown, New Jersey, that she believed in them. But, she said, they needed to believe in themselves, too. “I push you in these clinics because I believe you can do more. I believe the horses can do more. … I push you to get you out of your comfort zone so you can experience something different.”

Throughout the three-day clinic, Kursinski gave the riders a variety of exercises to help them become aware of what they and their horses were doing. She was also a stickler for details, like halting exactly where she said, because then those skills become automatic. “I don’t have to think where my eyes are. I don’t have to think where my heels are. Stopping straight becomes automatic,” she explained.
Kursinski also wanted clear communication, which she said starts on the flat. “The better you get the horses trained off the aids on the flat, the better they will jump.” She said that when she rides, she asks the horses different questions to test their responsiveness to her aids. Below are some questions she helped clinic riders, who were split into three groups, work on with their horses.
Get a Reaction
If riders asked their horses to go forward or sideways and they didn’t get a reaction, Kursinski told them to use a stronger leg or spur or reach back and tap the horses with their sticks. “If you ask him to do something and you’re not ready to support him, you’re teaching him, ‘Oh, OK, I don’t have to do it,’” she said. “Are you giving clear signals? Are you following up after you ask your horse to do something to make sure he does it?”
Use Your Eyes
As riders worked in a groups that included four to eight riders, Kursinski wanted them to use their eyes to space themselves evenly around the arena without circling or passing the other horses. This was so they would know how fast or slow they were going and could practice adjusting their rate of speed. This skill became more important when galloping and jumping, she said.
Ride Lateral Work
Throughout the flatwork, Kursinski interspersed riding forward and back with asking the horses to move sideways off the riders’ legs. In turn on the forehand, many of the horses backed up as they turned, which she said happened because the riders were pulling them back. When this occurred, she told the riders to immediately walk them forward to the wall. Riders needed to think forward throughout the movement, she said. For leg-yield, the key was to keep the horses straight because some riders wanted to overbend the horses to the inside. In addition to getting horses to move sideways, shoulder-in makes the horses load their inside hind legs, Kursinski said. It’s also a great straightening exercise because many horses like to let their haunches drift in on the flat. After a few minutes of asking the horse to move laterally, Kursinski told the riders to ride forward and straight.

Turn Your Hand Over to Hold the Rein
A lot of riders hang on the inside rein, Kursinski said. To make riders aware of this, she had them practice holding the inside rein with a turned-over hand to make that arm a little softer. “It’s just a different exercise to feel,” she said.
Kursinski had riders work with a turned-over hand on the flat, riding forward and straight, bending and counter bending, and then in leg-yield to keep from pulling on the inside rein. She also had them jump with both hands turned over on the reins.
Knot the Reins, Hands on Hip
Several times throughout the clinic, Kursinski had riders tie a knot in their reins and hold onto either the knot or just in front of it, adjusting their hands if they needed to take more on the left or right reins. The knots were placed so the riders’ hands were in front of the horses’ withers and there wasn’t a lot of play in the reins.
The knot helped riders feel their horses’ mouths consistently and stay centered and in balance, which resulted in more control. It also helped those whose hands were too busy both on the flat or if they had trouble jumping a fence and halting smoothly in a straight line.
On the second and third days of the clinic, Kursinski had riders practice holding the knots in their outside hands and placing their inside hands on their hips, first on the flat and then jumping. This was another exercise to help riders who were too heavy on their inside reins.
Drop Stirrups to Relax Your Horse
“Everyone uses their seat and back better without stirrups,” Kursinski said. If the horses were having trouble relaxing, she had the riders drop their stirrups, which encouraged them to sit deeper. This happened when excited or nervous horses were having trouble picking up the correct canter lead or if they were jigging over a cavalletti when they were supposed to walk over it. She often had riders jump a fence or line and halt in a straight line. If riders wobbled left and right during the halt, she had them drop their stirrups after the fence to smooth out the effort.
Cavalletti Work
After riders worked on the flat the first day, Kursinski had them ride a variety of patterns over three cavalletti set on a straight line; each spaced 58 feet apart. The purpose was to help with horses’ rhythms—“You are working on your speedometer,” Kursinski said. Over the cavalletti, riders worked on lengthening and shortening and straightness. “Can you go forward? Can you go back? Can you halt in a straight line?” Kursinski asked. Here are some of the exercises:
Exercise 1: Ride a posting trot over the first cavalletti, walk over second cavalletti, ride a posting trot over the third cavalletti and halt in a straight line at the end of the arena. The goal was to get the horse back to walk early after the first cavalletti to be able to give with the reins over the second cavalletti. “Invite the horse to relax over the second cavalletti,” Kursinski said.
Exercise 2: Canter the first cavalletti. Deepen the seat to ride a transition to walk and walk over the second cavalletti. Canter the third cavalletti and halt in a straight line.
Exercise 3: Canter all three cavalletti, first in five strides to five strides. Approaching the first cavalletti, get in two-point and start to count out loud when you are about eight strides from it to help with the rhythm. Then count the strides between the lines, being careful not to count the landing stride. After the third cavalletti, sit in the saddle and halt.
Exercise 4: Canter the cavalletti line, lengthening your horse’s stride on the approach and ride it in four strides to four strides. “Can you let go and get four?” Kursinski asked. Then she had riders canter in five to four strides and then four strides to five strides.
Jumping Tips for Success
On the second and third days of the clinic, Kursinski had riders jump, starting with individual jumps and lines and then putting more lines together to make a full course. Here are some general tips she gave:
- Over easy, simple jumps, practice working on important basics, like halting straight, or if your horse shifts or pulls on landing in one direction, halt and then turn him in the opposite direction.
- If you look at a focal point in a straight line after the jump, your horse will halt straighter.
- Count out loud about seven or eight strides on the approach to the jump and count strides between jumps. Both help improve the rhythm, which helps find a distance.
- Know your horse: When jumping lines, riders need to ask themselves and know, “Does my horse have a big stride or a little stride? Do I have a lazy horse or hot horse?” These details tell you what type of speed you need to get over the first fence and down the line.
Day 2 Course Exercises
On the second day of the clinic, Kursinski taught a variety of jumping exercises over a simple course of single jumps, lines and small courses.
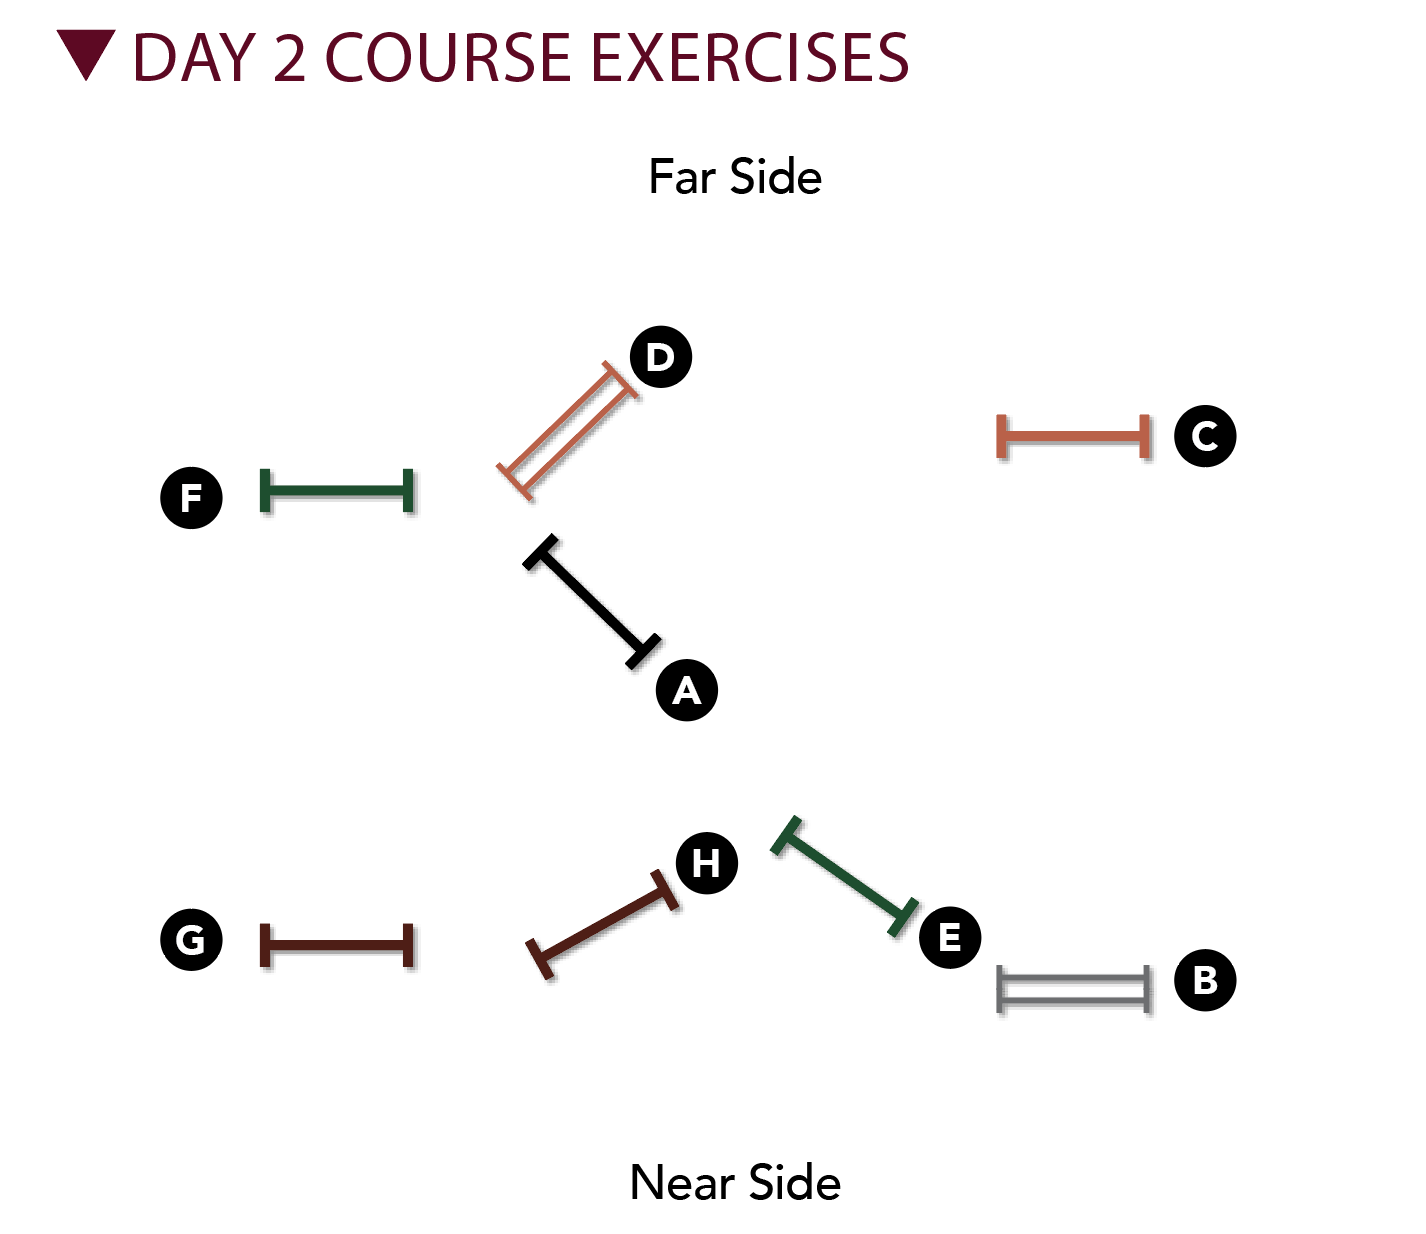
Exercise 1—Halting Straight: As a jumping warm-up, Kursinski had riders trot, then canter on the right lead over Fence A toward the far end of the arena and halt in a straight line after it. She had a helper stand at the end of the line near the arena wall to check for straightness and to be a focal point for riders. When some riders shifted left and right as they halted, she had them tie a knot in their reins to have a more consistent feel.
For the third group, Kursinski had riders put their right (inside) hands on their hips and hold the knot in the reins in the left hands both at the trot and then the canter. The goal was to keep them centered and going with the horse’s motion.
Exercise 2—Track and Pace: Group 1 rode Fences B–D in a bending eight strides to Fence A to Fences B–D again, this time in a direct seven strides, halting in the corner. To get the eight strides, riders jumped Fence B straight. To do the seven strides, they had to ride deep into the corner and jump B a little right to left. The focus was getting the correct pace and determining the right track to the line for the appropriate strides. If a rider wasn’t able to leave out the stride, Kursinski told them to gallop down the long side to open the horse’s stride.
Exercise 3—Automatic Release: Group 1 rode a left lead to Fence H to the near end of the arena to Fences G–F in five strides to Fence E to Fences B–D in seven strides. They finished by halting in a straight line.
Group 2 jumped Fence H to Fences G–F in five strides to Fences C–E in five strides, then halt. Kursinski had these riders practice an exaggerated automatic release by turning their hands over on the reins to keep their arms softer and keeping the hands wide apart and off the horse’s neck on the approach, over and after the jump before halting, all while following the horse’s mouth. This exercise gives horses confidence. “The wider you make your hands, the more you engage your core,” Kursinski said, and not use the horse’s mouth for balance.
Exercise 4—Knot the Reins, Hands on Hips: Group 3 rode on the right lead to Fences A–G toward the near end of the arena in four strides with their right hands on their hips and their left hands on the knot. After landing from Fence G, they turned left and switched hands so their left hands were on their hips and their right hands were on the knot to jump Fences H–F in a direct six strides, and then they halted. The goal was for riders to stay centered and do less with the hands and bodies. “Part of the exercise is can you give?” Kursinski asked. “Follow. Do less. Follow. Give. Halt. … Can you ride to the corner straight? Not shifting left and right. It’s about doing less, not interfering with the horse. … How little can you do?”
Exercise 5—Turning: Riders tracked left and jumped Fence H toward the near end of the arena (staying inside Fences A and C). Kursinski told them to look to the right over the fence and use a right opening rein to turn right. Then they stayed inside Fence A again to jump Fence E, toward the near end of the arena, looking to the left and using a left opening rein to turn left. They repeated this pattern several times. Kursinski had the riders turn their hands over on the reins so their arms didn’t lock up. The biggest thing over the jump, she said, was to look with the eyes and use the opening rein to turn.
Day 3 Course Exercises
Kursinski had the riders jump a more complicated course on the third day of the clinic. Below are some of the exercises.
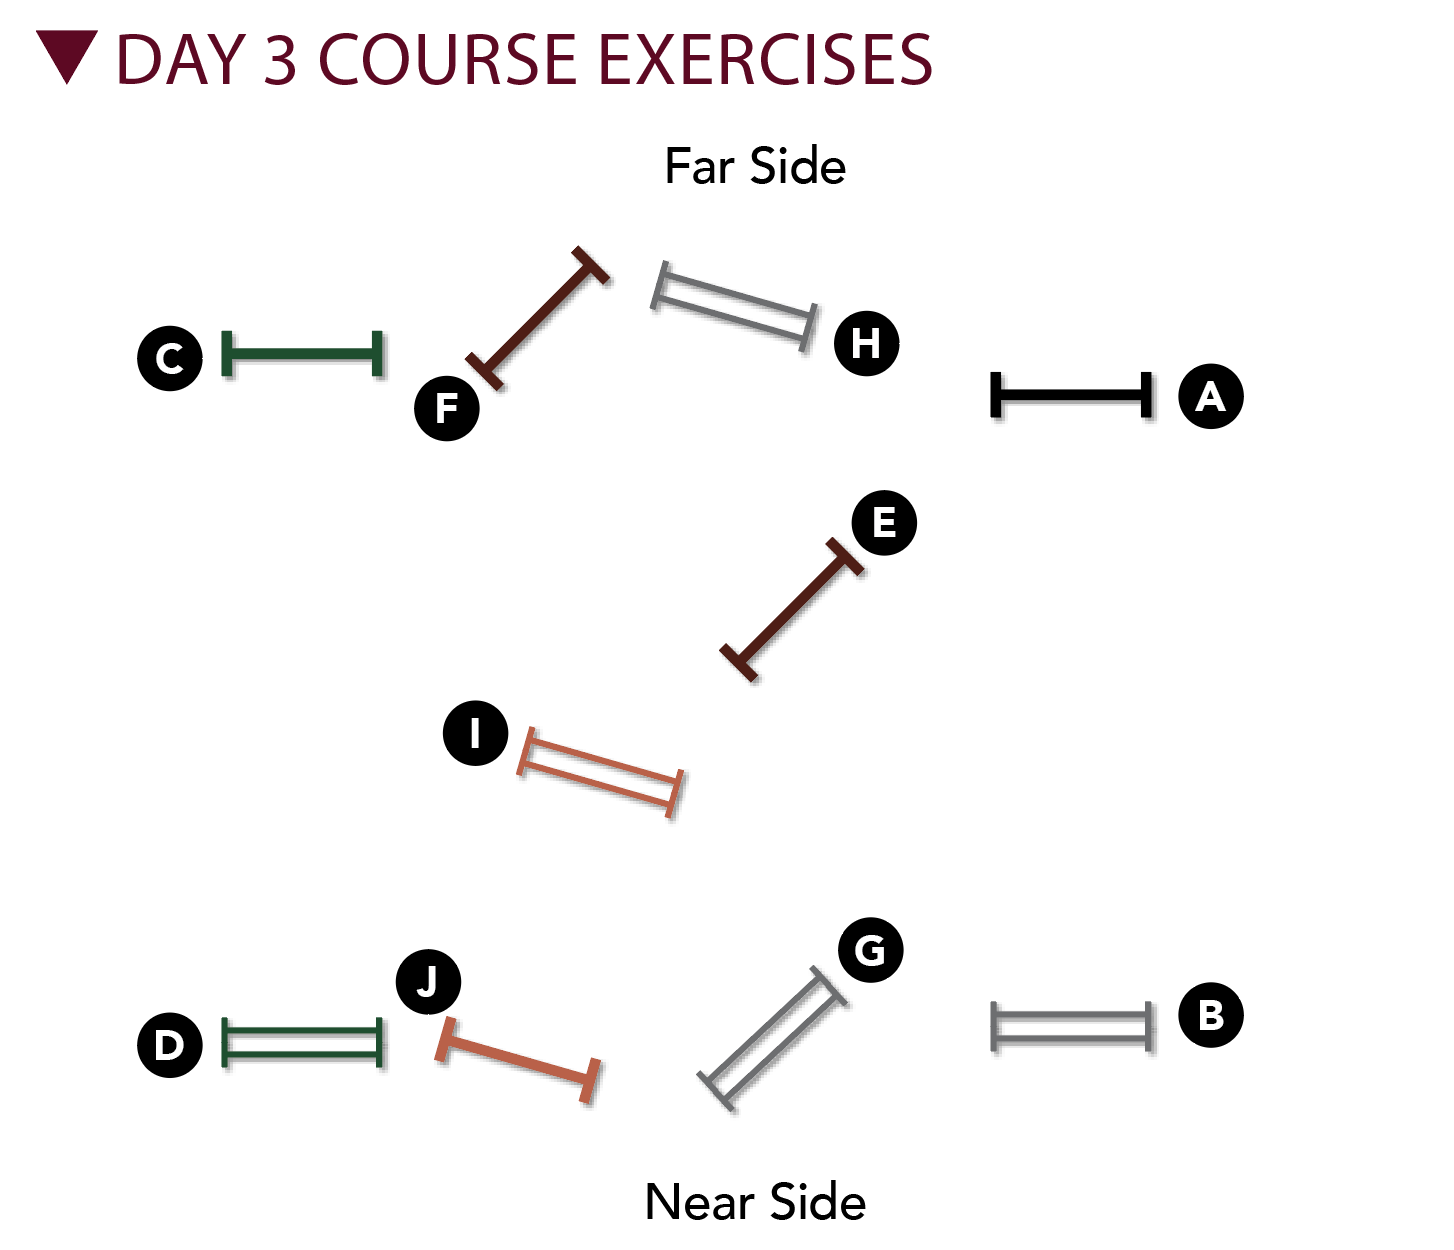
Exercise 1—Act Like a Winner: Riders started on the left lead to Fences B–A in four strides to Fences F–E in three strides to Fences D–C in five strides to Fences H–I–J in three strides to two strides. Kursinski pushed the riders to focus on all of the different aspects of what she was asking them to do—counting on the approach and in the lines, riding a set number of strides, halting—and to focus on what their horses needed. When one rider’s horse picked up the wrong (right) lead to start, Kursinski told her to drop her stirrups to use her seat and right leg more effectively. “I want you to walk out and look like you own the ring,” Kursinski said. “Act like a winner. Don’t act like a beginner. I want you to come out and nail it.”
Exercise 2—Progressive Counting: Kursinski had riders work on turning and counting. They rode a right rollback turn to Fence J, then turned left and rode a left rollback turn back to Fence J. They continued on this figure-eight pattern without halting. Approaching the fences in each direction the first time, riders counted “one” when they were one stride away from the fence. The next time, they counted “one, two” when they were two strides away from the fence in each direction. Riders continued this progressive counting until they were counting from eight strides back. The goals for this exercise were to establish a steady rhythm and for riders to use their eyes. Kursinski told them the exercise helped them know when they needed to drift in slightly to get the right counting. “Just count the rhythm. Let the horse look for the distances,” she said.
Exercise 3—Ride with Pace to First Jump: For one of the final courses of the day, riders started on the left lead to Fences A–B in four strides to Fences C–G in a direct six strides to Fences J–I–H in two to three strides to a left turn to Fence F, right turn to Fences H–I–J in three to two strides. In this and other courses, Kursinski reminded riders to ride to the first jump in a line with the pace that they were riding to the second jump, especially if they had been standing waiting for others to go or hadn’t jumped the line before.
This article originally appeared in the Winter 2021 issue of Practical Horseman.