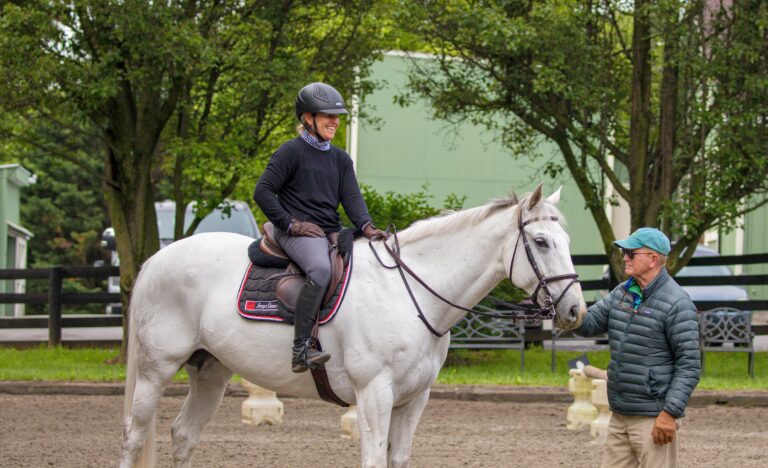
Yogi Berra says, “You can see a lot just by watching.” He should have been standing at an event with me recently, watching cross-country riders gallop past in a galloping position. He would have seen that riders have lost both the ability to gallop their horses in balance and the ability to keep themselves balanced above their horses in a galloping position. This bothers me, both because it is uncomfortable for our horses and because it reveals a basic lack of understanding about how we connect to them.
Before we start talking about our galloping position, let me ask you a question: How many jumping efforts are on a recognized Preliminary cross-country course? The US Equestrian Federation Rule Book says 24 to 32. OK, now how many strides does your horse take while going around that course? Lots, right? We spend a lot more time galloping than we do jumping, so we need to pay attention to how we gallop. (For my purposes, let’s define “gallop” as anything faster than 350 meters per minute.)
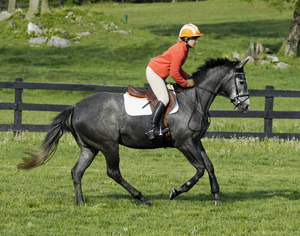
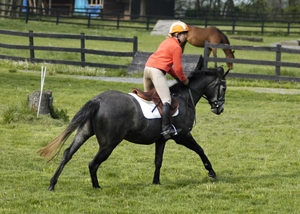
Everything we do with our horses should make them comfortable. It is obvious that horses are not as comfortable galloping with riders seated in the saddle as they are with riders suspended above their backs. I usually call this suspended position the two-point, meaning riders support their weight on the two points of their knees while their seat bones do not make contact with the saddle.
This sounds simple, but the next time you are at an event, watch riders gallop by on cross-country. It’s not a pretty sight. Almost every rider going by you will be “posting” at the gallop. Posting at the gallop means riders are alternating between falling (sitting?) down on their horses’ backs, then standing up and falling over their horses’ forehands. When you multiply this banging on horses’ backs by the number of strides they take, it explains why so many horses need special saddle pads, chiropractors, back injections and so on.
This month, I am going to focus more on your galloping position than on how your horse gallops. The two topics are really one and the same, but it is a little easier to understand if we break it down into different parts. I will return to how we want our horses to gallop and how to jump from that gallop in another column. First of all, let’s examine the two-point. There are four times we use the two point:
- Galloping
- Jumping
- “Up” phase of the posting trot motion
- Any other time we want to take our weight off our horse’s back, such as walking up a steep incline.
Before you start any of the exercises I am going to describe, go to the rider rating system in the March 2008 issue and self-rate yourself. I would prefer that you be at least at Level 5 before trying these exercises. If you are at a lower level but have expert supervision, you can certainly attempt them. They are not that complicated; it is just that I try to be very aware of safety around the stable and in the saddle. I will give you two exercises to help you find a better galloping position. Do them in an enclosed area first, and then when you are certain you are comfortable and your horse is relaxed, you can attempt them in an open field.
I: Make Your Two-Point Consistent
Mounted at the halt in an enclosed area, drop both of your stirrups and adjust your stirrup leathers so that the tread of the stirrup iron touches you at or just above your anklebone. This is the correct length of stirrup for show-jumping. In addition, it is the length that I recommend for Novice and Training cross-country galloping and jumping. As a crude rule of thumb, you should shorten your stirrup leathers at least one hole for each level up the rider rating system from Level 5. Place your foot in the stirrup correctly: This means the ball of your foot is on the tread of the stirrup, your foot is slightly angled outward and your weight is pressed down into your ankles.
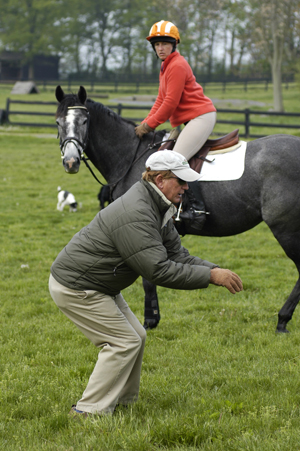
If your horse is restive at the halt, have someone stand quietly at his head while you attempt this exercise. Let your helper control your horse while you work on yourself. Once you have adjusted your leathers correctly, perform this simple check: Stand up in your stirrups without leaning forward or toppling back. At the halt, practice doing this smoothly and quietly several times without changing the inclination of your upper body. After you find this easy, cross your arms behind you, and try it again. The key to this exercise is that you can smoothly control the height of your body above your horse’s back without toppling forward onto his neck or falling back onto your coccyx.
After you have practiced this simple exercise a few times, relax into the saddle. If you are a Level 6 rider, you will find that your slightly shorter stirrup leather will close the angle behind your knee to a little less than 90-degrees, and your hip angle should be about 70-degrees. These angles will vary a bit according to your conformation, but make yourself conform to them as closely as possible.
Still in an enclosed area, practice this exercise while walking around the arena. Make sure you are comfortable with this before you try it at the trot and, later on, at the canter. Keep your movements smooth, and take your time so that your horse does not become upset. If there is a mirror in the arena, make sure you are standing and then sitting without changing the angle that your ?upper body makes with the ground.
If you do not have a mirror, you and a friend can work on this exercise together and take turns photographing each other’s position with a cell phone. Use your photos to make sure that when you rise out of the saddle, you remain above a vertical stirrup leather, and that you now have approximately a 110-degree knee angle. Note that 110 degrees is the same knee angle my fellow columnist George Morris recommends for jumping. The galloping position and top of the jumping position are the same thing a balanced two-point. This hip angle will become more acute as you ride with shorter stirrups, but your poise and balance should be established immediately.
If this is going well for you, take your act on the road move to a large open field and go through the same routine. Try it first on more or less level ground, and then gradually introduce terrain with more rise and fall. Use the same progression of walk, trot and canter that you used in the enclosed arena. As you get more comfortable with the exercise, increase the amount of time that you spend suspended above your horse’s back. Gently touch your horse’s back with your seat bones and then return to your two-point again. You will have noticed by now that this exercise tests your strength and fitness a little, which is a good thing.
II: Connect Quietly With Your Horse
If you have been diligent about making your two-point consistent, then you will find my next exercise makes sense. First, spread your thumb and little finger as if you were measuring something. This will give you a span of six inches or more, depending on the size of your hand. At the halt, hold the reins in one hand, and rise into a two-point position. Place your other hand behind you so that your thumb is on the back of your thigh, and your little finger touches the saddle. This will form a “connector” between your seat and the saddle. Now adjust the location of your connector so as to produce approximately a 110-degree knee angle. (The closer you move your thumb toward your knee, the higher your stance will be and the more open your hip angle, and vice versa.) Now relax back into the saddle for a breather.
Next, I want you to walk around the arena with the reins in one hand, move up into your two-point, make the connector with your other hand, and place it under your leg. OK, stay there. No, don’t fall back down like that, you might break a finger! Keep that exact distance between your seat and your horse’s back while you are in motion, first at the walk, then trot and finally at the canter. You will struggle with this exercise at first, because you might have never noticed until now how much turbulence there was in your connection with your horse.
The secret of a good galloping position is to take the shock of your horse’s movement in your ankles and especially in your knees, not by opening and closing your hip angle like the riders I described earlier in this column. Practice this exercise until you can keep your upper body stable and the connector stays quietly between your thigh and the saddle. Remember to change hands occasionally: You will naturally be more comfortable holding the reins in one hand than in the other, but you should work to become totally ambidextrous in everything you do on horseback.
After you are comfortable with this second exercise in the arena, move back out into an open field and go through the same progression as before: Walk on level ground, then trot in two-point, then canter. At the trot and canter, imagine the same feeling that you get on a trampoline: that the trampoline is pushing your knees up while your upper body feels poised and still. Gradually begin to hold the reins in both hands and try to maintain your position for longer periods of time. Occasionally check, with your connector, that your two-point is stable and that your seat bones maintain a consistent distance from your horse’s back. You will not have a mirror outside in a large field, but you can still check your galloping position by watching your shadow. If your shadow is weaving back and forth, you need to practice until you can be still above your horse.
As an aside, I do not like a galloping position that is too high above the horse’s back. The farther apart you and your horse are, the greater chance there is for miscommunication. For example, flat race jockeys ride incredibly short, but they keep their seat bones quite close to their horses’ backs. You will find that it is extremely difficult to hold your seat bones a consistent distance above your horse’s back when riding with very short leathers unless you are extremely fit. This explains why most upper-level riders ride cross-country with their leathers one or two holes too long: They are secretly not fit enough. Used correctly by a fit rider, short leathers do not mean that the rider will be high above her horse. If you think about it, once you take your seat bones off the saddle, it doesn’t matter if they are one inch above your horse’s back, or one foot your weight is now carried in your knees, not on your horse’s back.
Finally, remember that your elbow must follow your horse’s motion at all three paces during all three disciplines. We want a consistent connection with the horse’s mouth at all times, but to produce a horse who is confident and flexible in his neck, we must be flexible as well. For this reason, I discourage riders from standing in the stirrups and resting on their knuckles while galloping. This position inhibits the flexibility of your joints, which immediately affects for the worse the way your horse moves.
Once you master these simple exercises, you will find a greatly increased sense of stability and poise and your horse will thank you for it.