For a successful equitation, hunter or jumper round, your aids need to effectively communicate with your horse. And he must respond to those aids—shortening his stride for a steady line or lengthening it for a forward line and moving laterally for turns and to navigate bending lines. How well he responds determines his rideability—forwardness, straightness, balance and rhythm. And the more rideable he is, the smoother—and in jumpers, the faster and cleaner—your round will be. To help you and your horse develop and improve these skills, I’m going to share one of my favorite exercises.
The Exercise
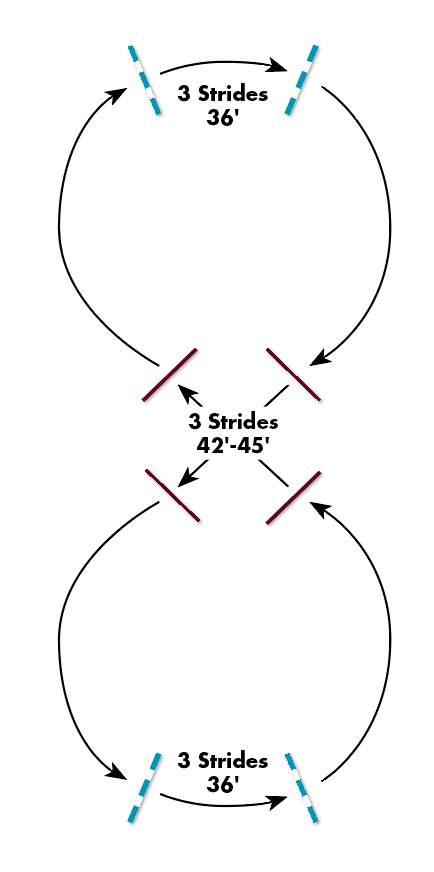
This exercise is basically a figure eight with jumps. It’s a course of four lines—two bending 3-stride “fans” at the short ends of the arena and two 3- or 4-stride lines across the diagonals. The exercise is straightforward and simple, but it’s a really good way to test that your horse is in front of your leg and on the outside rein, a basic requirement for you to be able to recover and maintain his rideability.
With all riders, break down the exercise into small, doable pieces. We start over one of the fans. Only when you and your horse can make that look easy, comfortable and confident in both directions, do we add a diagonal line. When that’s going well, we add the second fan, then the second diagonal. Finally, we can put together the figure-eight pattern, with you working at all times on your your horse’s rideability in both directions.
Repetition will help you and your horse tune in to doing things better but avoid monotony. Practice each piece of the exercise approximately three to six times, and always try to end on a positive note. The next time you school the exercise, repeat the pieces you’ve already done (you’ll master it faster), then add the next one so you maintain a forward and understandable progression.
Benefits
This exercise:
• Controls and balances your horse
• Improves the coordination of your inside and outside aids
• Supples your horse
• Increases adjustability
• Improves recovery
• Diagnoses problems
Who Can Do It
The exercise can be adjusted to suit riders and horses of all levels. For novice riders and green horses, I use ground poles or crossrails. If you’re having trouble with the diagonal lines, put just one jump on the diagonal or canter through the diagonal without a jump, making a simple or flying change, then ride the next bending line. For my more advanced equitation riders, I use higher fences. But with all riders, I break down the exercise into small, doable pieces.
Setup

Following the diagram above, set two crossrails on a bending line, 36 feet apart from center to center at the short ends of the arena—these are your three-stride fans. There should be enough room so that you can canter on the rail to the outside of the fans. Set two more crossrails across each diagonal 42 to 45 feet apart—a normal three-stride line for a horse. Lay ground rails on both sides of all of the jumps so you can jump them in either direction.
How to Ride the Exercise
1. First warm up your horse at the walk, trot and canter. Practice riding forward-and-back transitions at the canter. When he’s easily responding to your aids, pick up a balanced, rhythmic right-lead canter.
2. Warm up by riding the individual fan-line fences on a small figure-eight-like pattern. To do this, first pick up a right lead canter and ride toward the second fan-line fence with a “connected” seat—a little closer to the saddle than a half-seat because of the collection needed. Hold your upper body on the vertical and guide your horse between your legs and reins, riding him forward from your leg but closing your fingers on the reins and half-halting to keep him light in your hand. Ride past the outside of the first fence and jump the second fence. Land, reestablish contact with his mouth and rebalance him. Use your outside (right) aids to turn left and ride a half-circle so then you can jump the first fence backward. Because you’ll be jumping this fence on a bit of an angle, keep an even feel of your reins and use both legs to steer him to the center of the fence. Again, use your outside (left) aids to turn right and repeat this exercise. Do this exercise a few times, then …
3. Ride the fan line. Start on the right lead and ride to the first fence of the fan line in the same balanced, controlled canter you had in Step 2. To keep your horse from falling in, use your inside leg and rein. Jump the center of the first fence, keeping your eyes ahead to the center of the second jump to tell your horse where to go. Maintain your inside leg to ask your horse to curve his body in the line but keep a solid connection on your outside rein so he doesn’t bulge his shoulder out and drift left. Ride the line in three even strides. As you land from the second fence, reestablish your connected seat and rebalance your horse before the turn. Practice riding just the fan line in both directions until it feels easy, and when you’re doing it in three even strides. Then you’re ready to …
4. Add the first diagonal line. Jump through the fan line off the right lead. As you land from the second fence, rebalance your horse and maintain your inside aids to keep him from falling in on the turn. Look at the “in” jump of the diagonal line. As you turn, lighten your seat a little to allow your horse to move forward out of the turn, then maintain that balanced canter to the first fence. If you have a nice distance jumping in, stay in balance and follow your horse’s even stride to the second fence in three strides.
Over the second fence, stay connected with your horse: Push your weight down into your heels, keep your seat close to the saddle and give a limited release. This will help you recover your position as you land, which you’ll need to do immediately when starting the second fan line to your pattern (Step 5). Upon landing, balance and shorten your horse’s stride (after going over the diagonal line, you’ll have more momentum than you did to the first fan line). When you feel comfortable riding the first fan line to the diagonal …
5. Add the second fan line. As you rebalance after the diagonal line, look at the second fan line. Through the turn, push your horse over with your inside (left) leg and maintain a steady connection on the outside (right) rein so you don’t lose his shoulder and he drifts right. Ride this bending line as you did the first bending line (Step 3), remembering that maybe your horse is stiffer in this direction and you might have to use stronger aids. Once you’re comfortable over the three lines …
6. Add the second diagonal line. After the second fan line, rebalance your horse in the turn, and ride the second diagonal as you rode the first one (Step 4). Even though this is the last line of the exercise, pretend that you’ll be riding the fan line again so you can practice your modified shorter release and recovery over the “out” jump. Once you’ve jumped the second fence, ask or allow your horse to go forward a little as a reward (horses naturally prefer to go forward). Circle at the canter, then collect him back to a walk.
By practicing each phase of the exercise, you’ll eventually master the entire pattern. And when you go to your next competition you’ll be pleasantly surprised to find that your horse is listening to your aids and you can quickly and smoothly recover his rideability: pace, balance, rhythm and suppleness.
Frank Madden has been a fixture in the winner’s circle at all the major equitation finals for over four decades. Recognized as one of the most successful trainers of young talent, his students dominate the junior ranks and finals. In addition to teaching, Madden is a respected clinician, top “R” judge and the head trainer and owner of Capital Hill Show Stables in Middlefield, Connecticut.
This article originally appeared in Practical Horseman’s Fall 2019 issue.


