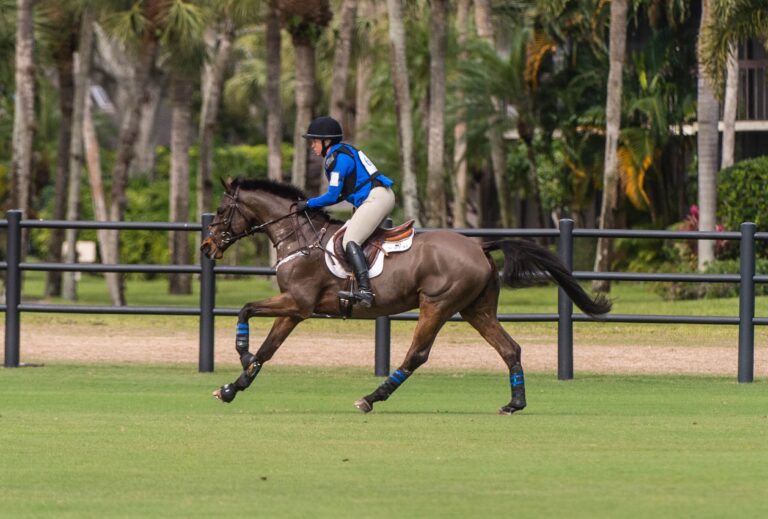
The gymnastic exercises presented in this article address the horse who has some jumping experience but has not been introduced to more technical aspects of the sport. Never forget that it is essential to maintain the calmness and confidence of your horse throughout his training over obstacles. If you preserve these two elements, you will be able to make the most rapid progress with him and produce the most long-lasting and beneficial effects.
Approach these exercises at a calm, regular, balanced pace with quite a long or possibly even loose contact. I place a great deal of emphasis on awakening the horse’s initiative at an early stage of training and attempting to maintain that initiative throughout his career; thus, my emphasis on soft reins.
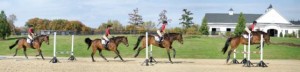
Do not ride your horse as if you must give him a good ride, but rather attempt to be an intelligent passenger. Once he gets to the obstacle, he must arrange his footwork and propel his body over the fence. At this point, it is your job to stay out of his way. If you run into difficulties, you should either lower the obstacle or, if you are jumping gymnastic obstacles in sequence, remove the last obstacle and lower the others until you get your horse going forward again. Once he is calm and balanced, you can resume the exercise.
Your goals are for your horse to maintain his rhythm, balance and regularity of stride over obstacles. I think that we should teach the horse to balance himself, not to expect us to balance him. An excellent exercise is to count in rhythm with his stride as he proceeds down the line of obstacles. For example, if you have obstacles set up to produce one stride in between them, as the horse lands over the first element you should be able to say out loud, “land.” Then, as he reaches the end of his stride before leaving the ground over the second obstacle, you should be able to say, “one,” in rhythm with the takeoff. If there are succeeding obstacles, you should be able to repeat this down the entire gymnastic line.
This sounds like a very simple exercise, but you will find it surprisingly difficult to perform correctly while your horse is jumping. You may find that the timing of your voice is not in rhythm with your horse’s landing. This is the most common mistake I see in my clinics. Riders who make this mistake usually have some weakness in their jumping positions that causes a loss of balance. This loss of balance is very distracting because the rider will think more about self-preservation than about maintaining balance and rhythm in the landing phase of the jump. If you land out of balance, it means there is something wrong with your position. If there is something wrong with your position, it is usually that your lower-leg position is faulty. Most of the time, if you improve your lower-leg position, you will improve your landing after jumps.
Your horse should maintain an absolutely steady, regular cadence down the line of obstacles. Your counting should also be steady, regular and cadenced. Riders who become agitated when jumping will find that their voices rise in volume and pitch. Many riders will quicken the cadence of their counting until their voices and their horses’ strides are no longer in synchrony. Many times, these are the same riders who will blame their horses for rushing.
Practice keeping your eye on the next object in your horse’s path. For example, if you are trotting toward a pole on the ground, look through his ears at the pole until it goes out of sight. With young horses and inexperienced riders, I do not ask the rider to alter the horse’s step in front of the pole because I want to awaken the horse’s initiative. Whether he takes a slightly long step or adds a step before the pole, I am equally satisfied. If he steps on the pole, the chances are good that he will learn from the experience and not do it again. If he continues to step on the poles on the ground, I suggest that the rider find another prospect, as this one is probably too dumb to improve over obstacles.
Look sequentially at each object in your horse’s path. If you are trotting over a series of ground poles followed by an obstacle, look at the first pole on the ground and then keep your eye on the obstacle until it goes out of sight between your horse’s ears. This will help you maintain a straight line through the gymnastic exercises and will also help you develop your timing. You can’t see your stride if you don’t see the jump.
These exercises rely on cavalletti to stabilize your horse’s length of step, speed and balance. If an obstacle follows the cavalletti, use the posting trot until your horse steps over the last pole, then softly lower your seat to the saddle. This ensures that you are in touch with your horse’s back when he leaves the ground.
Do not lean forward while negotiating the cavalletti. When your horse leaves the ground to jump the obstacle, you should have the sensation that he has brought his withers up toward your chest.
For all cavalletti and jumping work, your horse should wear protective boots or bandages on his legs as he may knock his legs while learning to coordinate them.
For this column, I am excerpting Gymnastics 2 and 3. To learn Gymnastic 1, which consists of four cavalletti exercises, click here.
Gymnastic 2
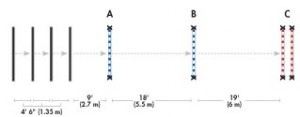
This exercise is usually your horse’s introduction to gymnastic jumping. Start with four rails lying parallel on the ground set 4 feet 6 inches (1.35 m) apart and one more rail 9 feet (2.7 m) away, which will form the A component (see diagram below).

Trot back and forth several times to show your horse the distance between the poles and establish his rhythm and balance. You can then raise the fifth rail at A to produce a suitable warm-up fence. This obstacle will usually be 18-24 inches (45-60 cm). You should now trot through the cavalletti toward the warm-up rail at A. Repeat this exercise several times.
As your horse becomes more experienced at cavalletti and gymnastic jumping, you can add and gradually raise the rail at B. Do not make the rail at B any higher than the rail at A to begin with. Once your horse figures out the striding between A and B, you can start to raise the rail at B.
If I am confident in the progress of the horse and rider involved, I will gradually raise succeeding elements until one element is 3 inches higher than your horse’s competitive level. Before adding obstacles in a gymnastic line, lower the previous element to maintain your horse’s confidence. When using gymnastics as a training tool, we can make the exercise higher or more complex by adding elements, but we should not make the gymnastic higher and more complex at the same time. Keep in mind that the performance of your horse is the best judge of how rapidly you can raise the fences.
If this is your horse’s first experience with gymnastic jumping or he has limited experience with this type of training, four to six repetitions through A and B should be sufficient for your first training period. After an easy day of work on the flat, you can come back and repeat this exercise. If your horse appears to understand what is being asked of him and especially if he maintains his calmness, balance and regularity through the exercise you can change B to an oxer by adding a second rail in the back pair of standards. The oxer should be no higher than the preceding vertical and only 2 feet wide to start. As usual, once your horse understands the exercise, the height and spread can be increased to the competitive heights and spreads required by the rules at that level.
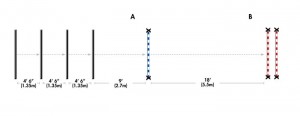
For your horse to see both rails of the oxer, make sure that the front rail of B is level with or slightly lower than the back rail. You should then jump these two obstacles several times, entering the four ground poles at a posting trot in the approach to A, landing quietly behind the vertical and cantering quietly over the oxer.
Jump the oxer at B several times before starting to raise and widen it. I usually try to finish the series of repetitions with the last obstacle set at the size and spread that would be required at the horse’s level of competition.
Gymnastic 3
Gymnastic 3 is a continuation of the work that was done in Gymnastic 2 and is created by constructing a vertical at B, and adding an oxer 19 feet (6 m) from the vertical at B. Start Gymnastic 3 with the rails taken away from B and C. This will leave only the open standards, four trotting poles and one rail on the ground at A as in Gymnastic 2. Warm up your horse as before, and work in both directions through the ground poles. Repeat the procedure for Gymnastic 2 until you are jumping the obstacles at a comfortable height. If you have raised the vertical at A to slightly higher than your competitive level, you should lower that fence before adding a rail to B. For example, set the obstacles in the following manner: The first time you confront the entire sequence of obstacles they should probably be 2 feet (60 cm) at A, 3 feet (90 cm) at B and 3-foot-3 (1 m) at C, with C first set as a vertical.
Once your horse is calm and confident, make C into an oxer that is approximately 3 feet by 3-foot-3 at first.
Although I have suggested heights for the various obstacles, you need to determine the correct height for your horse. The only way to be sure of the correct height is to observe his reactions carefully. If he remains calm and balanced, you are on the right track. If he becomes agitated and starts rushing, lower or even remove the last obstacle in the line and continue working quietly and methodically until he reestablishes his mental and physical balance.
If you feel your horse losing confidence as the jumps get higher, lower the obstacles and narrow the spreads until his confidence has returned.
The distance between the three obstacles will produce one stride from A to B and one stride from B to the oxer at C. Strive for balance and regularity. If your horse gets too close to B and/or C, put a pole on the ground exactly half the distance between A and B and, again, between B and C. This will make your horse land sooner after A and B, giving him more distance in front of B and C to complete his stride. Continue, gradually raising the heights and spreads as your horse develops fitness and displays regularity and balance.
This article originally appeared in the May 2013 issue of Practical Horseman magazine. Jim’s book Modern Gymnastics: Systematic Training for Jumping Horses can be purchased here.