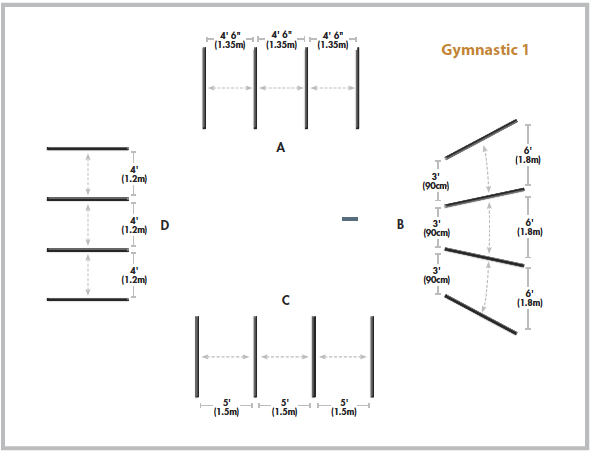
Gymnastic 1 is designed to introduce your horse to stepping over poles on the ground in an organized manner. Dressage horses can also benefit from this first gymnastic, because no jumping is involved. Your emphasis here should be on the rhythm of your horse’s trot, and the calmness and regularity of his step as he negotiates the cavalletti. Your horse should step over the ground poles with relaxed back muscles, and his head and neck should lower slightly, in order for him to measure his step to the next pole.

The four exercises that comprise Gymnastic 1 will fit comfortably in a 75 x 150-foot (22.8 m x 45.7 m) arena.
After you have warmed your horse up at the walk, trot and canter, then trot into the exercise marked A in the diagram. Cavalletti set at this distance will produce a working trot for most horses. These exercises are all designed for horses with some jumping experience. If your horse is extremely green, he probably should not be attempting this exercise yet. However, if he is slightly inexperienced or is an experienced jumper but has not done much work over cavalletti, you can pull the first and third poles in towards the centerline of the arena. This will produce a 9-foot (2.7 m) distance between two poles. Horses find this exercise easier and will soon become stable and regular at the trot, which is always your goal. You can then put the four poles together as shown in the diagram and work in both directions over four of them on the ground. After you have established your horse’s balance and rhythm here, you can proceed to the curved poles in Exercise B.
At the posting trot, proceed on a circle in either direction though B. Keep your horse’s direction adjusted so that the length of his step on the curve feels the same as it did over A.
Once you and your horse have become adept at this, you can then start to enter, for example, closer to the 3-foot (90 cm) end of the poles where the distance is shorter, and then let your horse angle away from the center of the circle. This will cause him to go from a working trot to a medium trot or possibly, if your angle becomes too great, even take a couple of steps of extended trot. If your horse takes two steps between the poles or breaks into a canter, you have probably asked too much flexibility from him. Aim closer to the 3-foot (90 cm) end of the curve, and enter B again at the posting trot.
Alternatively, you can enter from the outside of B, where the rails are farther apart. This will cause your horse to take quite a large step at first. Guide your horse toward the 3-foot (90 cm) distance between the last two poles. This will bring your horse back to a working, or even a slightly collected, trot. Having worked in both directions over B, including being able to angle both ways, you can then proceed to Exercise C.
The poles positioned at C will produce the sensation of an extended trot and you may find that your horse cannot reach enough in his fourth step to get out over the last pole without “chipping in” an additional step. Simply remove the last pole and continue. You will find that, after a couple of days’ work over cavalletti, your horse gets the message and you can replace the fourth pole. You should work in both directions over the 5-foot (1.5 m) poles at C until your horse can maintain his regularity and length of step.
After a short break, proceed to Exercise D.
These four rails on the ground, set at 4 feet (1.2 m) apart, will produce a collected trot. Although this exercise can be ridden either posting or sitting, you should definitely use a rising trot until your horse becomes adjusted to them. Using rising, rather than sitting, trot encourages your horse to lift his back while he elevates his step. In addition, it will be less complicated and will allow you to work on his cadence, rather than worrying about your position. Again, work both ways through D until your horse is relaxed and steady in his balance and rhythm. He should be able to deal with the rails without any interruption in the flow of his movement, changing only the length of his step to adapt to the various distances that you have put in his path.
After another break, you can now link these four elements together in order to produce various transitions that will be of great benefit in teaching your horse to be flexible. For example, enter A on the right hand in a working trot, where the rails are 4-foot-six (1.35m) apart. As you leave A, turn right in such a fashion that you produce an arc through B that causes your horse to change the length of his step from working to collected trot. In other words, start exercise B from the outside in. This will put your horse into a slightly collected frame. Proceed directly then to C, which will produce an extended trot. After the extended trot at C, turn right and enter the shorter cavalletti at D.
If your horse has difficulty with this, you can do A, B and C as I have described and then, in a posting trot, circle (or repeat a circle until your horse has settled down to a working trot), turn and enter D, thus producing a collected trot. If you have successfully done this, walk, reward your horse and let him relax and consider his effort while you plan your next series of repetitions through these exercises. When you resume the posting trot, work in both directions and vary the relationship between the exercises to improve and confirm your horse’s flexibility.
Take a moment to remind yourself of your horse’s bad habits. If he tends to rush at the trot, he will not need too many applications of C. He should come from outside in rather from inside out at B, as this will cause him to continually rebalance and collect his step rather than rushing forward. If, on the other hand, your horse is choppy-strided or lazy, a bit more emphasis on and a few more repetitions at B, going from inside out, will teach him to lengthen his step. The total amount of exercise over these rails in any one period should not exceed 45 minutes, including the periods of rest between exercises.
Excerpted from Modern Gymnastics: Systematic Training for Jumping Horses by Jim Wofford. $24.95


