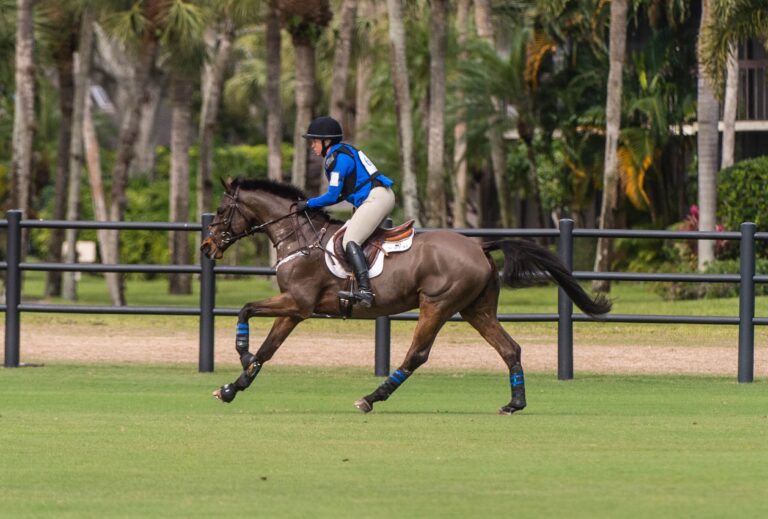
Riding over ground poles and very small jumps is a great way to polish your skills over fences. Here, Skidmore College senior Ursula Green is demonstrating excellent form on Tonic, or “Timmy,” an 11-year-old Hungarian Warmblood. She rode a great track to arrive at this flower box straight and centered. In the air, she’s already focusing her eyes on the ground pole ahead of her, ensuring that they’ll land and continue to it on the correct track, while also maintaining the left lead. Timmy’s workmanlike expression illustrates the confidence and “no big deal” attitude these exercises help to develop. | Amy K. Dragoo
One of my favorite exercises that we use frequently in the Skidmore College riding program is cantering over ground poles. This is a great way to work on course-riding skills without wearing out your horse’s legs. It removes the stress and anxiety about “the jump” and teaches you to focus on what really matters: the ride between the fences and through the corners of the ring. By understanding these fundamentals and consistently executing them properly, you will set yourself up for competition success. This is particularly critical in intercollegiate competitions, where riders have so little time to get to know their mounts before going into the ring.
Ground poles teach both horses and riders how to relax and feel confident on course. Students come to our program from around the country (as well as internationally) with a variety of backgrounds and anxiety levels. Over ground poles, they learn to control the horse’s straightness, balance and rhythm while maintaining correct position. With these skills, they can tackle courses with a more relaxed, “no big deal” attitude, even on strange horses. Ground poles also allow horses to chill out and tune in to their riders’ aids.
Exercises over ground poles are also an excellent refresher for students returning to school after a summer of not riding as much or riding in programs with a different focus. They help to fix bad habits—for example, slowing down an upper body that closes too dramatically over the fences—and reinforce good ones. Working over ground poles reminds riders to use the ends of the ring and stay in balance on the turns. It also helps them feel what is happening on course and react to their horses instinctively, so they can recover from little mistakes before they turn into disasters.
Later in the season, we use ground poles to refine skills even further and zero in on problems. For example, they teach riders to utilize the opening circle on a course for creating the correct canter and track to that elusive first jump.
Setting up a course of ground poles is much easier and more convenient than building a course of jumps. But riding over ground poles is not easy. When we jump, we can make a lot of mistakes and our horses usually still save us by going over the fences. But when we make mistakes over ground poles, our horses rarely help us out. They chip, break to trot, trip on the rails and so on. That’s the magic of ground poles: They magnify riders’ mistakes—so it’s easier to identify what needs improvement.
In this article, I’ll share some of my favorite ground-pole exercises. Remember as you set them up and canter through them, the goal is to reinforce good habits, not to catch your horse with tricks or surprises. Place all of the poles in locations that allow plenty of space for the approaches—so no tight jumper turns. Make distances between them long enough to avoid difficult striding questions—so no in-and-outs—and to enable your horse to add strides easily, when necessary. For the purpose of these exercises, make flying changes only in the corners, never over the poles.
We do these exercises with only well-broke, educated horses and with riders who are jumping at least 2 feet high. Keep in mind, the purpose is to create a confident rider to the jump. You cannot achieve this on a green or unruly horse. I also recommend practicing them with an instructor or ground person to give feedback on your position and canter quality.
Position and Track
From the beginning of every exercise, strive for the perfect position. Whenever in doubt, refer to the “bible” on this subject, George Morris’ Hunter Seat Equitation. Here are a few other tips to keep in mind:
• Adjust your stirrups for riding on the flat so when you take your feet out of the stirrups and hang your legs down, the irons hit just above your anklebones. Then place the stirrups on the balls of your feet.
• Stretch your lower legs down and around your horse’s sides. Always think “long legs,” enveloping your horse’s sides.
• Stay connected to the horse and saddle with your lower legs and thighs at all times, even on hotter horses.
• For these exercises, sit down on your seat bones in the center of the saddle as you would for an equitation flat class, rather than in the half-seat you’d use for jumping. Still, think of your seat supporting your leg, not the other way around. Different horses require different amounts of seat, but they all jump much better if you ride more off your leg than your seat.
• Balance your upper body with the horse’s motion, not in front or behind. It should be at the vertical or slightly ahead of it. If your hip angle is too closed, you will feel as if you’re falling forward. If your upper body is behind the vertical, you’re probably taking your leg off your horse and pumping too much with your seat. Ask yourself, “Do I feel off balance and vulnerable? Or do I feel secure?” Your ground person can help you identify the latter, correct position.
• Adjust your rein length short enough to bring your elbows in front of your body, but not so short that they are straight and stiff. The most common rein mistake I see is too-long reins, which often turn into rough reins.
• Wrap your fingers around the reins and try to maintain a connection with your horse’s mouth at all times.
From this solid position, you can apply appropriate aids to keep your horse’s body straight with his hind legs working underneath his body and on your chosen track, never falling in or out on the turns. Place your inside leg at the girth with the stirrup leather perpendicular to the ground, asking him to be supple in his body and curve it around that leg. Keep your outside leg slightly behind the girth to keep his hind end from drifting out. Always think of riding all four “corners” of your horse (his right and left hind and front quarters) with both reins and legs. Use your eyes correctly, always looking where you intend to go. To work on this, practice riding to specific points around the arena.
Canter
When your horse’s body is in proper balance, he can produce his best canter. Ideally, it should feel as if he has plenty of engine and yet is still polite. He should carry himself and not lean on your hands or try to run away with you. His canter should be smooth, consistent, rhythmical and easy to adjust. This is the canter that will get you to the jump with options—able to add or leave out a stride without risking a chip or awkward launch over the fence. Most mistakes occur because riders either don’t find this canter at the beginning of the round or lose it midway and fail to recover it. A consistent, balanced canter is essential to producing a good round.
One good tool for finding the ideal canter is counting in time with your horse’s strides. You can do this out loud during a lesson or to yourself in the show ring. This helps you to create a steady rhythm and pace so you can maintain the correct canter for the course that you are jumping. My students find it easier to keep the numbers low when they count: “One, two, three, four, one, two, … .” If you have to pause to make adjustments and re-organize, start up the count again as soon as you can.
Learning to recognize the feel of a great canter takes a lot of practice. It is easier to do with some horses than others, and it can feel quite different from horse to horse. Some are more athletic than others. Some have bouncy canters while others are extremely comfortable. Fortunately, a horse does not have to be a great mover to have a great canter. He just has to be able to turn on his motor, balance his body and respond politely to your aids.
Once you find the best canter you can produce with your horse, try to create it every time you pick up the canter, whether you’re at home or in the show ring.
Throughout all of the following exercises, focus on your position, track and canter quality at all times. If anything goes not according to plan, fix the problem as soon as possible, then return your attention to these three essential factors.
Prior to working over poles, warm up on the flat just as you would to prepare your horse for jumping. Then walk and trot over a single ground pole several times before moving on to the canter so your horse is absolutely comfortable with the idea. Give him—and yourself—every chance possible to succeed.
Exercise 1: One Thing (And Pole) at a Time
My first exercise is very simple: two single poles placed on opposite long sides of the arena, several feet off the rail and about 100 feet from the corners.
Always start with an opening circle, creating that balanced, organized, solid canter with a medium-length stride. (If you have too much canter, your horse might be tempted to jump the pole.) Canter at least one circle. If the canter still needs improvement, make another circle.
When you like the canter, proceed to the pole, using the end of the ring in your approach and riding your turns very precisely. Use your eyes through the final turn, looking at the center of the pole. This will help to prevent you from caving in on the circle or falling to the outside. As you canter out of the final turn, you should already be straight and on track to the pole.
Instead of worrying about the striding to it, focus on maintaining your lead, canter quality and straightness. Keep your connection to the saddle and your horse’s mouth. Three or four strides away, elevate your eyes to a point beyond the pole and plan where you’re going. Remain sitting over the pole, reminding yourself, “This is not a jump. It is a pole on the ground.”
If you have a great canter, chances are your horse will meet the pole perfectly and canter neatly over it. If he chips or breaks to a trot, ask your ground person for input on what looked amiss in your position, track or canter. Did you not support him enough with your legs? Was your upper body ahead of or behind the motion? Is he falling in on the turns? Maybe you need more inside leg and outside rein. Try to identify the problem, then fix it in another circle before approaching the same pole again. Deal with one thing at a time. Eventually, you will get everything right and your horse will canter over the pole correctly every time.
If he jumps the pole instead, don’t make a big move with your body. Soften your elbows and follow his motion as best you can. Then rebalance his canter and repeat the exercise until he realizes, “Oh, it’s just a pole,” and canters quietly over it.
If he swaps leads over the pole, make a simple change afterward, then circle back to repeat the exercise. This time, check that you’re using enough outside aids to keep him straight. To end repeated lead swapping, work more on a circle and less on straight lines. The number-one reason for lead swapping is a horse who is not around your inside leg and whose hindquarters are not adequately supported by your outside leg. Never hesitate to circle after a pole to correct these mistakes.
Each time you canter over the pole, continue to ride straight ahead afterward, re-establishing your good canter and track before turning across the ring and returning to the same pole.
Once this single pole feels good, canter over it again, then make a circle and approach the pole on the other side of the arena. Ride it just the same way, maintaining your position, track and canter. If that goes well, canter the poles one after the other without making a circle in between.
Repeat the entire process in the other direction. Be aware that you may feel like you’re on a new horse riding a new canter, which may be either better or worse depending on which lead he favors.
Exercise 1: Single Ground Pole
 1. You can see from Timmy’s topline and his hind leg stepping underneath his body that his canter is very balanced. Ursula’s lovely angles are keeping her in balance. Her reins are a proper length, enabling her to maintain a good connection. Timmy’s perked ears indicate that he’s focused. This is impressive because they are going down the long side where many tend to lose quality. For this exercise, Ursula should be a bit deeper. | Amy K. Dragoo
 2. In preparation for the first ground pole, Ursula has opened her hip angle slightly and sunk a little deeper into her seat and heels. She’s doing a good job of bending his body around her inside leg while using her outside aids to keep him balanced without caving in or falling out. Note how well aligned his head and neck are with his body. By looking through the turn, Ursula is also keeping Timmy on the correct track to meet it straight and centered. | Amy K. Dragoo
 3. In the last few strides before the pole, Ursula’s excellent position keeps Timmy in balance and focused on the pole. She is sitting nicely on her seat bones—more connected to the saddle and deeper in her heels than in Photo 1—without exaggerating the motion in her hips. Her supporting outside leg is maintaining the right lead. Everything is organized and on track. | Amy K. Dragoo
 4. As a result, Timmy canters neatly over the pole. Even in the air, Ursula maintains the connection with her left rein and leg so he stays on the right lead. She has, however, lightened her seat a little too much. I would like to see her seat closer to the saddle so she doesn’t accidentally encourage the horse to jump over the pole in the future. | Amy K. Dragoo
 5. After the first pole, Ursula canters all the way around the ring to the second pole on the opposite long side. She had to stay connected and maintain her good canter the whole way in order to meet this pole in the same nice balance. Achieving this consistency is harder than it sounds! I like her deeper heels and closer connection to the saddle over this pole. Her slightly closed hip angle is also allowing her upper body to stay with the motion, centered over the middle of the horse. | Amy K. Dragoo
Exercise 2: A Line Of Poles
Next, build a simple line of two poles about 72 feet apart, again placed far enough from the corners so you have plenty of space to practice maintaining your track and balanced canter in the approach and recovery.
Pick up the same great canter you had in Exercise 1 and begin counting out loud (or to yourself), still keeping your numbers low: “One, two, three, four, one, two … .” Over the first pole, stay connected to your horse’s sides with your seat and legs and to his mouth with your hands. Continue counting to the next pole to keep your canter consistent. Don’t worry how many strides your horse takes—it may be six or seven. Focus more on maintaining his straightness, quality of canter and rhythm. If he’s too strong down the line, go back to working over just one pole.
Just as before, be prepared to react to any mistakes. If your horse breaks to trot in the middle of the line, allow him to trot over the second pole. Then make a circle at the end of the ring, re-establish your canter, track and position and repeat the exercise. Use this opportunity to re-evaluate the effectiveness of your aids. Did you take your leg away? Did you lighten your seat? Did your reins get too long?
If your horse repeatedly meets the second pole awkwardly, the distance isn’t working. Ask your ground person to roll the poles a foot or two closer or farther apart. The purpose of this exercise is not to test him but to build his and your confidence over a comfortable distance.
Once you’re riding this line successfully, play with the striding. Try doing it in one less stride by riding with a little softer arm and, if necessary, a slightly stronger leg. Then try collecting a little to add a stride. This will make your horse more adjustable and you more confident about controlling the canter stride.
Exercise 2: A Line of Poles
 1. Next, Ursula approaches a line of poles. She’s found the same organized medium canter that she had in Exercise 1 and is looking through the turn toward the first pole. Timmy is bending around her inside leg in a nice, balanced frame. | Amy K. Dragoo
 2. This time, he takes a more athletic step over the pole—not quite a jump, but more elevated than his normal canter stride. Instead of stiffening in the saddle or falling behind the motion, Ursula just lightens her seat and hand a little. She’s still in a good position, looking ahead to the next pole, which encourages Timmy to focus on it as well. | Amy K. Dragoo
 3. In between the poles, Timmy is tempted to lengthen his canter stride, so Ursula is applying a little more rein pressure to remind him to maintain the same, balanced canter. Having the correct length of rein makes this easy for her to do effectively. Meanwhile, her right leg is keeping his hindquarters in line so he holds the left lead while her eyes stay focused ahead to keep Timmy straight on the track. | Amy K. Dragoo
 4. By the time they reach the second pole, Ursula has restored the organized canter and nice shape in Timmy’s topline. She’s sitting closer to the saddle now, which encourages him to take a normal canter stride over the pole. The fact that he stayed on the left lead shows that she did a good job maintaining his balance and straightness. | Amy K. Dragoo
Exercise 3: A Course Of Poles
Now you’re ready to try these skills on a course of poles. Have fun with your course design. Be sure to incorporate any questions you might encounter in the show ring—bending lines, rollbacks, fences on the diagonal and so on. Look online for courses used at competitions in the past, such as an equitation final. Just replace any in-and-out with a single pole. I’ve also given a sample, basic course on this page.
When you ride these courses, always start with a good circle. Practice holding your lead on the lines—including bending lines—and make any necessary flying changes in the corners. If you’re having trouble meeting the poles smoothly or balancing your horse in between them, try counting throughout the entire course. Anytime you feel things start to unravel, circle and get organized again.
Exercise 3: A Course of Poles—Rollback
 1. High-school senior Georgia Goodell is riding Warhol, or “Andy,” a 12-year-old Dutch Warmblood. Georgia’s done a good job organizing his canter, which helps her meet the first pole perfectly. The angles in her position are great, her rein length is good and her deep heels and connection to the saddle tell Andy to go over the pole in a normal canter stride. She is already looking ahead. | Amy K. Dragoo
 2. As she got to the end of the ring, Georgia looked back over her shoulder, focusing on the next pole before she initiated the turn. Here with her eye still focused on the second pole, she uses an opening rein to make the turn. Meanwhile, she supports Andy with both hands and legs, as well as her seat. This keeps him balanced and on the correct track to take them straight to the pole. | Amy K. Dragoo
 3. As a result, Andy arrives at the second pole in the same balanced canter. Georgia continues using her outside aids over the pole so he’s not tempted to swap leads in the air or make an automatic lead change as they head back toward the rail. Instead, she insists that he maintain the right lead all the way to the rail … | Amy K. Dragoo
 4. … where she then asks for a flying change to the left lead, turning her eyes to focus in the new direction. Everything else is still the same—her nice position in the saddle, her connection to the horse and his good balance and straightness. | Amy K. Dragoo
Exercise 4: Incorporate “Speed Bumps” and Jumps
To begin practicing your new good habits over real fences, set up the same line of poles that you used in Exercise 2. This time, build the first pole into a small crossrail or vertical, about 1 foot high. Then canter to it, still sitting in the saddle, but staying somewhat looser in your arm and following your horse’s motion a little more with your upper body.
Think of this jump as just a “speed bump.” Your horse’s effort over it shouldn’t create enough thrust to push you up and out of the saddle. Avoid any exaggerations in your rein release or position. Simply reward your horse with a slightly following upper body and arm. After the jump, reorganize and canter to the pole. Then practice riding the line in the other direction.
In your regular jump schooling, throw a ground pole or two into your exercises and courses now and then. Many riders allow their canter and track to deteriorate after a few jumps. Adding a pole here and there reinforces the necessity of balance and control. When you approach each pole, sit down in the saddle and focus on your position, canter and track. This is a great way to remind you and your horse to pay attention to what really matters—and to take a deep breath and remind yourselves, “We’ve got this!”
Exercise 4: Incorporate “Speed Bumps”
 1. In the approach to a small flower box, Georgia has made a nice, balanced turn. Andy is curving his body perfectly around her inside leg and they are both already focused on the jump. Georgia is somewhat looser in her arms and lighter in her seat, telling Andy that it’s OK to jump the fence this time. | Amy K. Dragoo
 2. Because it’s such a small jump, she is careful not to make a big move with her body. Her upper body is slow and calm and her hands are maintaining a connection to his mouth. Both are already focused on the ground pole ahead. After landing, Georgia will sit down in the saddle, reorganize and rebalance to create the same good, controlled canter that they had in Exercise 3. | Amy K. Dragoo
Ground-pole Course
 Pick up the left lead and canter a large opening circle. Maintain the left lead over Pole 1. At the end of the arena, execute a flying change at A. Canter over Pole 2, maintaining the right lead across the arena to Pole 3. Canter Pole 4 without allowing your horse to swap to the left lead over the pole or down the broken line to Pole 5. Maintain the right lead over Pole 5 and ask for a flying change at B. Proceed over Pole 6, maintaining the left lead and execute a flying change at C. Roll back to Pole 7 on the right lead. Canter past the in-gate and return to a walk.
Riding students have benefited from Cindy Ford’s words of wisdom for more than 40 years. She rode and taught at Peter Van Guysling’s Dutch Manor Stables in Guilderland, New York, for many years before becoming the director of riding at Skidmore College in Saratoga Springs, New York, in 1988. Two years later, she accepted the additional role of team coach. Since then, she has guided the Skidmore Thoroughbreds to six Intercollegiate Horse Show Association national team championship titles, bringing the team’s total to seven IHSA national championships.
 Amy K. Dragoo
In addition to her Skidmore College students, Cindy also trains Juniors and Adult Amateurs and coaches them at U.S. Equestrian Federation-recognized shows year-round.
A big proponent of the sport as a whole and of horse shows in her region, Cindy was instrumental in creating the Skidmore College Saratoga Classic, a two-week A-rated horse show held every June since 1998. She is a trustee of the local Capital District Hunter/Jumper Council, which she helped to establish. In 2011, in recognition of her great contributions to the sport over the years, Cindy received the IHSA Lifetime Achievement Award.
This article originally appeared in the December 2015 issue of Practical Horseman.