In today’s horse-show world, hunter derbies are hot. Since being introduced by the U.S. Hunter Jumper Association in 2008, these exciting new classes have grown exponentially—driving more entries and an ever-expanding group of riders who want to try their first derby course.
In last month’s issue of Practical Horseman, I explained that derbies may seem intimidating, but they really are just a series of tests. And these tests can be isolated and practiced at home. I introduced three key exercises focused on developing and keeping the right hunter pace, mastering the bending line and taking the fear factor out of trot fences.
This month, we will build on that learning by introducing three more exercises that add even more skills to your tool kit. No matter what your goal—nailing your first hunter derby or just being more competitive in your hunter division—these exercises will help you master pace, track and balance. And that will make you and your horse more successful anywhere you choose to compete.
See also: Liza Boyd’s 6 Exercises to Nail Your Hunter Derby: Part 1
1. Rock the Rollbacks
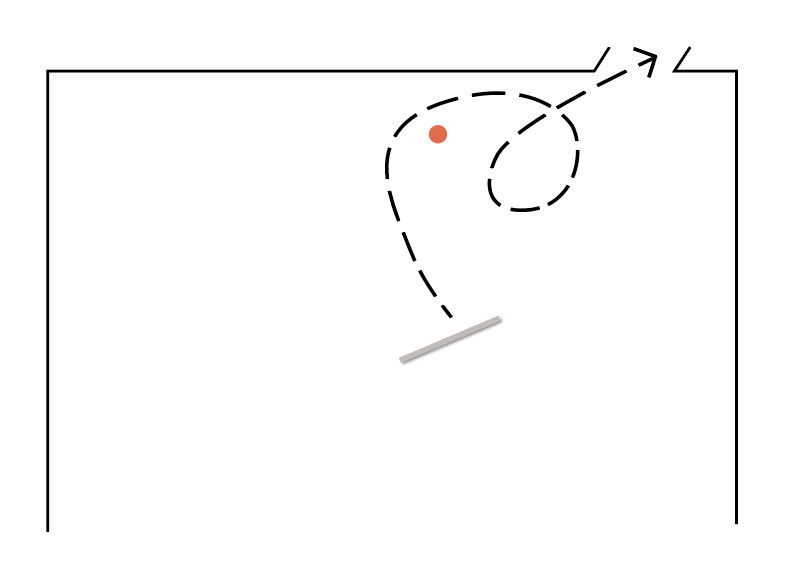
The Challenge: A rollback occurs when you land after a single fence (or a line) and need to execute a very sharp turn back to another fence. This challenge is typically set as a vertical fence to an oxer. Sometimes there is another obstacle in your way, so you need to decide to go inside or around it to make the turn.
There are four things that typically go wrong at rollbacks: turning in the air too quickly on the vertical, leaning in on the turn, slowing down on the turn and neglecting to get your horse’s attention on the oxer.
Your Goal: Find the same pace and the same distance to both fences with smoothness on the track and accurate distances to the jumps. Just like in any hunter course, the trick is making the jumps match. And a rollback is no different than any other turn—it is just a lot faster.
The Exercise: Start with a simple vertical with a 180-degree right turn to a crossrail representing the oxer. Place an obstacle (like a standard or a big plant) in the middle of the turn—you want to be able to ride about five strides to pass the standard, then you will make a right turn around it to get to the second fence.
In the beginning, the crossrail allows you to work on your technique in the turn without worrying about finding a distance to a real oxer. Practice each of the following parts of the rollback, starting with a turn around the outside of the standard.
Step 1: Work on staying straight to the vertical and straight in the air until your horse lands. Do not try to turn in the air—it is not necessary and it will make your horse land on his inside shoulder with his haunches trailing out. Rather, look straight ahead in the air and step into your outside stirrup, which will help keep you centered over your horse. On landing, use a little inside leg with an opening left rein to keep your horse from cutting in on the turn. As you land, your eyes can look right to focus on the turn to come.
Step 2: Once your horse is straight and you feel organized, you start to make the turn. Practice staying in the center of your horse. Do not lean in. Pulse a little of your weight into your outside stirrup. Your shoulders should mimic your horse’s shoulders—square and straight. Keep a feel of your outside rein, as you push your horse from the inside leg to the outside rein.
Step 3: Practice keeping your pace consistent throughout the whole exercise. As you land after the vertical, quickly find your horse’s balance. You should feel that he has his weight under him, on his hind legs. Your seat should be lightly touching the tack and you should feel centered in your saddle. Canter for ward all the way through the turn. Recognize that the turn will naturally slow down your horse, so press forward with purpose around the turn. Note that by cantering forward you are not committing to taking a big distance on the second fence. You are just creating enough pace to give yourself options.
Step 4: As you make the turn, realize this is a blind turn for both you and your horse. You know that you are turning directly to another jump, but did you tell your horse? Make sure you are steering with both your arms and your legs. Keep using inside leg to prevent him from dropping in. As you crest the turn and pass the standard, add your outside leg to straighten him and focus his attention on the second fence.
Once you can successfully execute all four steps of the rollback, you are ready to build the crossrail into an oxer. And as you get smoother, try to tighten the rollback. Make it riskier and riskier and test your ability to tighten the turn while keeping your horse balanced with a good line and a forward pace.
Step 5: Got it mastered? Now try turning inside the standard.
2. Show off the Hand Gallop
The Challenge: The derby course designer will ask for a hand gallop, usually right before you jump the last big oxer or obstacle of the course. It provides a thrilling finish for the audience and a real challenge for horse and rider: how to show a brilliant hand gallop without losing your balance to that all-important last fence?
Your Goal: Show the hand gallop early so that the judges check it off the list. Execute the hand gallop seamlessly and with control so that you can jump the last fence in style.
The Exercise: Set up two fences at opposite ends of your ring, a vertical to an oxer. Place a cone three strides after the vertical.
Step 1: Jump the vertical. Immediately upon landing, your first goal is to find your horse’s balance. Bring your upper body to a more vertical position, sink down deeper in your tack and steady with your hand and leg working together. Let your horse rock back onto his hind end. Practice this until you can achieve this balance well before the first cone and without it being visible to the judges.
Step 2: As you pass the cone, move up into the hand gallop. Lighten into a half seat, move your upper body in front of the vertical, add more leg and take a soft feel of your horse’s mouth as he increases his stride. You should feel more power, more energy and a longer stride from your horse. As you practice, think about adjusting your horse’s stride: Can you do it in one to two strides? Can you do it seamlessly?
Step 3: Hand gallop for at least 10 strides. The goal here is to keep your horse uphill between your leg and hand—do not let him flatten out or become heavy in front.
Step 4: Now you have executed the hand gallop, so focus on finding a good distance to the second jump. If you have your horse’s engine working from behind, then you can make any distance work—long or deep. But be careful not to look at this last fence too early as you are galloping—it will tend to make the distance you see long.

3. Finish Your Course with Flair
The Challenge: Typically, at the end of the handy course, you see the riders come back to the walk promptly after their last fence and walk directly out of the ring. But sometimes the gate is very close and your horse may be too enthusiastic to do this smoothly. Remember that you are being judged from the moment you walk into a ring to the moment you walk out of the ring. I don’t like to see riders do a rough downward transition just trying to achieve the walk in time.
Your Goal: Landing and immediately coming back to the walk is the handiest, and over time this should be your goal. But if your horse is strong and you are going to end up in an unattractive tug of war, it is more appealing to do a tight turn and then walk directly out of the gate. The trick is testing your ability in advance and knowing what you and your horse can execute smoothly.
The Exercise: Set a simple jump on an angle near the gate of your schooling ring. Or set a simple jump heading right toward that gate. Either option works, and you will encounter both set-ups in derby classes. Place a cone about three strides before the gate.
Step 1: Jump the fence quietly and practice coming back to the sitting trot as soon as you can—if it needs to be on a circle, that’s a good place to start. Once your horse gets the idea, practice jumping and then coming back to the sitting trot earlier and earlier until you can do it by or before the cone.
Step 2: Jump the fence, land and then halt and back up a few times. Try to do this earlier and earlier until you can halt quietly by the cone.
Step 3: Now jump the fence and come back to the walk at the cone and walk out of the gate. If your horse is now responsive enough to execute this, that’s your game plan. Note that if you land on the wrong lead and you are worried that you might miss the change, then why take the risk? Just go immediately to the walk.
Step 4: Keep practicing, but if your horse is too anxious to give you the walk in a reasonable time—then plan for a balanced tight turn and then walk out of the gate. Practice this to the right, then eventually move the jump so that you can also practice a tight turn to the left. Over time, your horse should be able to land, execute a nice turn that fades into a walk and exit quietly out of the gate. The beauty is that the turn will put the brake on your eager horse. Your job is to make this transition smooth and make it look like you planned it. Which you did!
About Liza Towell Boyd

Liza Towell Boyd is one of the country’s most successful hunter riders and trainers and has won more than 25 USHJA International and National Hunter Derbies. In a historic three-peat, she rode her legendary chestnut gelding Brunello to win the USHJA International Hunter Derby Championship in 2013, 2014 and 2015. Brunello went on to be the 2015 USHJA National Horse of the Year. Liza trains at her family’s Finally Farm in Camden, South Carolina.
This article was originally published in the July 2017 issue of Practical Horseman.


