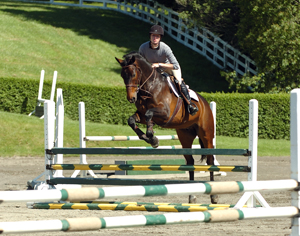
Riding a connected broken line, you jump two fences set on a curve with related striding, where how you ride the first jump affects how you arrive at the second. To be successful and smooth, you need to keep your horse in balance while choosing the correct track and pace to produce the desired number of strides between the jumps. Any loss of balance, direction or pace will make it difficult to recover between the jumps and cause you to “miss” the distance,” leave out a stride or have an awkward too-close or too-long takeoff. Combining two broken lines, creating a total of three or more jumps connected by related distances, increases this challenge.

When you ride connected distances well, each jump sets you up for the next. For every jump, you have to take off in control and land in control. Particularly with the first jump of the line, you have to take responsibility about your track both arriving at and riding away from the fence.
In this article, I’ll share two exercises I use with many of my students to help develop these essential skills and “tune” your eye. The first combines two lines that curve in the same direction, creating a half-circle. With it, you can practice your timing skills without worrying about changing leads. When you’ve mastered that, you’ll be ready for my second exercise, two soft loops of an S-curve line, which incorporates a change of bend and lead in the middle of two broken lines.
In these exercises, you’ll
- use both inside and outside rein and leg aids to ride your “whole horse” around turns
- add and leave out strides, helping you feel the type of pace you’ll need for quiet and forward lines,
- focus your eyes on each new destination, both before and after jumps, to improve your steering and patience to the jumps and keep your cool on course. Good use of your eyes will connect the jumps in broken lines and maximize your ability to ride them correctly, and
- coordinate your aids to ask for the correct lead on landing.
Both exercises offer many opportunities for modification, allowing you to be creative with as few as three or four jumps while making your practice sessions fun! The added bonus: The turning, gymnastic nature of the exercises will improve your horse’s jumping style and make him more balanced, adjustable and obedient in between fences.
I use these exercises with all equitation and jumper horses and riders, from the 2-foot-6 to the 4-foot and higher levels. You’re ready to do them if you can use your hands, legs and seat independently of one another, can stay on a designated track without significantly drifting right or left, and know how to adjust your striding for different types of distances. You should feel comfortable recognizing and riding lines set on standard 12-foot-stride distances, as well as slightly shorter and longer distances. Before trying connected broken lines, be sure you’re comfortable riding connected straight lines: three or more jumps connected by related striding on a straight line.
Exercise 1: Three Verticals on a Half-Circle
In this exercise, you’ll learn to approach two broken lines in the correct balance and pace for either quiet distances or more forward distances. Because you’ll stay on the same lead throughout the exercise, you’ll be able to focus on maintaining your outside rein aid to keep your horse on the circular track.
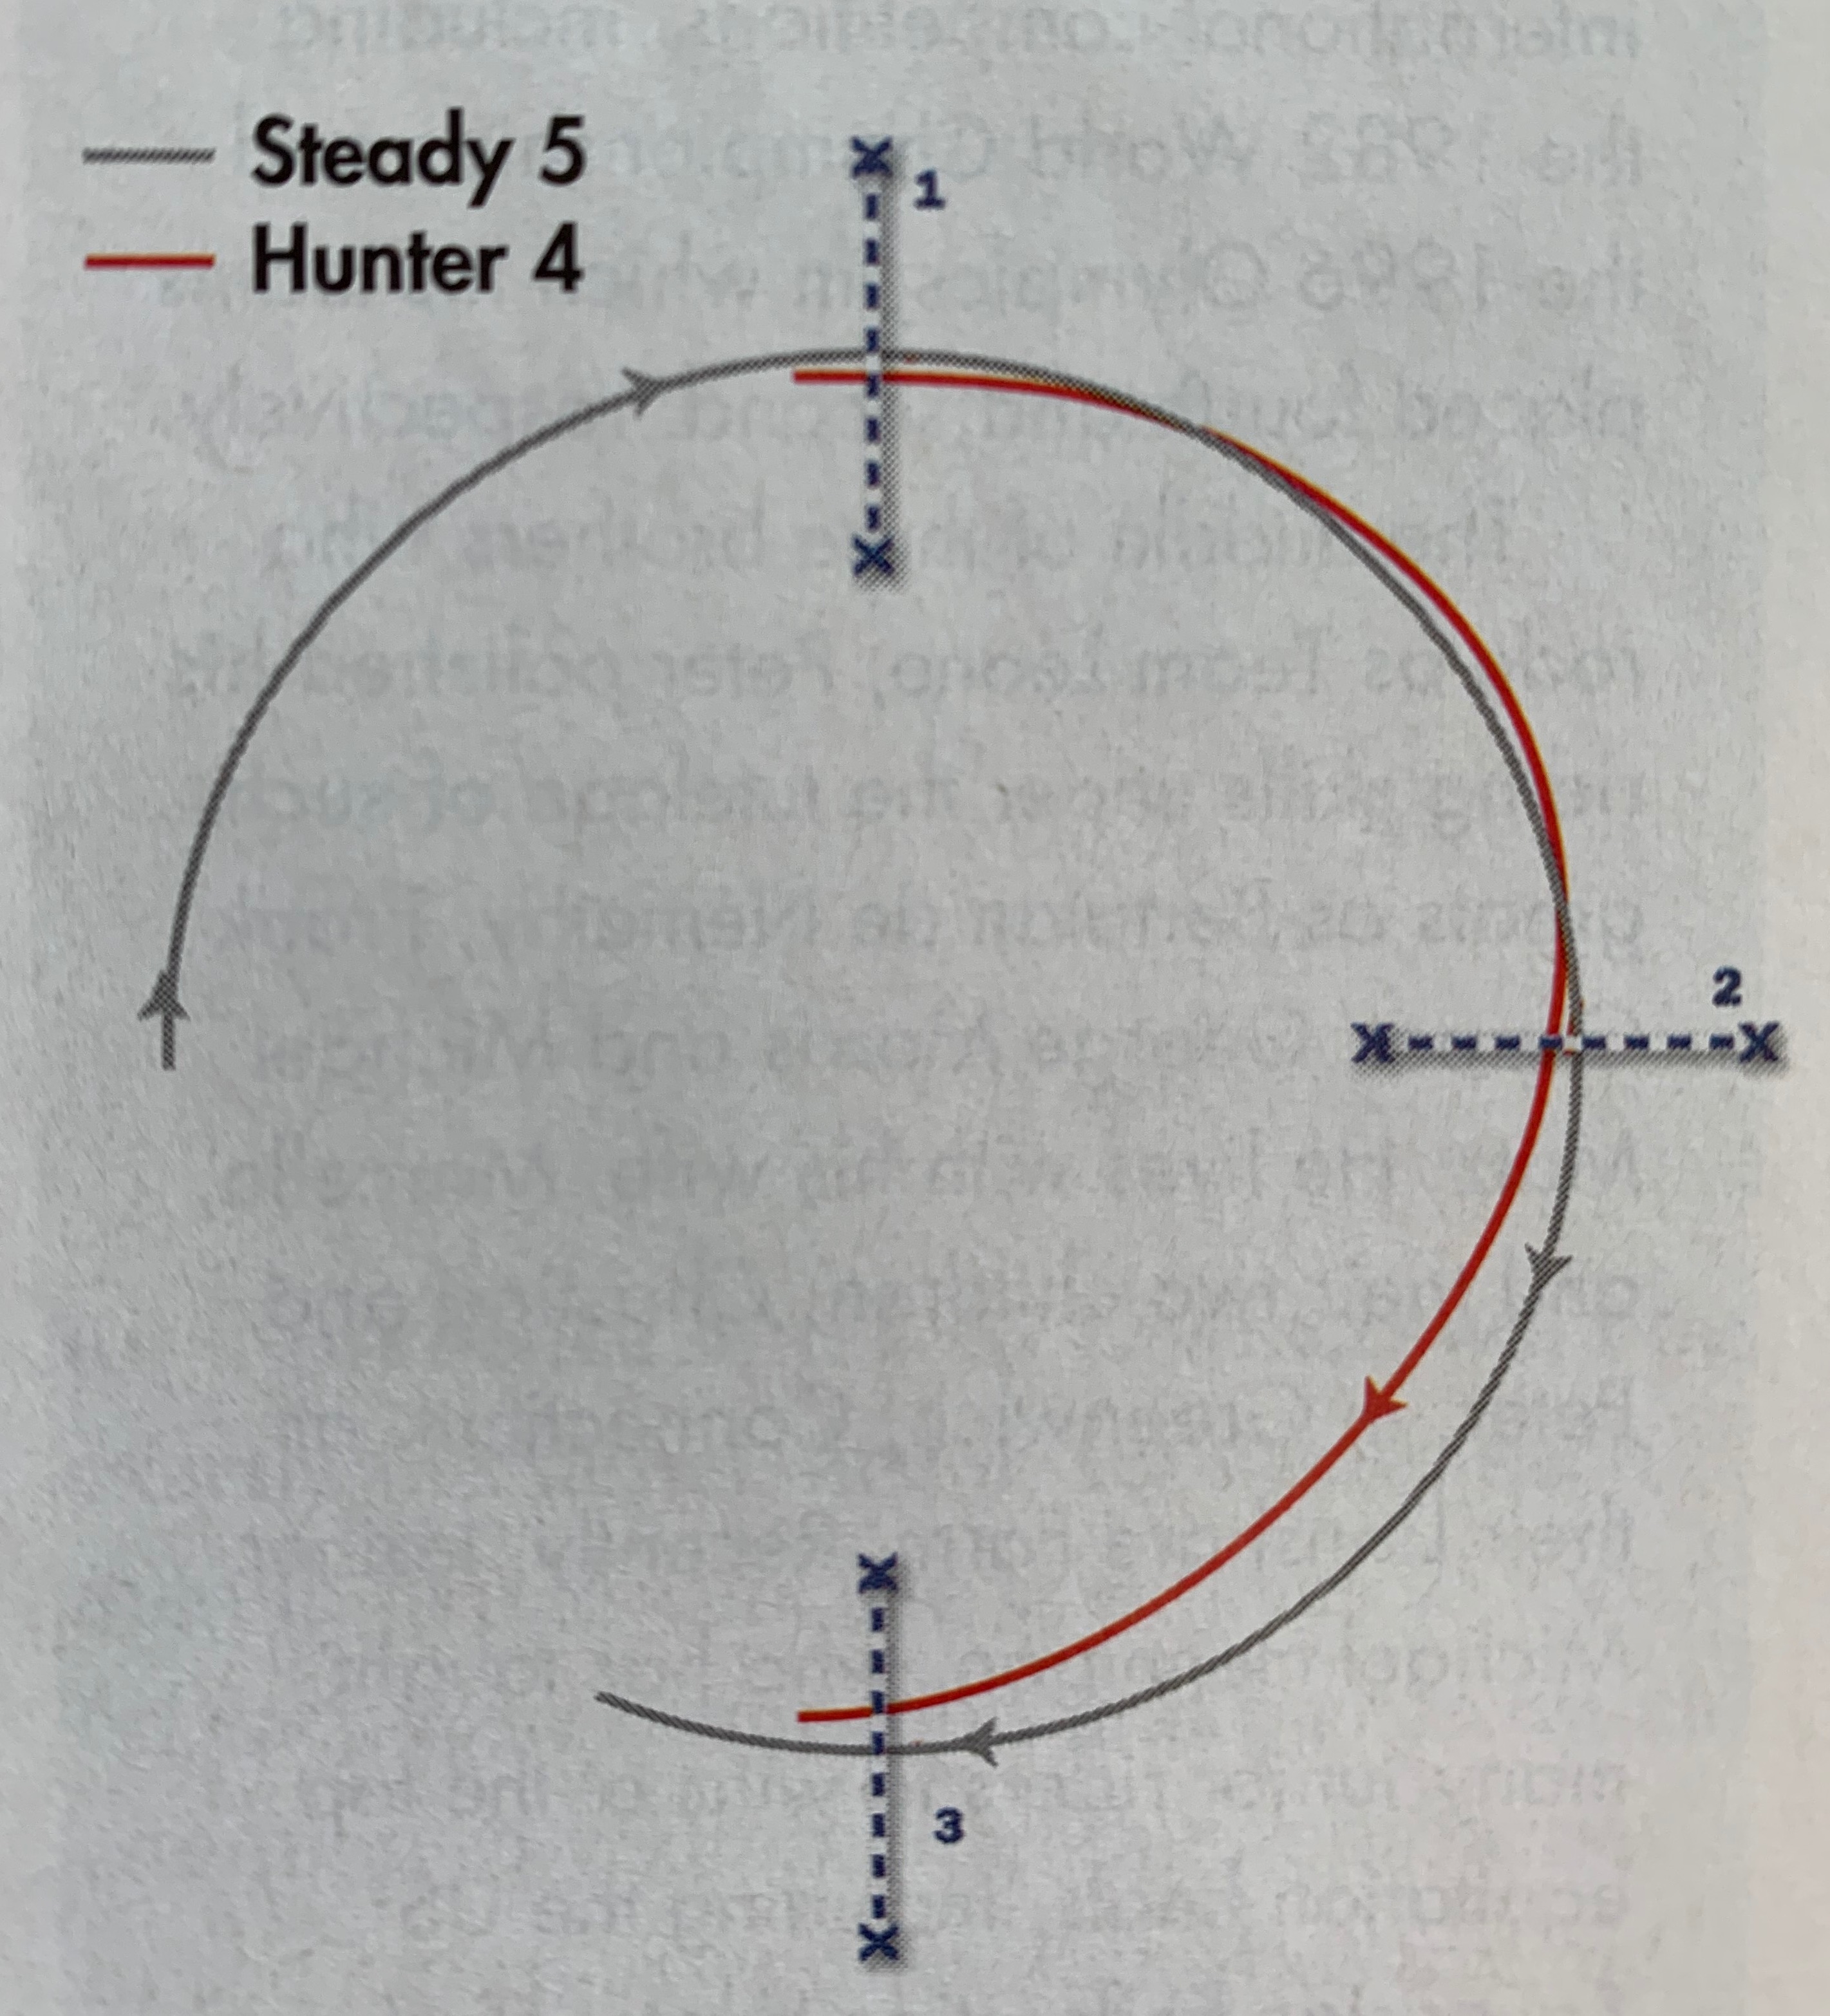
Setup: Arrange three verticals on a large circle. Imagine the face of a clock and position the jumps at 12 o’clock, 3 o’clock, and 6 o’clock. Set them 60 feet apart from one another, the standard four-stride distance, as measured on curved lines between the centers of the jumps. Be sure there’s plenty of room to approach and exit all of the jumps from either direction. (See diagram below).

Place ground lines on both sides of each jump. Set the jump cups on the inside standards 3 inches higher than you normally jump, and then set the cups on the outside standards 6 inches lower than normal. This helps to discourage your horse from cutting to the inside on the approaches.
You’ll begin by jumping the first two fences of the exercise. When you’re comfortable with that, you’ll add the third fence.
The Steady Five
For the first part of this exercise, ride each line in a steady five strides. Even though the line is set for four strides, fitting in five will be easier than you think. Your horse won’t know where he’s going at first and will be more willing to contain his stride and stay on the track you choose.
You’ll start with just the first two fences. Begin by visualizing an imaginary curved line intersecting the center of each of the jumps, creating a quarter of a circle. This is your track.
Pick up a balanced, connected canter, on whichever lead your horse jumps and turns the best on, keeping his strides controlled and relatively short. So, for example, if you’re on the right lead, the first jump would be at the 12 o’clock position.
In the approach to the first fence and in between the fences, keep your upper body tall and close to vertical to help balance your horse for the shorter striding. Try to arrive at each jump exactly in the center and perpendicular to it to help your horse land on the correct track to the next fence.
Ride past the outside standard of the third fence (the one you’re not jumping for now, at the 6 o’clock position) and then onto the curved track of the half-circle that has no jumps.
Use your eyes throughout the exercise, always focusing on your new destination (the next jump, the rail, etc.). As you pass the 9 o’clock position, look at the center of Fence 1. Be patient in the approach, staying on the curved line of the circle, helping your horse arrive at a balanced, deep takeoff spot. This, in turn, will make his feet land closer to the jump on the other side, leaving more room to fit in the five strides. If he takes off long, it will be difficult to influence where he lands and control his balance and track to the next jump.
As you approach the takeoff spot, look at Fence 2. In the air over the first jump, use a tactful indirect inside rein to indicate the turn to come. So, for instance, if you’re turning right, bring your right hand toward your left hip, so the right rein comes against the side of your horse’s neck. Close your inside leg at the girth to prevent him from drifting to the inside. Maintain contact with your outside leg and rein to prevent him from drifting off the track to the outside. As you land from Fence 1, hold your focus on Fence 2 and continue toward it, staying on the track of the quarter circle.
Between the jumps, keep your upper body tall and use both reins and legs to bring your whole horse around the turn instead of just pulling on the inside rein. You’ll find that your outside rein and leg aids are even more important than they are on straight lines to keep your horse from drifting out.
In the takeoff for Fence 2, focus on the track straight ahead and prepare to either pull up on a straight line afterward or continue around past Fence 3 to repeat the exercise.
When you’re comfortable with the two jumps, add the third. This time, visualize an imaginary curved line intersecting the center of each of the jumps and continuing around from the last jump back to the first, creating a perfectly round circle. This is your track.
Approach the exercise in the same organized canter to fit five strides in each line. Again, focus your eyes on each jump as soon as you find your distance to the previous one.
If your horse has trouble fitting in the five strides, even when you enter the exercise very quietly, choose a slightly wider track between the jumps. By developing your ability to consistently control both the track and his stride length, you’ll learn to tackle any broken line successfully.
Once your horse is jumping well through the exercise on his good lead, ride it the same way in the other direction. Start with just the first two jumps again, until he feels ready to add the third. Remember to stay conscious of your track in both the approaches and landings of every jump. Any deviation from it will alter your striding to the next jump.
If, at any point, your horse lands on the wrong lead between the jumps, don’t let that sidetrack you. Making a flying change in the middle of a broken line can be disruptive and might cause you to miss the distance to the next fence. Instead, focus on working through the exercise, regardless of what he does with the lead (maintains the counter-canter, cross-canters, etc.) Let your horse figure out the exercise. After several repetitions, he’ll land and stay on the correct lead because it will feel more balanced to him.
The Hunter Four
When you can do the five-stride lines comfortably in both directions, lengthen your horse’s stride to a regular show-ring working canter pace in the approach and jump through the lines in a more forward four strides. This time, ride slightly inside the track that you did in the five-stride exercise with a more forward upper-body position.
To make the turn to Fence 3 easier, ride a slightly wider turn from Fence 1 to 2, so you arrive at the center of Fence 2 angled just a bit toward the inside of the circle.
Note: I don’t recommend doing the “hunter four” on a regular basis with jumpers, because it encourages them to jump a little flatter than you want them to jump in the show ring.
Increase the Difficulty
To make this exercise more challenging, replace the verticals with oxers. Place the inside standards of the oxers close enough together that they touch and the outside standards farther apart (about as wide as the height you normally jump). This will encourage your horse to use himself over the jump, improving his technique and bascule. Set the jump cups higher on the inside standards than the outside. This will discourage your horse from cutting to the inside on takeoff. The combined result will be a straighter, sharper, rounder jumping effort.
If you’re having difficulty with this exercise, see “Troubleshooting,” below.
Exercise 2: Three Verticals on an S-Curve
The next exercise builds on the skills you learned in Exercise 1 by adding a change of bend in the middle to improve your horse’s flexibility and steering aids.
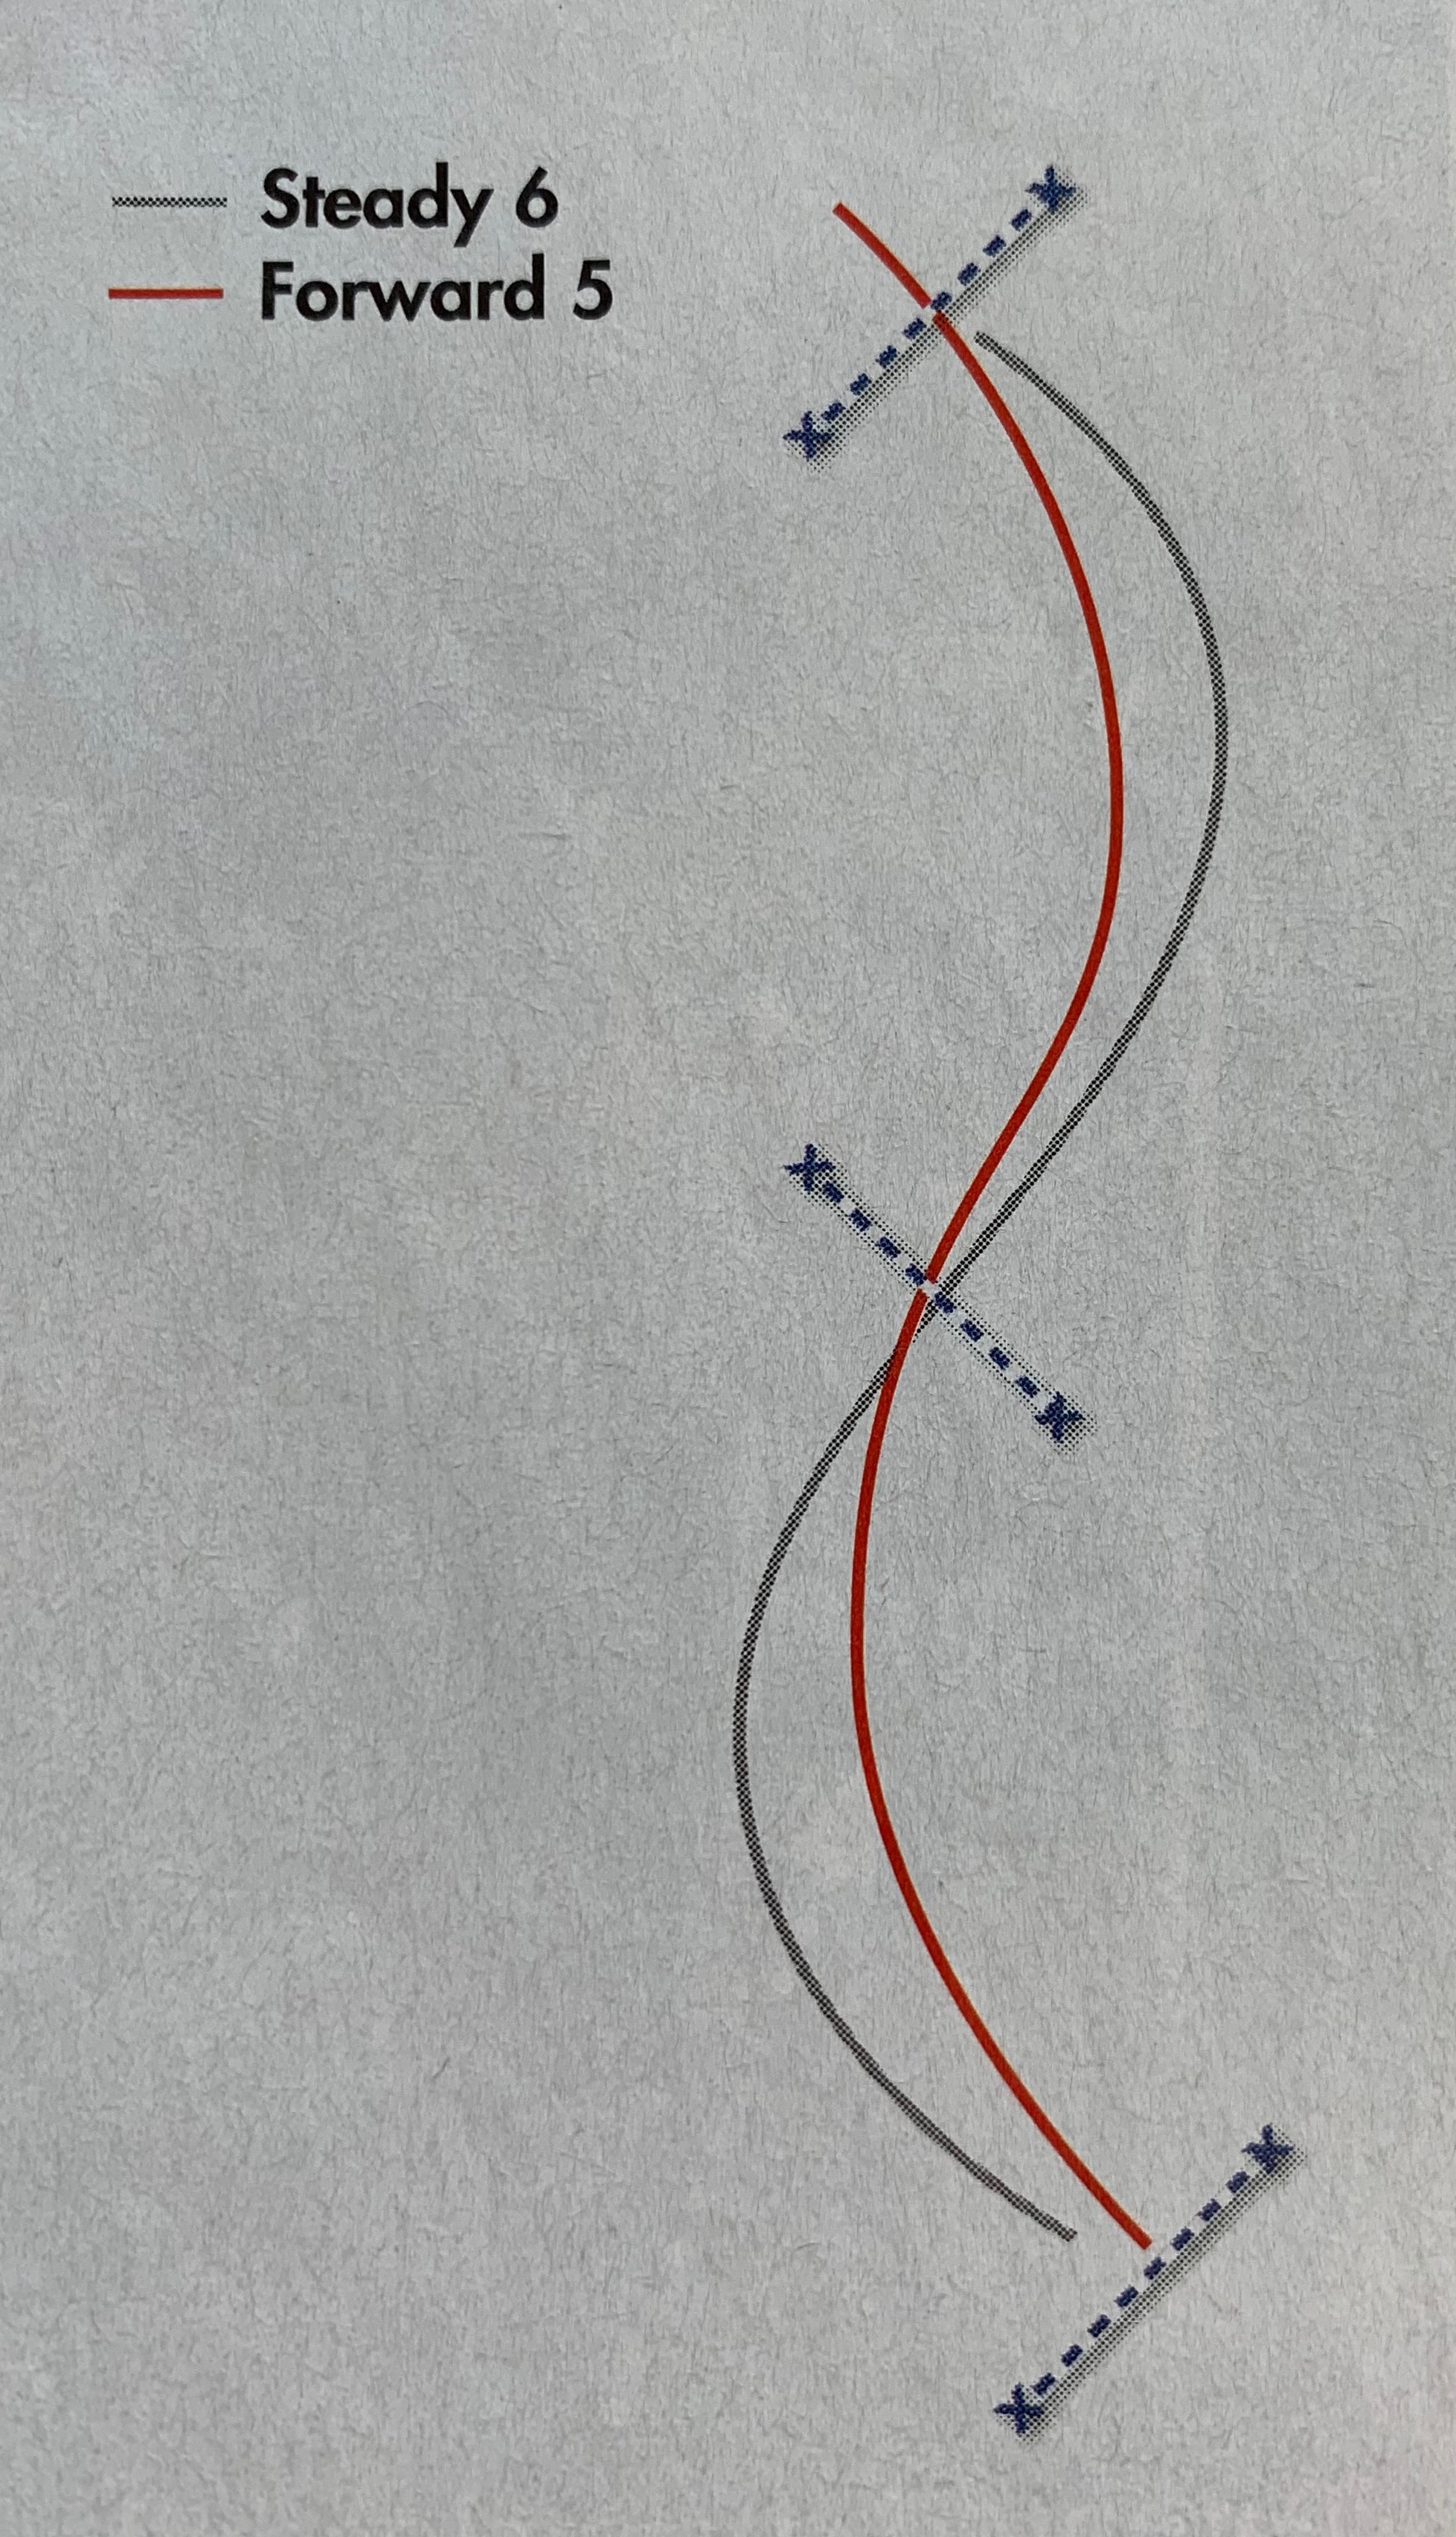
Setup: Arrange three verticals on a two-loop serpentine (see diagram below), measuring distances of five and one-half strides (78 feet) on curved lines ?between the centers of each jump. Set the jumps at the height you normally jump, with ground lines on both sides. As with Exercise 1, be sure there’s plenty of room to approach and exit all of the jumps from either direction.

Begin with the same organized, balanced canter you used in the five-stride version of Exercise 1, with your upper body tall and close to the vertical. Approach Fence 1 on the right lead, this time on a straight line. Be patient, allowing your horse to find a comfortably deep takeoff spot, so he lands in the same contained, balanced canter. Using both legs and reins, gently guide him to the right in the air while focusing your eyes on Fence 2. Ride your whole horse around the bend with both reins and legs, asking him to fit six, equal strides into the line. (If he had trouble fitting the five strides into the half-circle exercise, widen the curves of your lines again here, so he can fit in the six comfortably.)
As he takes off over Fence 2, look straight ahead down the diagonal track. Continue cantering well past Fence 3, before looking back over your left shoulder to make a rollback turn to it. (If he lands on the wrong lead, make a flying change before the turn.) Maintain the steady, balanced canter to another quiet takeoff in anticipation of the next six strides in the broken line to Fence 2. Turn your eyes to it as soon as possible to encourage him to land on his right lead. Ride the steady six strides just as you did the first broken line. If he doesn’t land on the right lead, don’t try to make a flying change in the middle of the line. Let him figure out that it’s more comfortable landing on the correct lead.
Over Fence 2, focus your eyes again on the diagonal track so you can land and canter straight away before gradually transitioning to halt or walk.
Repeat this “add” exercise a few times before increasing to a show-ring pace in the approach and asking for the more forward five strides in each distance. As with the “Hunter Four” striding in the half-circle exercise, you can ride slightly shallower turns, inside the tracks you rode for the six-stride lines, to make the forward distance easier.
When you’re comfortably riding both the added and regular distances in the above course, put the two broken lines together to ride from Fence 1 to 2 to 3 (or from Fence 3 to 2 to 1, which will ride exactly the same), first in six strides each, then in five. Again, use your eyes to focus on each new destination and pay as much attention to your track in the approaches to the jumps as you do after the landings.
Troubleshooting
When jumping either of these broken-line exercises, here’s how to correct the most common problems:
- The mistake: When riding the “add” striding, you get a long takeoff spot to the first fence. As a result, you have less control of your horse’s stride and direction on landing, so you have to scramble to recover in time to try to make the correct distance to the next jump.
The fix: Take plenty of time to arrive at the first jump in an organized, balanced canter and on the appropriate track. Then be patient, waiting for a quiet, relatively deep takeoff spot. This way, your horse will land balanced and organized, ready to fit in the striding to the next jump. - The mistake: Your horse drifts off the track toward the outside of the broken line, forcing you to overcorrect to get back to the center of the next fence. This changes the distance in the line, producing a long and/or awkward takeoff. Note: Because horses usually have a “good side” and a “bad side,” this may happen to you more frequently in one direction than in the other.
The fix: Set yourself up for the broken lines by having your horse’s body perpendicular to the jumps (or even slightly angled from the outside to the inside) as he goes over them. Be sure to use both legs and reins to hold his whole body on the chosen track. To correct a bulge to the outside, use stronger outside aids than inside aids. - The mistake: Your horse cuts to the inside of the track, arriving at the next jump at an angle and on an awkward distance.
The fix: Again, ride your whole horse around the turns, using both reins and legs. In this case, add a little extra inside leg pressure to push him out to the track.
About Peter Leone
Grand Prix jumper Peter Leone began riding at age 5 and went on to earn many Best Child Rider Awards at major horse shows before winning the World Cup Grand Prix of New York at age 18. Since then, he has represented the U.S. Equestrian Team at numerous international competitions, including the 1982 World Championships and the 1996 Olympics, in which his teams placed fourth and silver, respectively.
The middle of three brothers who rode as Team Leone, Peter polished his riding skills under the tutelage of such greats at Berlin de Némethy, Frank Chapot, George Morris and Michael Matz.
This article originally appeared in the October 2009 issue of Practical Horseman.


