In Part 1 of Michael Dowling’s article on how to practice an hourglass exercise, we learned the basics of the gymnastic. Now in Part 2, we’ll add more elements of this exercise to challenge Intermediate and Advanced riders.
Intermediate Riders
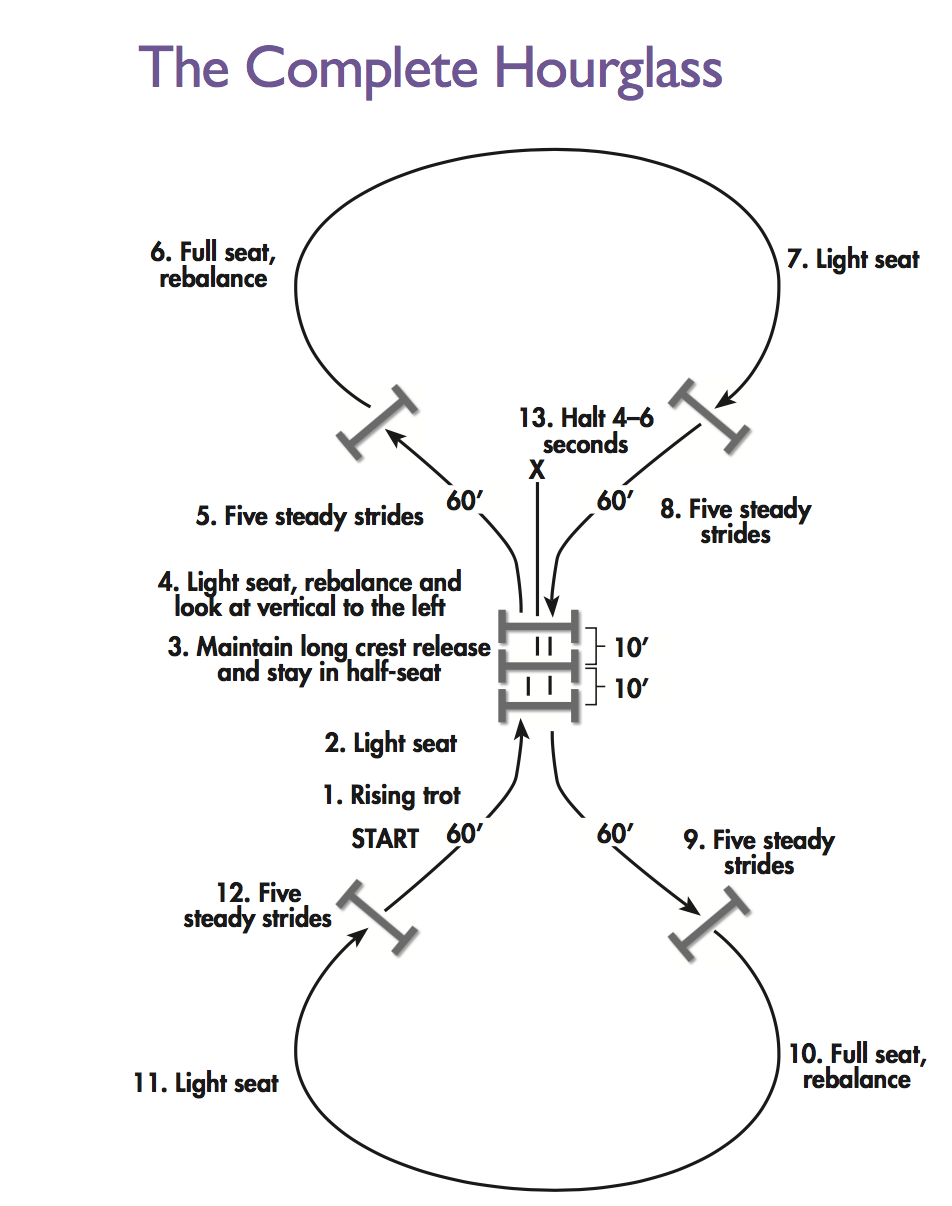
If you are an Intermediate rider, set up the entire hourglass exercise that you see in the diagram above, with the fences at about 2-foot-6. Then follow all of the steps previously outlined. The slightly larger jumps will make the lines ride steadier than they did for the Novice riders. This means you must be even stronger in your position with a clear understanding of the track you need to ride to produce five even steps. Your rein length will be more important, too, for achieving the necessary control throughout the exercise.
Your eyes will also be more critical, as the jumps will feel like they come up quickly. Always be focused one step ahead of where you are, looking for the next obstacle and planning your track to it.
When you’re competently riding through the bounces to the left vertical, around the turn to the other vertical and back over the bounces, instead of halting on the centerline, proceed on another five-stride left-hand bending line to the vertical on that diagonal. Then, just as you did on the other end of the ring, return to your full seat before the corner, reorganize and rebalance. Proceed in a steady rhythm around the turn, then come out of it in your light seat, aiming for the final vertical. Be patient in the approach to this jump, as you want to be ready to ask for yet another five quiet strides on the bending line back to the double bounces.
Again, your horse may want to pull a little as he heads into the bounces. Keep your eyes up to help your upper body stay tall. This, in turn, will improve your control of the pace. Remember to stay in your half-seat through both bounces. Then finish up with a nice straight halt on the centerline.
If at any point during the exercise you feel your horse losing his balance—getting too strong in the bridle or long and flat in his stride—execute a circle and reorganize. It’s very important that he is balanced and prepared before you go on to the next obstacle.
Once you feel capable of holding your position consistently throughout the exercise, play with the striding a little. Practice riding the third line (the next-to-last line) from the bounces to the vertical in a more direct four strides. Then ride the final (fourth) line in the steady five again. This is a test you’ll often see in Open equitation classes where judges want to see that you can reestablish the steadier canter after going forward.
You can also mix things up by reversing the direction now and then, following the bending line to the right from the double bounces to the right-hand vertical rather than aiming for the left-hand vertical. This would put you on track to make a left turn to the other vertical, followed by another bending line to the right back to the bounces. Just be sure to plan your track ahead of time and lift your upper body tall as you ride each line.
Open/Advanced Riders
If you’re an Open rider, you’ll enjoy all the benefits of this exercise that the Novice and Intermediate riders enjoyed plus a few more. With the jumps just a little bit higher—between about 2-foot-9 and 3-foot but no higher than that—the quiet five-stride lines will require even more core strength and track precision. At this level, rather than trotting into the double bounces, you can canter in. If you decide to do this, lengthen the distances between the bounce jumps by about a foot.
Just as the other riders did, work through the exercise progressively. Incorporate your more advanced skills wherever necessary. For example, after first trotting over the double bounces and halting, instead of making a wide circle back to them, make a neat turn on the haunches.
Depending on your comfort level, use either a shorter crest release (pressing your hands about one-third of the way up the horse’s neck) or automatic release (maintaining contact with the horse’s mouth in the air by following his head with your hands). Just be sure to apply it smoothly, always giving him the freedom to finish each jump.
Once you’re riding through the entire exercise comfortably, challenge yourself by riding some lines in four strides and some in five. And be precise about what lead you want your horse to land on so the lines ride even more smoothly. For example, over the third crossrail, use an opening/leading left rein to encourage him to land on the left lead for the bending line to the vertical. Over the vertical, use an opening right rein to ask for the right lead in preparation for the turn. Over the next vertical, use an opening/leading left rein again to land on the left lead for the bending line back to the bounces.
When you ride the direct four-stride line between the bounces and vertical, use a bearing rein to keep his body straight: After you land from the third crossrail, move your outside hand (in this case, your right hand) toward your horse’s neck, so that the rein presses against it. Be sure not to cross the withers with your hand. This bearing rein will help to keep him straight and prevent his shoulders from bulging out.
Similarly, use a bearing rein when you make the turns on the ends of the ring or when you throw in the occasional rollback turn. So, for example, when you make the right turn on the end of the ring between the two verticals, use a left bearing rein against the neck. Close your outside leg against your horse’s side at the same time. This will keep his body straighter and better balanced so you can ride the track even more accurately.
If you’re on an educated, experienced horse who tends to rush down the lines, ask him to compress his stride dramatically and ride an exaggerated bending track, producing six even strides. This will teach him to land and wait after the jumps.
You can also build the verticals into square oxers, being sure to keep ground lines on both sides so you can jump them safely in either direction.
Keep in mind as you ride through the exercise that your goal at this level is to have invisible aids. When you feel you’re accomplishing this, cross your stirrups over your horse’s withers and ride the exercise again. Focus on keeping your lower leg underneath your body—not slipping forward or backward—with your toes still slightly above your heels. Ride all of the same seats (light, half and full) in the same places that you did earlier. This is a great exercise to do when you’re prepping for Indoors, Finals, IHSA Nationals, etc. If your position is strong enough, you’ll still be able to pull it off with invisible aids.
This article was originally published in the December 2017 issue of Practical Horseman.