If you board or train at a facility like ours—Sonoma Valley Stables in Petaluma, California—you may have to share the arenas with as many as 50 horses being trained. We work with all levels of hunters, jumpers and equitation riders and their horses. It can be difficult setting up, adjusting, moving and tearing down jumps and courses to suit everyone’s needs.

One of our solutions is schooling over a small but versatile jumping grid made up of bending lines, straight tracks and set distances. The basic grid—a single cavalletti to a bending four to a vertical-oxer-vertical combination to another bending four over a cavalletti—teaches a multitude of jumping skills.
As a rider, you can focus on strengthening your position and developing or fine-tuning your aids because the grid removes a lot of the decision-making involved in single jumps and courses, such as finding distances. Once you find your distance to the first cavalletti, you can focus on balance, length of stride and track.
Your horse benefits in a number of ways, too:
- His jumping style improves because the distances within the grid help place his landing and takeoff an equal distance in front of and behind each jump, centering his jumping arc over the middle of the fence.
- As you concentrate on yourself, you interfere less with his balance, which allows him to jump in better form.
- By going both ways through the grid, he works both sides of his body equally, which helps to strengthen him behind and develop his balance. He also bends equally on both sides, maximizing the suppleness through his body.
- When you repeatedly jump the grid without allowing him to cut in or fall out on the track, you eliminate any tension he may have. It helps him navigate the grid relaxed in his neck and soft in his shoulder, sharpening his front end.
- By focusing on meeting and jumping the center of each element, you teach your horse to stay straight, helping to strengthen him—he has to push off evenly with both hind legs—producing a nicer jump.
After developing or fine-tuning these skills over the basic grid, you can tweak the grid to work over more challenging tracks, distances and heights. Even if you don’t board at a big multiuse facility, this grid is a useful training tool. A relaxed, balanced, supple horse performs better as a hunter or jumper or in equitation.
In this article, we’ll explain the grid in its most basic form and talk you through the exercise. Then we’ll give you modifications for intermediate and advanced use and explain how to adjust track, distance and height for equitation, hunter or jumpers. Note that less-experienced horses and riders may work over the basic grid for several sessions—even on and off throughout an entire season—learning to master these essential skills. More advanced horses and riders can move on to the intermediate and advanced exercises more quickly, but we don’t usually expect them to master these in one session. At our stable, horses and riders practice the different versions of the grid throughout the season if they need to brush up on particular skills.
The Basic Grid
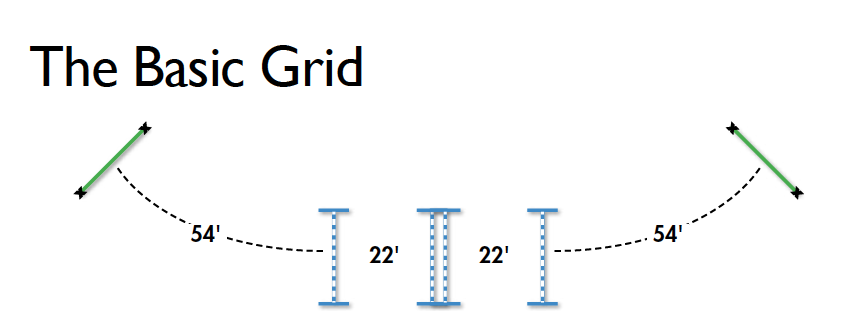
You need: Two cavalletti, two verticals, one square oxer.
Get set up: Following the diagram above, center a narrow, square oxer in your work area with verticals 22 feet in front of and behind it. Place a cavalletti 54 feet away from each vertical on symmetrical bending tracks that mirror one another. Begin with the verticals and oxer set at 2-foot-3 to 2-foot-6 and the cavalletti raised off the ground (traditional cavalletti with Xs on the ends work fine, although we like the commercially available Bloks on which we set rails at the 12-inch or 18-inch height). Depending on your skill and your horse’s level, lower the jumps or even use ground rails.
The exercise: You’ll canter the grid going both ways, the bending line to the vertical in a slightly collected four strides, then one stride to the oxer, one stride to the second vertical and another slightly collected bending four strides to the second cavalletti.
How it benefits your horse: In addition to the benefits described above, the bending lines will encourage him to land easily on either lead. He’ll also learn to relax his topline, stay square and even in his front legs, maintain an even poll-to-tail bend before and after the jump and keep the corners of his mouth soft and supple. These are desirable qualities in all jumping horses.
How it benefits you: You’ll strengthen and steady your position with weight in your heel, and you’ll focus on staying balanced in the middle of your horse. Your trainer or a knowledgeable friend can watch you go through the grid from behind to make sure you’re not twisting or leaning sideways. A good center of balance is imperative for a good jump, and leaning shows up easily with this exercise. You’ll also learn to use your eyes and shoulders to follow the track and to keep your horse’s speed consistent from beginning to end. Even if you’re an advanced rider, you can strengthen and stabilize your position by riding the grid without irons.
How to do it: Pick up a left-lead canter and jump in over the center of the raised cavalletti. As you leave the ground, shift your eyes and shoulders left toward the “in” vertical and open your left rein slightly to smoothly indicate the direction you want your horse to turn. Keep your weight in your heels and add a little outside right leg to encourage him to follow the 54-foot curved track in a slightly collected four strides to the middle of the first vertical.
As your horse leaves the ground, keep your legs down and around his body, and stay tall with your upper body. Do not lean down or let your body get ahead. Look straight ahead and ride the 22-foot one-stride, jump the oxer and ride the 22-foot one-stride to the second vertical. As you leave the ground over the second vertical and prepare for the slightly collected four-stride curved track to the raised cavalletti, do exactly what you did on the way in: opening left rein, weight in your heels, a bit of right leg.
If you’re relatively new to jumping, zero in on developing just one or two qualities at a time. Once those feel solid, focus on another skill until the entire line feels smooth and confident.


Troubleshooting tips:
- What if your horse cuts in and gets to the vertical too easily or bulges out and gets there long? The landing stride of the cavalletti is where he’ll generally begin, so set a drift rail about 2 feet to the inside of the curved track if he cuts in, or to the outside if he bulges. Remember to angle the rail to take the curved track into account. Drift rails should be set so that your horse is aware of them but cannot step on them.
- What if your horse gets nervous and quick, starts jumping past his arc and gets too far into the line so he gets to the next jump too soon? These distances are set to center his arc over each jump, so relax him by just taking your time and using half-halts and repetitions at the lowest heights. On the first stride after landing and as soon as your horse has had a chance to get all four feet on the ground, smoothly add leg and put a little additional pressure on his mouth to encourage him to rebalance, step under and take a lighter, shorter stride. If you stay calm and do this consistently, he will eventually learn to relax and jump the grid in stride.
When you can canter this basic grid off both leads repeatedly, with your horse relaxed and jumping through effortlessly, and you feel as if your position stays smoothly with him—neither getting ahead of or behind the motion—you’re ready to move on to …
The Intermediate Grid
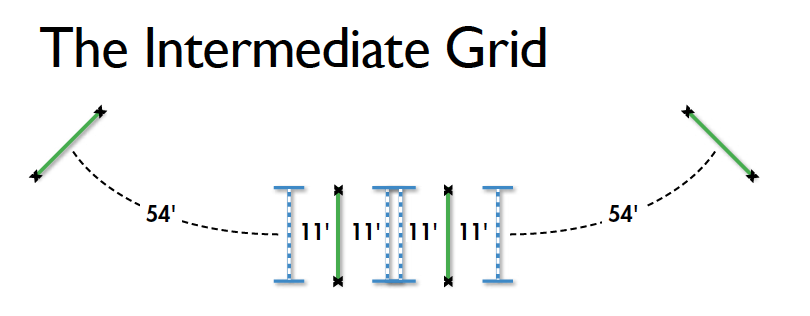
You need: In addition to the basic grid, two ground rails or preferably cavalletti. If you opt for ground rails, we’ve replaced a lot of wooden ground rails with ¾-inch PVC pipe because it’s inexpensive and safe (if a horse missteps on PVC, the pole breaks instead of his ankle).
Get set up: Following the diagram above, center a ground rail or cavalletti halfway between each vertical and the oxer—11 feet away in both directions. Begin with the jumps at the basic level of 2-foot-3 to 2-foot-6 and the cavalletti at 12 inches. Eventually, you can raise the verticals and the oxer to the height you’re jumping in the show ring, but it’s always a good rule to add elements first and only start thinking about increasing height later, when everything else is going well.
The exercise: Again, you’ll canter the grid in both directions—a cavalletti to a slightly collected, bending four-stride line in, four no-stride bounces, then a slightly collected four-stride bending line to a cavalletti out.
How it benefits your horse: The bounces encourage your horse to be quicker on his feet, and, by definitively placing his landing and takeoff an equal distance in front of and behind each jump, they keep the arc of his jump centered over the fences.
How it benefits you: The bounces make your horse work harder, but when he works harder, the chance that you’re going to get thrown around a little increases. This exercise encourages you to focus on maintaining your position and a consistent leg-to-hand connection throughout.
How to do it: Start cantering in on a slightly collected stride and jump the cavalletti. Remember that your horse should be jumping to you and your body and weight need to remain centered with your heels down—don’t jump down to his neck. Especially when you get to the bounces, remember that just because things come up quickly, there is no reason to get weak in your upper body and ahead of the motion. Keep your torso up and tall and allow your horse to jump up to it.
Make sure your legs stay down and around your horse—do not let them swing. Keep your release shorter by following your horse without overreleasing. This will make you a much more effective rider because it allows you to communicate with your horse smoothly in the air and much quicker on the landing stride.


Troubleshooting tip:
Are you having trouble holding a steady position and consistent contact when your horse shifts his weight back to the bounce? It’s likely that your lower legs are weak. Return to the basic grid, set the elements at less-than-show-ring height and do strengthening exercises, such as riding without irons, until you can successfully support your body throughout.
You are ready to move on when your horse is relaxed, positive and doing the exercise several times in a row off either lead and when you feel confident that you’re staying with his motion. There should be NO tension in either one of you when you’re ready to move on to …
The Advanced Grid
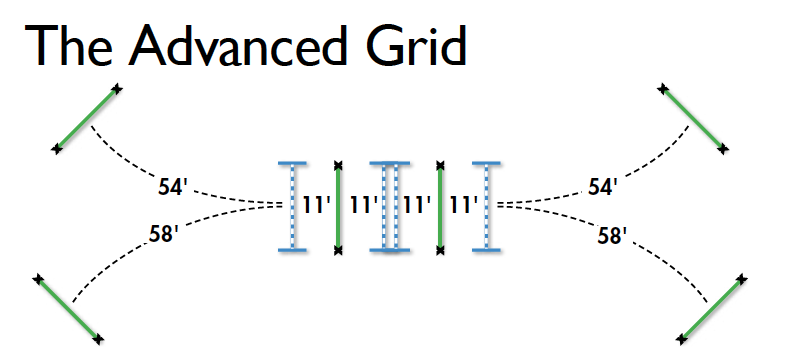
You need: In addition to the intermediate grid, two cavalletti.
Get set up: Following the diagram above, set the two additional cavalletti in front of and behind the grid on 58-foot bending lines so they mirror the initial bending lines. Set the jumps at 2-foot-9 or 3 feet and the cavalletti—even those between the jumps—at 2 feet. After you’re riding over the line smoothly, you can increase the height.
The exercise: So far, we’ve focused on straightness, position, balance and connection. Now we’re going to add longitudinal suppleness, adjustability of stride and the ability to change direction without sacrificing straightness or relaxation. You can still ride the exercise on a right or left bend, but for the most advanced version, you come off one lead and stride length and finish on the other lead and stride length—for example, the short right-bending four to the long left-bending four. Sound challenging? It is! But remember, you can still get a lot out of the exercise by lowering the jump heights and zeroing in on just one or two qualities at a time. Just be sure to maximize suppling, balancing and strengthening by doing the bending equally both ways. Every time you come in on a right bend and go out on a left bend, do a mirror image by coming in on a left bend and going out on a right bend.
How it benefits your horse: It helps him stay sharp—he has to look down and stretch his neck as he improves and strengthens his arc from start to finish. He has to push off hard and square behind to jump higher, and because by now he knows the exercise and is coming in relaxed in his neck and soft in his shoulder, he’s really improving his front end. It helps a jumper learn to smoothly adjust by riding the short to long bending lines, so he eventually knows how to approach and leave any jump on a collected or lengthened stride. And by building up the grid, you can challenge him to think on his own, “daring” him to hit a rail by adding leg on landing and, with light contact, getting to the base. Finally, the grid is a great tuneup for handy-hunter classes or hunter derbies where you’re asked to do more than just jump line, diagonal, line. It really gets your horse thinking and keeping his eyes on what’s ahead of him. The bounces set him up to build a good jump, and the tracks set him up to be adjustable and handy.
How it benefits you: It poses and answers some of the stickiest questions found in today’s courses. It will test your ability to adjust your horse’s stride without changing or losing your position. It will test whether you can change direction without losing your track or suppleness. It will test your mastery of pace and your ability to smoothly and seamlessly adjust it for your horse’s stride. This version of the grid refines all these skills. What’s more, because the grid helps your horse jump better and more relaxed, it helps you. After all, you have to have a well-balanced horse and jump to maintain a good position across the top of the fence.
How to do it: Canter in on a slightly collected stride, just as you did with the basic grid, and jump the cavalletti. Ride the bending line to the vertical, then make sure your horse is straight through the next three jumps. Your hips and shoulders should be square. Weight both heels equally, and take a soft feel of your horse’s mouth. Look ahead and let your eyes lead your horse in the direction you want to go. Great riders look and think ahead. Their horses start to understand what they are thinking and asking for early, which keeps the horses relaxed and responsive.


Troubleshooting tip:
Does your horse back off to the jumps? Use your leg off the ground over the bounces to encourage him to take an extra-good landing stride. If he takes you to the jumps and is a little quick off the ground, don’t try to back him off with your hand. Let the exercise and the bounces teach him to back himself off. One of the most common problems we see at this level in an equitation rider is that you get the first bending four done well by bowing out the track of the short four or cutting in on the track of the long four, but that just messes up the short or long four at the other end. Go back and really focus on riding the pace as well as the track—that is what’s going to get you to the other side in good order.
Continue to work over these grids to learn new skills or brush up or refine old ones. Target one or two skills you want to improve, solidify them over the grid, then move on to another skill. By the time you jump your next course, you’ll find that both you and your horse are ready to answer any questions asked of you.
About Ned and Hope Glynn
Ned and Hope Glynn own and operate Sonoma Valley Stables in Petaluma, California. Over the past 10 years, they have trained hundreds of local, regional and national champions and reserve champions in the hunter, equitation and jumper divisions. Their riders have won numerous local and regional medal finals. Their students compete in divisions ranging from Short Stirrup to national grands prix.
In 2012, Ned was chef d’équipe of an award-winning team at the Spruce Meadows Skyliner Tournament and was the trainer of the best horse in the 1.3-meter division. Hope rode Chances of Flurries to circuit championships in the High Performance Working Hunters at HITS Thermal in 2011 and 2012. She rode Woodstock to the U.S. Equestrian Federation National Championship in the Performance Hunters in 2011. She also finished in the top 25 in the 2011 $100,000 U.S. Hunter Jumper Association International Hunter Derby Finals and the Diamond Mills $500,000 Hunter Prix Finals. She recently was honored with the Arthur Hawkins Award of Excellence for her contributions to the industry of show hunters.
Also in 2012, Ned and Hope were inducted into the Sonoma Horse Council’s Hall of Fame for their contributions to the horse industry in their area. Hope and Ned sit on the USHJA Zone 10 hunter and jumper committees, respectively, and Hope is also a member of the USHJA Derby Task Force. They have a 7-year-old daughter, Avery, who competes in the Short Stirrup division.
This article was originally published in the October 2013 issue of Practical Horseman.