This rider’s crest release is her worst style flaw, with her hand much too high, floating above her horse’s neck. …”
“Again, we have an elementary rider using a release that’s too short and restrictive for her level of ability. …”
“Her release, all too common today, is an unattractive, nonfunctional mimicking of a true crest release.”
Sound familiar? I often repeat such phrases when critiquing photographs in “Jumping Clinic” because time and again I see riders using the wrong release—wrong for their ability level or wrong because it’s executed incorrectly.
The reason I emphasize correct releases as much as I do is not simply form or style but function and safety. At the least, an advanced rider with a faulty release may lose a class because she can’t turn quickly in a jumpoff. At worst, an inexperienced rider can risk her security and can hurt her horse when, lacking the support an appropriate release would give her, she grabs him in the mouth.
Moreover, a release executed correctly helps your horse balance himself. Watch a track runner over hurdles and you’ll see she uses her arms, moving them back and forth to help balance herself. Your horse needs to do the same sort of thing over his fences—but the way he balances himself is by stretching his head and neck. Your release must give him the freedom to jump without being hit in the mouth when he makes this balancing effort.
In addition to helping your horse’s balance, a correct release also helps your balance—first by giving you security (positioning you to stay with his motion and not fall back and supporting your upper body) and then, as you advance, by increasing your control over fences for such needs as tight turns or steady lines.
In this article, I describe the three classically correct releases: the long crest release, the short crest release and the automatic release. I’ll explain when to use each and how to execute it correctly. Then I’ll give a simple jumping exercise that will let you learn the release that’s appropriate for you without worrying about seeing a distance, so you can concentrate on the release’s feeling.
Two guidelines before I begin: First, I strongly suggest you practice any release at a standstill before jumping. Without the distractions of jumping and the worry of hurting your horse, you can concentrate better on where to place your hands and how that feels so you understand the release. Second: Never risk your safety and his by hurrying to advance from the most basic release, the long crest release, to the more difficult ones. Learning to hold correct body position and develop a following hand instinctively, which the long release will teach you and which is a must before moving on, takes time—years in some cases. I’d much prefer that you take whatever time you need to develop sound basics and not pressure yourself to advance before you’re ready, as so many riders do.
Now let’s take a look at each of those three releases in turn: who needs it, what it is, what it does and how to execute it.
The Long Crest Release
We’ll begin with the long crest release, which is mandatory if you’re a beginner: if you’re insecure in your position on the flat; if, over fences, your leg swings and you lean too far forward, losing your base of support; if you ever balance on your horse’s mouth; or if you find yourself getting left over jumps when he shifts even slightly.
The long crest release—which puts your hands halfway up your horse’s neck, on either side of the crest, with your body weight pressed into them—automatically increases your security and balance over a fence. It positions your upper body correctly (about 30 degrees in front of the vertical) to stay with his forward motion as you approach a fence: You can’t fall back in the saddle because you’re balanced forward; you can’t fall too far forward because you’re pressing your weight into his neck. Your horse benefits because he has complete freedom of his mouth—your hand position creates a loop in the reins and a broken line from the bit to your elbow. Even if you’re jostled and move your hand, you don’t risk hitting him in the mouth, so he can stretch his head and neck out, which helps him jump rounder and develop a bascule.
Beginners aren’t the only riders who might want to use a long crest release. I often use it, as do other advanced riders, when working green, flighty or unfamiliar horses whose actions I’m unsure of, to avoid falling back and hitting them in the mouth. A skilled hunter rider might also use this release to show a judge that her horse is balancing himself, rounding his back and lifting his knees evenly, instead of being hand-ridden.
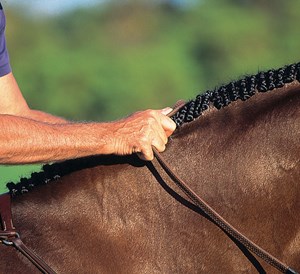
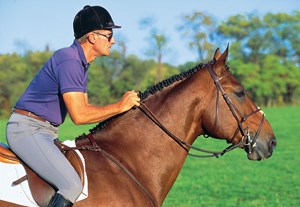
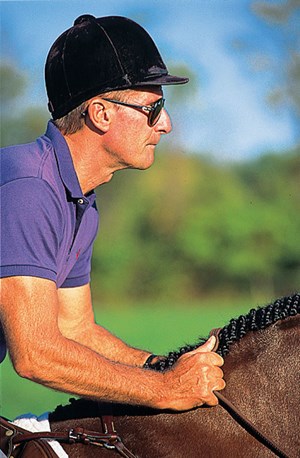
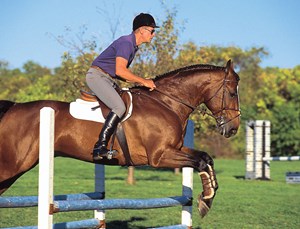
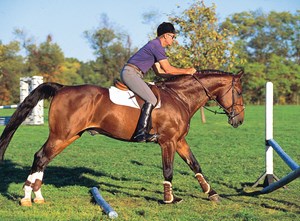
1. My hands are midway between Jump Street’s wither and poll on either side of his crest, just under the base of the mane, so that if I straightened my thumbs over the top of his crest, their tips would touch. For extra security (inset), I’m grasping two braids between my right thumb and index finger; if he was unbraided, I’d hold two fingerfuls of mane with each hand. Holding mane is mandatory for riders who lose their position, fall back or come off over fences. If your balance is secure, try jumping without holding mane; the top of your index finger will just skim the bottom of the braids.
My wrists are straight, my knuckles pointed toward my horse’s ears, my thumbs halfway between the vertical and horizontal. I’ve pressed the weight of my upper body into my knuckles and closed fist; there’s no air between my hands and his braids and neck. The broken line from his mouth to my elbow gives him freedom to stretch forward.
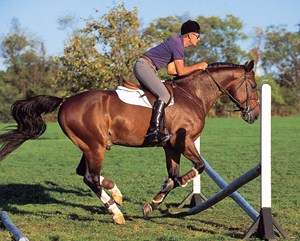
My halfway-up-the-neck hand automatically closes my hip angle about 30 degrees, which helps keep me with Jump Street’s forward motion. Now his jumping thrust pushes my seat out of the saddle and closes the angle more—about 45 degrees. My heels are down, my ankles are flexed and my toes are out about 45 degrees, which puts my lower leg on him. My leg has slipped back, putting my base of support too far forward, but those faults haven’t made me out of balance. My eyes are up, looking ahead. My lower back is firm and flat and I’m sitting up toward the pommel, not on my buttocks.
Now let’s look at some common faults associated with this release.
2. This is a floating hand. My hands are above the crest, not resting on it and not supporting my body weight. If I lost my balance, this release—without those supporting hands—wouldn’t stop me from falling back and hitting Jump Street in the mouth.
3. This is a subtle floating hand: My hands are close to the crest, but they aren’t pressed into it. Hands even this small distance above the neck defeat the purpose of a crest release.
The Short Crest Release
If you can maintain your position in a long crest release without holding mane and you have a secure leg that doesn’t swing, but you still need a little support, you’re what I call an intermediate rider—and the short crest release is for you.
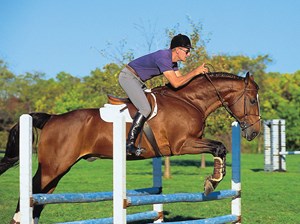
As you might guess from the name, the short crest release differs from the long in hand placement: You move your hands only about a quarter of the way up from the withers, place them on either side of the crest and press your body weight into them. This release does not put your body in the correct position to stay with your horse’s forward motion. That’s why you don’t want to attempt it until your base of support—legs and seat—is secure enough to keep you in balance. It also creates only a slight slack in the reins; the line from his mouth to your elbow is almost straight. That gives you more control over him—control you’ll want if you need to steady in a tight line or lift his head up if he’s bucking. But it also puts you more at risk of hitting him in the mouth if your balance isn’t secure.
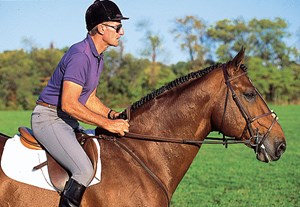
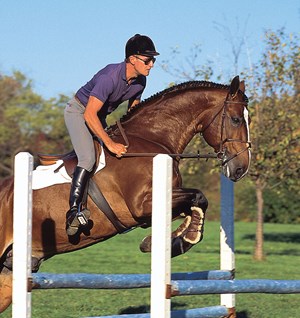
1. I’ve placed my hands a quarter of the way up Jump Street’s neck from his withers and (inset) the same distance from the mane as in the long release. I’m not holding mane because I’m secure in my position, but if I was just learning this release, unsure of my distance or jostled by my horse, I would hold mane with my thumb and index finger. My wrists are straight and my thumbs are halfway between the vertical and horizontal. I’m pressing my weight into my knuckles and closed fist.
The slight broken line from Jump Street’s mouth to my elbow gives me more control because I have to move my hand only a few inches to feel his mouth. But my hand position here won’t automatically make my body follow his motion the way it did in the long crest release, so before the fence I shift my weight slightly forward. I’m letting the thrust of his jump push my seat out of the saddle and close my hip angle. My leg has slipped back and my base of support is too forward, but because I’m pressing my weight into my hand and I’m balanced, I’m not in danger of falling off.
Let’s look at some common faults associated with this release.
2. I’ve set my hands on my horse’s withers and not moved them forward at all. Jump Street can’t stretch out his head and neck without hitting the bit; to save himself, he stiffens and jumps flat and hollow. I’ve compounded the error, as many beginners do, by following his mouth with my body instead of my hands. My seat and thighs are out of the saddle, my legs have swung back, my knees are acting as a pivot and I’m ducking slightly to the left. If he stopped, I’d probably fall off. If I see this fault when I’m judging, I mark it severely because of its serious consequences.
The Automatic Release
This is also known as the “following release.” Don’t even think of using an automatic release until you’re what I call an advanced rider—you rarely miss distances, you’re very secure in your position with a tight leg, you never grab your horse in the mouth, you stay seated even if he trips or stumbles and you’re balanced enough to follow his mouth with your hand when he moves his head and neck forward.
For the automatic release, at a stand-still, begin with your hands about 2 inches in front of your horse’s withers but also about 2 inches farther down the sides of his neck than they were in the short crest release and off his neck about an inch. You never want a pulling feel with this release; as he stretches his head and neck forward, you follow with your hand so that the straight bit-to-elbow line stays constant. As with the short crest release, your hand position with the automatic release won’t cause your body to follow his motion automatically, so your position must be strong and secure to follow it.
This release is particularly appropriate for the steady lines and tight turns that are usually part of an advanced-level course or jumpoff because it gives you maximum control. The straight line from the bit to your elbow lets you feel your horse’s mouth just by moving your hands a fraction.
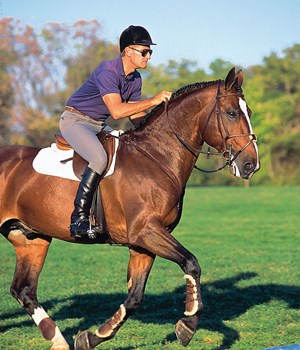
1. My hand position for the automatic release (inset)—about 2 inches in front of Jump Street’s withers, but also about 2 inches farther down the sides of his neck than in the short crest release and about an inch off his neck—creates a straight line from his mouth to my elbow, which gives me instant contact if needed. As I shift my weight slightly forward before the fence and let his thrust push me out of the saddle into a two-point jumping position, I follow his mouth with my hands—but here you can see I have a slight feel because Jump Street (an amateur-owner jumper who’s started getting impatient with the small fences we’re jumping in these photos) has hurried to the fence.
Now for the automatic release’s common faults:
2. I’ve lowered my hand 3 inches too much and created a broken line below the mouth. My arm is stiff and I’m pulling down on Jump Street’s mouth, which will make him uncomfortable enough that he won’t want to use his head or neck. This mistake also risks my balance by putting me too far forward.
Practice Your Release
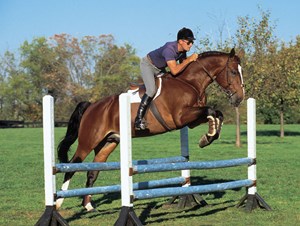
Here’s a simple exercise you can use to practice any release. Build a crossrail that’s 2 feet high in the center. Place a ground rail 9 feet in front of it. Then at the posting trot, trot the ground rail to the crossrail as shown below in Photo 2. Move your hands into your release position just before you cross the ground rail, continue posting to the crossrail and hold your release until two strides after the fence.
The ground rail helps you develop timing and a reliable feel for the release; the posting-trot approach and low fence make you comfortable focusing all your attention on holding the release from the time you go over the rail and jump the fence to when you canter away. (I’m demonstrating the long crest release here, but the exercise works equally well with the short crest release and the automatic release.)
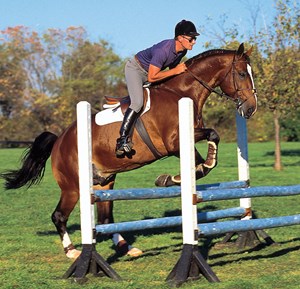
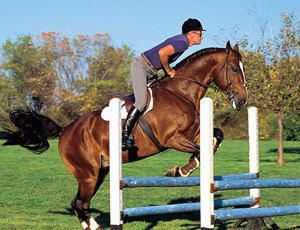
1. I trot until my horse’s takeoff pushes me out of the saddle. Two strides in front of the ground rail shown in Photo 2, I’ve slid my hands into a long crest release: midway between withers and poll and on either side of the crest; I’m holding two braids for added security. My wrists are straight and my thumbs are between the vertical and horizontal. The weight of my upper body is pressed evenly, through my knuckles and closed fist, into my horse’s braids and neck. Moving my hands up has closed my hip angle to about 30 degrees in front of the vertical, which keeps me with his forward motion.
2. Over the ground rail, I hold the long release at the posting trot. The slight loop in the reins lets Jump Street stretch his head and neck forward. My release has already put me with his motion, so there’s less risk of my getting left, jumping ahead or ducking. My heels are down, ankles flexed, toes out and lower legs in contact with him near the girth.
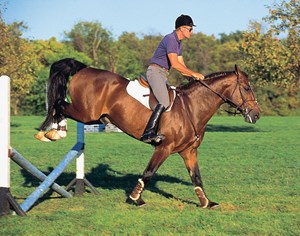
3. The thrust of the jump has pushed my seat out of the saddle and closed my hip angle to about 45 degrees in front of the vertical. I’m in a two-point jumping position—only my two legs are touching the saddle—and I continue pressing the weight of my body into my hands.
4. My hands are still in the long crest release as I land, and I’m still holding mane to make sure I don’t fall back. I’m sinking into the front of my seat bones and my heels, with my knees and ankles acting as shock absorbers. As my horse canters away from the jump, I’ll stay in my two-point and hold my release for two strides.
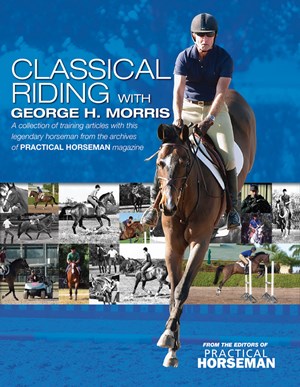
A world-renowned hunter and jumper instructor, George H. Morris is considered to be one of the most influential trainers in the history of equestrian sports. In addition to riding on eight winning Nations Cup teams between 1958 and 1960 and earning the show-jumping team silver medal on Sinjon at the 1960 Rome Olympics, George won the prestigious 1960 Grand Prix of Aachen in Germany on Night Owl. He went on to win the biggest purse in show-jumping history at that time at Spruce Meadows in Canada on Rio in 1988.
His former students are among many of today’s most successful riders and include Leslie Burr Howard, Katie Monahan Prudent, Norman Dello Joio, Conrad Homfeld, Melanie Smith Taylor, Anne Kursinski, Lisa Jacquin and Chis Kappler.
His coaching duties include serving as co-chef d’équipe of the U.S. silver-medal show-jumping team at the 1996 Atlanta Olympics and the U.S. team at the 2000 Sydney Olympics. He also was chef d’équipe of the U.S. team that earned team gold and individual bronze at the 2008 Olympics in Hong Kong.
His teaching philosophy has reached thousands of riders throughout the world in books he has authored: Hunter Seat Equitation, George H. Morris Teaches Beginners to Ride and The American Jumping Style.
George serves on the U.S. Equestrian Federation National Jumper Committee and Planning Committee, is an adviser to the USEF High-Performance Show-Jumping Committee and is president of the Show Jumping Hall of Fame. He resides in Wellington, Florida, and gives clinics throughout the world.