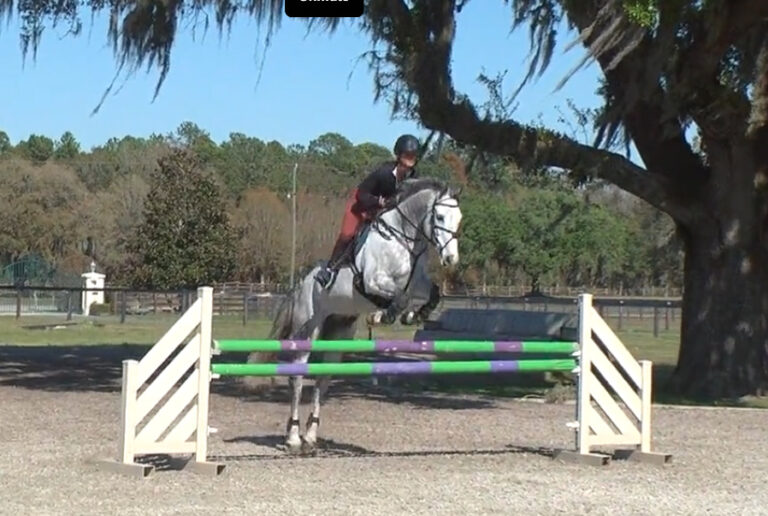
When I was a younger rider in the jumper ring, I felt like I saw every distance perfectly, but I still could have eight faults. I’d watch other riders’ rounds, and sometimes their distances were too long or too deep, but they were jumping clear rounds. The reason was because they created a good canter, giving their horses a chance to gauge the jumps. I think that the biggest myth in the American system is the need to find perfect distances. At an early age, we become so fixated on finding the perfect “x” on the ground to take off from that we’re willing to throw the canter out the window just to get to it. That is not the best chance for success.

If you watch top riders on course, they are in charge of the canter. They start with a canter that has good balance and impulsion—the energy harnessed within the gait—and keep it to the first fence. When they jump a line that requires them to open up the horses’ stride, after it, they immediately collect to return to that base canter. When they jump a line where the striding requires them to collect the horses’ stride, after it, they immediately move the horse up to get back to the base canter.
On the opposite end of the spectrum, I see rounds that become erratic because riders lose track of the canter in search of the distances. The riders might ride a line that is very forward and after it, instead of going back to the base canter, they overcollect the horse. Similarly, if the rider gets too slow, then suddenly shoots the horse forward to find a long distance, the base canter disappears. This pendulum effect makes the horse focus on the rider instead of the jump in front of him.
To jump a course, the horse needs to maintain a canter with good balance and impulsion so he can rock back onto his hind end and jump. A horse with good impulsion is active and moving forward. He feels like he is driving with his hind legs and he looks like he’s practically cantering uphill or as if he’s going to do a wheelie.
Less-experienced riders often wrongly equate speed with impulsion. Just because a horse is galloping in a straight line doesn’t mean he has impulsion. If you’ve ever been on a boat, you know that when the engine in the back of the boat engages, the back of the boat drops into the water and you see and feel the bow rise up. That’s the feeling I want a rider to create in any gait they’re in—whether it’s walk or trot and especially at the canter and when jumping.
To develop that feeling to jump a course, you need to
- learn how to create a good base canter,
- understand how that canter relates to the lines on the course, and
- know how to get back to it.
Once you have mastered these steps, you will have a greater chance for a better jumping round. I’m going to show you how to achieve that in this article.
Teaching Impulsion
Every time you get on a horse, you need to establish the impulsion for the day. Your horse should be in front of your leg, working properly and with good, active energy in his gaits. The first step is to put on your leg and ask him to step up underneath you with his hind legs. Once he is in front of your leg, ask him to accept your hand by taking a feel of his mouth. Once you feel that he’s softened slightly, then give back by relaxing the amount of contact. Through the process of taking and giving, look to elongate the horse through his topline, from the back of his tail all the way to the tip of his nose. But don’t fixate on his frame—all horses go in different versions of a frame and it’s secondary to the way the horse is working from his hind end forward. Always remember when applying your aids: ask, then give the horse a chance to respond. If he does not respond, then apply more pressure the next time you ask.
When your horse is moving forward, you can begin to ride transitions to improve his impulsion. Remember, whether you are asking a horse to go forward in a gait or to collect, always think about applying your aids in this order: leg, then seat, then hand. This is important on course. Imagine that you land from a jump and need to fit a big stride into a steady distance to the next jump. If you pull only on the reins, the horse is going to lean on your hands and his ability to rock back when he gets to the jump will be drastically lower. Instead, you want to put on your leg to engage his step, then use your hand to take and give to collect him. This allows him to sit on his hind end and shorten his stride, so when he gets to a tall vertical or big oxer, he will be able to rock back and push off to jump the fence well.
Exercise 1: Figure-Eight on the Flat
My favorite flatwork exercise to teach impulsion and understand how to create a good canter is a figure-eight exercise using the whole ring. This exercise is a great way to mimic what you need to feel on course. You will practice coming forward through a turn and onto the diagonal and then collect on the diagonal so the horse is like a spring and can rock back on his hind end. This is the same feeling you want when you are going to a jump. You can do this exercise in all three gaits and in different variations.
After warming up your horse, start in the posting trot. As you come to the short end of the ring, your horse should be in front of your leg and moving forward. Turn onto the diagonal and make sure he is really straight and forward by using both legs to drive him evenly up in front of you for a few strides. Then transition into the sitting trot, trying to keep the impulsion you created through the turn when you were posting so that you can harness your horse’s energy and bring him back onto his hind end. When collecting, always think, apply leg first, keep your seat soft, tighten your core and then to complement those aids, take just a little bit of a feel with your hand—then always give back. Your seat is an aid to provide relaxation and balance to the horse. It should not be used as a driving aid—that is the job of the rider’s legs.
Once you are at least halfway across the diagonal, transition into the walk, using the aids in the order described above. Even though your horse is slowing, he is still engaging his hind end, stepping forward underneath himself and rocking back. You always want to make sure to go at least halfway across the diagonal before making the downward transition to walk because you want to be sure your horse is going forward in the same way he would come off a turn and go to a jump.
After your horse is consistently coming back to the walk, vary this exercise so he doesn’t anticipate the next move—he should be thinking about your aids and stay with you, not a step ahead of you. For example, from the walk, you could transition to the halt, back him a few steps and then immediately trot forward into the short end of the ring and then across the next diagonal and repeat.
To do this exercise in the canter, come forward through the turn and onto the diagonal for a few strides and then ask your horse to collect like you did when you transitioned to sitting trot. You can keep your horse on the counter lead or ask for a transition to walk or trot for a simple change or halt and back up before moving forward again. If you are doing the exercise correctly, your horse should come forward and then collect and rock back on the end hind, which also sets him up nicely for a flying lead change. I usually ride a flying change only at the end of this exercise as a reward. If this exercise is overused to do flying lead changes, it can make the horse too lead-change happy.
In all gaits, I prefer to collect horses on a straight line at first, which is I why I collect the horse on the diagonal in this exercise. I don’t want the horse to confuse lateral movements with collection. If you are going to a fence and need to fit in a distance, the horse shouldn’t first think he can move his body to the left or right to accomplish that.


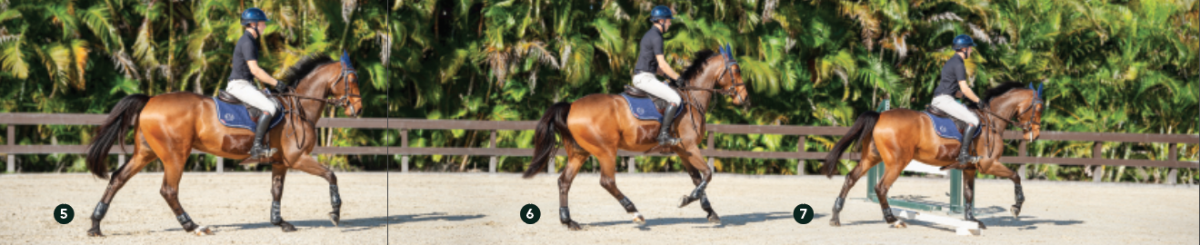
Exercise 2: Vary His Stride Over Poles
Riding over three ground poles set on a straight line is a great starting point for feeling your horse’s impulsion and finding your base canter prior to jumping. I like using ground poles to help get a feel for the concepts without putting unnecessary pounding on the horse’s legs. A lot of times, you will need to repeat the exercise quite a bit to learn to do it correctly.

This exercise will give you a feeling for the length of the horse’s canter stride. Your goal should be to set the length of the stride well before you turn to the line of poles, not after you canter over the first one. If you have a good canter, the adjustment for the distance to the pole should be minimal.
To set up the exercise, place three ground poles in a row, with 54 feet between each pole. Start by creating a good base canter with your horse up in front of you. Once that’s established, come around the turn and head for the line of poles. Just like in the figure-eight exercise, make sure you keep the horse in front of your leg through the turn. Canter the first pole and ride five strides to the second pole and then five strides again to the third pole. This would be considered “adding” a stride. Circle at the end of the arena, and then canter down the line from the other end. Be sure to practice the exercise on both leads. Once you feel like you can consistently ride five strides between the poles well, repeat the exercise, but this time do it in four strides. When riding four strides to four strides and five strides to five strides, you want to try to have the individual strides be even in length. There shouldn’t be a dramatic change in the way you’re riding the poles. Simply apply more leg to ask you horse to lengthen the base canter. Your goal should be able to lengthen the canter while still maintaining the proper balance and impulsion in your horse’s canter.
Once you can ride four strides and four strides well, ride four strides between the first and second poles and then five strides between the second and third poles. This is the more advanced version of the exercise. The horse needs to lengthen his stride to make up the ground in four strides, and then, after he canters the second pole, he has to step up underneath you and collect to fit in the five strides. Try to get close to the second pole in the four-stride so that your horse is already beginning to compress his stride to fit in five strides between the second and third poles. When collecting, you should feel like you could canter down to the poles and they could be 1.60-meter fences and you’d be able to clear them successfully out of the canter that you have, not that you just fit in an extra stride at the last second. Once that feels routine, ride five strides between the first and second poles and then four between the second and third.

Exercise 3: Add Bending Lines
This exercise is great to practice collecting the canter and then returning to a base canter. It encourages you to go forward down the first part of a line and then collect to finish it. You then ride a half turn to reverse and, in a short period of time, re-establish your base canter needed to enter the line from the opposite direction on the forward rhythm that you started with.
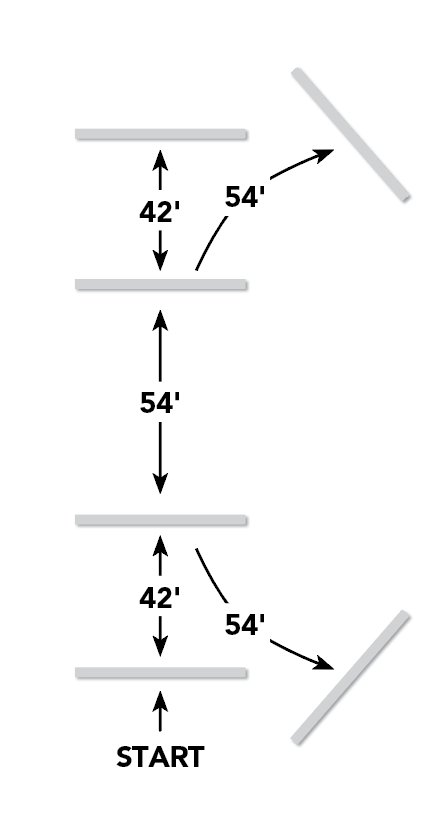
To set up this exercise, study the diagram above. Place four ground poles in a straight line in the center of your ring. There should be 42 feet between the first and second poles, 54 feet between the second and third and 42 feet between the third and fourth poles. Then, set two bending lines 54 feet from the two middle poles in opposite directions on the same long side of the arena.
Begin by cantering down the straight line of three poles in a base canter that has a collected stride, riding four strides from the first to second pole, five strides from the second to third pole and finally, five strides to the pole on the bending line. I call this the “add,” because your horse will be on a collected stride throughout the line. At the end of the arena, make sure you return to the base canter that you started with, look back at the exercise, ride a half turn and canter the straight line from the opposite direction.
The idea is to continuously ride the exercise twice in both directions, alternating the direction. Then you can give your horse a walk break and a chance for both of you to absorb the information. I love this exercise because its includes a right bend, left bend and the ability to lengthen or shorten on both bending and straight lines and you must return to the base canter before repeating the exercise. This exercise is similar to Exercise 2 in its execution, but it adds layers of complexity. Once your horse is consistently cantering over the poles, try riding three strides from the first to second pole, four strides from the second to third pole and four strides to the bending line. I call this the “forward” stride. At the end of the bending line, bring your horse back to the base canter ride a half circle and repeat the exercise in the opposite direction. After that, repeat the exercise once more in each direction.


Apply the Exercises to Jumping
A jump is just an interruption in your flatwork. The hard part is trusting that it’s the same concept as ground poles.
I like to build courses that ask the rider to lengthen, shorten and turn, all the while resetting the canter back to the base between fences. The goal of the course is to apply the work you did in Exercises 1–3 and gauge how much progress has been made and what still needs work. Just as you did in the previous exercises, focus on creating your base canter. It should be as simple as letting the jumps come to you out of the canter instead of looking for the perfect takeoff distance. When you let the horse size up the jump on a consistent canter, more times than not, he will show you the takeoff spot.
Sidebar: Developing Feel
Feel is the complement of leg, seat and hand aids that a rider develops over time. There’s no perfect percentage of leg, seat or hand—it’s situational. Using the aids in that order in differing amounts and with correct timing will develop with time. It is helpful to work with a professional to hone in on this skill, but it’s something you need to be conscious of. You never want to feel like the horse is ignoring your aids. Put on your leg and give your horse a chance to react to it. If he doesn’t and you need to increase your leg, then go back and do that again.
It’s the same thing with your hands. If you try to just lock on a strong horse and pull, the horse is always going to win. I enjoy watching petite riders like Meredith Michaels Beerbaum, Margie Engle and Beezie Madden ride their massive horses. They are in complete control not because of their brute strength but because of their tact. Instead of grabbing onto a strong horse and trying to wrestle him back, you’re better off to give and take 10 times in a smaller way than you are to try to get them back in one dramatic pull.
About Andrew Welles
Originally from Minneapolis, Minnesota, Andrew Welles developed his passion for horses at a young age. He grew up in the sport, training under equitation and show-jumping professional Missy Clark and Olympic gold medalist Chris Kappler. He made his first Nations Cup appearances in 2009, representing the United States in Linz, Austria, and Lisbon, Portugal. He represented the U.S. at the 2018 Spruce Meadows Masters CSIO*****, and the 2019 FEI Jumping Nations Cup™ Canada held in Langley, British Columbia. More recently, he finished second in the Longines FEI Jumping World Cup™ Washington with Primo Troy, a 10-year-old Irish-bred Irish Sport Horse gelding owned by the Itasca Group, LLC, and won the $37,000 CaptiveOne Advisors 1.45m Classic CSI** with Brindis Bogibo, a 14-year-old Dutch Warmblood gelding owned by the Itasca Group LLC.
Based at Team Welles in Wellington, Florida, and Mettawa, Illinois, Welles trains horses and riders in show jumping through the highest levels.
This article originally appeared in the Spring 2020 issue of Practical Horseman.