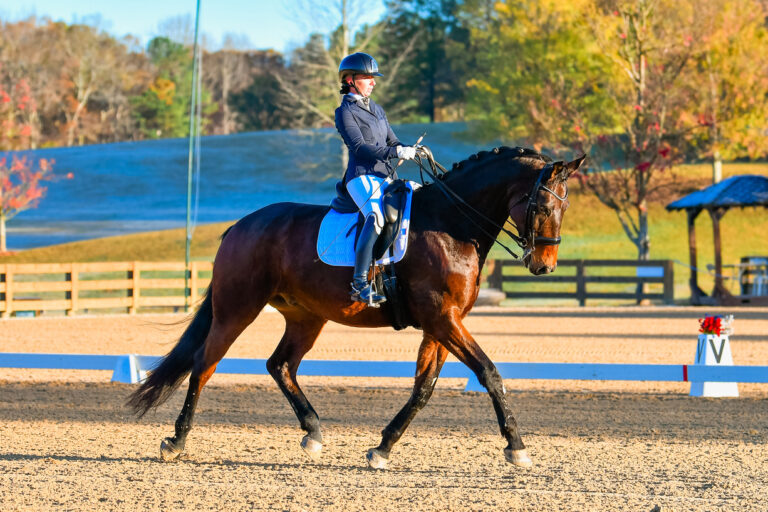

My number-one priority is always the horse. I’m constantly seeking new ways to extend my mounts’ careers without making them mentally or physically sour. I avoid overdrilling them not just to prevent unnecessary stress on their legs but also because I want them to look forward to their work with the freshest, happiest attitudes possible. I accompany my husband, Steve Engle, DVM, to veterinary conferences to keep up to date on the latest science and strategies for strengthening and conditioning horses while also reducing their risk of injury as much as possible. I also pay attention to methods that trainers use in other disciplines. Here are some of the most important lessons I’ve learned:
1. Minimize the pounding. Over time, concussion may lead to injuries in horses’ feet, joints, tendons and ligaments. The bigger the jumps, the greater the concussion. So small jumps are best for schooling sessions.
2. Avoid excessive repetition. Just as repetitive motions can cause tendonitis in humans, they can lead to muscle fatigue in horses, which, in turn, causes physical structures to break down. This can be challenging in sports like jumping, where a certain amount of practice is necessary for both horses and riders to develop and refine their skills. If you don’t practice at all, you and your horse may not have the required strength and timing to perform to the best of your abilities without risking injuries. So it’s a fine line. Some practice is a must, but change things up before your horse gets sore or bored.
3. Target the entire body. Focusing too much on one body part eventually leads to compensation. For example, if you constantly ask your horse to land on one particular lead, his muscles on one side of his body may fatigue. To compensate, he’ll try to shift the load over to the other side of his body. This is how many lamenesses develop. The stronger your horse’s entire body is, the less risk he’ll have of getting injured. So choose exercises that work both sides of his body equally and also strengthen his stomach, back, neck, etc.
4. Use interval training and cross-training. Event riders are especially good at interval training. They know how to bring their horses’ heart rates up, maintain the intensity for several moments, then ease off to bring the rates back down again. Gradually increasing the number of these interval “sets” improves overall strength and fitness.
I also incorporate the gallop into my jumpers’ routine programs not just to improve their adjustability and get them comfortable at the gait but also to expand their lungs.
Dressage is excellent cross-training and a great way to improve rideability and responsiveness. All horses should be taught basic dressage. If you are able to progress to a more advanced level, the gradual incorporation of collection into your jumper’s routine will strengthen different muscles from the ones he is accustomed to using. When Olympic dressage rider Lisa Wilcox rides my horses, it’s like sending them to the gym: She makes them use their hind ends in brief repetitive sets, asking them to do the equine equivalent of human squats.
5. Work on different surfaces. Riding your horse on a variety of terrain—sand ring, grass ring, trails, hills and even firm surfaces—strengthens different structures in his body and gets him comfortable performing on diverse types of footing. It’s great for his mental health, too.
6. Repeat exercises in both directions whenever possible. Horses’ brains don’t work exactly like ours do. When you perform an exercise and then approach it from the reverse direction, for them it’s like seeing it for the first time. You’ll always get the most out of a lesson if you can do it both ways.
I design my schooling sessions with all of these principles in mind. Below are three of the exercises I use to keep my horses’ programs fresh and effective.
Exercise 1: Football Grid

This exercise reminds me of the tires that football players run through to improve their agility and coordination. It strengthens a horse’s topline, engages his hind end, increases the suspension in his gaits, teaches him to regulate his pace and gives him a better awareness of where his feet are. At the same time, it improves straightness as well as the rider’s leg-to-hand connection with the horse.
To set up the grid, you can use any equipment that enables you to raise a cavalletti on just one side. I have boxes that I can roll over to create different heights (6 inches, 8 inches, 10 inches and 12 inches). Jump standards would work, too, if yours have holes that go as low as about 6 inches. Place three or four poles about 3 to 3½ feet apart—up to 4 feet apart for bigger horses—with a block or standard next to each pole.
For the first few passes through the grid, set both ends of each pole on the ground so they’re just normal trot poles. Approach them in an active, collected sitting trot. (Sitting trot is ideal because it provides the most control over your horse’s rhythm and impulsion and gives you the best feel of what he is doing underneath you. But rising trot is fine, too, if you’re not comfortable sitting the trot yet.) Wrap your legs down around your horse’s sides so you can feel his hind end and back working. Think of pushing his hind legs forward while creating more suspension in his steps, asking him to march up to the poles.
Trot straight through the center of the poles, then change direction, make a loop and ride back through them the other way. Change direction again, this time turning the opposite way after the poles (if you made the previous loop to the left, make this one to the right), so you end up riding a sort-of figure-eight pattern over them. Focus on riding a very accurate track: straight in the approach, over the poles and afterward, then making nice bending turns. Use the ends of the ring to maximize your straightness in each approach to the exercise.
If your horse is nervous or tries to rush through the poles, bring him down to the walk, remove a pole or two (from the beginning and/or end of the series so the remaining poles are still 3 to 3½ feet apart) and walk over the remaining poles very slowly and deliberately. This will teach him to step in between the poles. When he’s doing that well, go back to trot and approach the poles in a very quiet, controlled manner. After several successful repetitions, add the other pole(s) back in.
Once he is comfortable with the ground poles, raise the alternating ends of each pole so that one end rests on the ground and the other end is raised by the block or standard, set at its lowest height. For example, raise the first pole on the right side, the second on the left, and so on. Approach the grid in the same way, in your sitting trot if possible. Stay connected with your legs and hands so your horse understands he’s still supposed to step over the rails and not jump them.
Repeat this a few times in both directions, praising him each time he does it correctly and taking plenty of walk breaks. Then, if he seems really comfortable with the exercise, raise the pole ends to the next height. Don’t go above 8 inches in your first session. If he has a good first experience and is feeling confident and coordinated, you can start your next session where you left off and gradually increase the height and/or add more poles, if you like. Also, if you feel secure in the saddle, try the exercise a few times without stirrups.
As your horse gets the hang of the exercise, you should feel his energy clearly flowing from your legs into a nice connection in your hands. Each time you go through the poles, try to find a happy balance between your legs and hands. If he slows down and drops behind your leg, ask yourself if you were using too much hand. If he gets flat and fast, ask yourself if you were using too much leg and too little hand. You never want to be rough with either your hands or legs, but instead want to maintain a light connection with both, allowing for and supporting a nice steady rhythm.
You will also feel more spring in his back as he lifts his legs over the poles. This is the elevation and suspension you want to feel—and it’s just the impulsion and “spring-loading” we want for jumping. Once you have a nice connection over the poles, it’s OK to do them at the rising trot. Be sure to continue asking for collection and suspension in each repetition of the exercise.
Remember not to overdrill. Once your horse seems to understand the exercise, repeat it just a few more times before going on to something else. Then incorporate it into your flatwork, doing some lengthening and shortening of the stride, lateral work, canter transitions, etc., elsewhere in the ring in between passes over the poles.


Exercise 2: Bounces
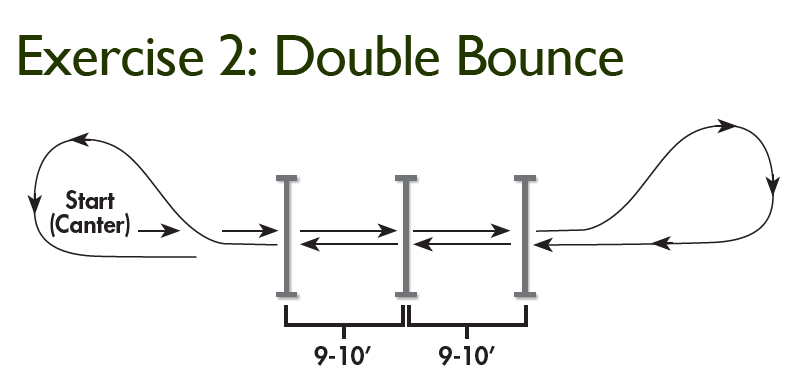
Like the last exercise, this one is great for improving straightness and rhythm while rocking your horse back onto his hind end and making him quicker with his front end. It helps to center his arc correctly over the tops of the fences. It also teaches him to learn from his own mistakes and back himself up from the jumps to avoid going “past the distance” or getting too close to the jump on takeoff. Meanwhile, you can focus on your own position and balance.
Only do this exercise with an experienced horse who is already familiar with bounce jumps.
Set up three small crossrails 9 to 10 feet apart. Alternatively, you can make each jump a single rail, raised at one end and resting on the ground on the other end as you did in Exercise 1. If you and your horse are more experienced, make the jumps small verticals, no higher than 2½ feet. If he has a naturally bigger stride, increase the distances between the jumps to as much as 11 feet. Place a ground rail on each side of every jump. This will help your horse’s depth perception and prevent him from going past the distances.
Approach the bounces in a collected canter, being sure that your horse is in front of your leg. In this exercise, it’s better to be a little tight to the jumps than too forward. When you arrive at the first jump, leave him alone to focus on his job. The more you can stay out of his way, the better. Hold your two-point position throughout the exercise, allowing him to jump up and close your hip angle over each obstacle.
If he gets quick over the bounces, think of being almost a little behind the motion with your body, using your weight—not your hands—to gently slow him down.
Jump the bounces in both directions. When that’s going well, you can gradually add another jump or two.
If you have a young horse and want to trot instead of canter into the exercise, put a placement pole 7 to 8 feet from the first jump to help him arrive at a comfortable takeoff spot. Then set a second placement pole 9 to 10 feet after the last jump. With this setup, jump through the exercise in only one direction so the trot pole is at the beginning, not the end.


Exercise 3: In-and-Out

This final exercise will continue to emphasize straightness while helping you focus even more on body control and reminding your horse to collect and rock back onto his hindquarters on takeoff.
Set up a small vertical 21 to 22 feet from a small square oxer. Place ground rails on either side of both jumps. Add another pair of ground rails in the middle of the exercise, perpendicular to the jumps, to create a straight chute for your horse to canter through. Some horses spook at these poles when they first see them, so set them 10 to 11 feet apart initially.
Approach this in-and-out at a working canter, starting in the vertical-to-oxer direction. This should ride comfortably at this distance, although you may need to add leg after the vertical to be sure the apex of your horse’s next jumping effort is directly over the center of the oxer.
When your horse has jumped the in-and-out well in that direction, approach it from the other direction. The distance might feel a little tighter this way, so after you close your leg to help him across the oxer, stay quiet in the tack, allowing him to figure out the exercise. Let the jumps back him off. Help him more with your body control than with your hands—by opening your hip angle and sitting a little taller with your upper body.
Continue alternating directions through the exercise a few times to feel how differently you need to ride the vertical-to-oxer versus the oxer-to-vertical. Meanwhile, if your horse is having trouble staying straight, gradually roll the perpendicular ground rails closer together until they are about 8 or 9 feet apart. If he has a major drifting problem, angle these rails into a mild “V” shape, bringing the ends of the poles slightly closer together (but no closer than 3 feet) in front of the takeoff of the second jump. At this point, only jump the in-and-out in this direction—or ask a ground person to reconfigure the “V” each time so that the narrower end is always pointing toward the second jump.
If you’re a more advanced rider and this exercise is going well, practice it without stirrups and/or tie a knot in your reins and put your hands on your hips or out to the sides like airplane wings over the jumps. This will help you improve your independence from your hands and focus on your position and balance in the air.
Remember, your horse’s welfare should always come first. Keep your schooling sessions fun and interesting without ever overdoing it—so you both can look forward to next time!


Daydream

I discovered the benefits of the football-grid exercise (Exercise 1) with Daydream, a horse I started riding as a 5-year-old. In a way, he and I grew up together: I won my first grand prix and my first big American Grandprix Association grand prix on him. He was a huge, gangly horse who was light on his feet but moved like a daisy-cutter hunter—low to the ground with very little knee action. He needed to learn to be quicker with his legs over very square oxers, so I consulted long-time trainer and horse dealer Vince Dugan. Vince was one of many generous professionals who offered me advice and horses to ride early in my career, when I was on a tight budget and starved for knowledge. He suggested I try this exercise to teach Daydream to think more about where his legs were and snap his front end up more quickly on takeoff. It worked! We went on to win countless grands prix and several puissance classes together, clearing walls taller than 7 feet! I continued to compete Daydream until he was nearly 20 and then watched him enjoy another decade of happy retirement.
About Margie Engle

Margie Engle has been one of the winningest jumper riders in the U.S. for more than three decades. As a child, she cleaned dog and cat kennels in exchange for riding lessons until she was deemed big enough to muck stalls and groom horses. She didn’t own her own horse until her late 20s. In the meantime, she learned every aspect of horsemanship, working her way to the top of the sport. To date, Margie has won more than 200 grands prix classes, six World Cup qualifiers, more than 20 Nations Cups and a record 10 American Grandprix Association Rider of the Year titles. She competed in the 2000 Olympics, won team silver at the 1999 Pan American Games, team gold and individual bronze at the 2003 Pan Am Games and team silver at the 2006 World Equestrian Games. Last year, she and 13-year-old Oldenburg stallion Royce anchored the winning team at the Nations Cup in British Columbia before topping the field in the $130,000 ATCO Nations Finale Grand Prix. Proving her ability to extend the longevity of her mounts, Margie currently has two 18-year-olds competing in FEI-level classes: Bockmanns Lazio, who has already scored multiple top-10 placings this year, and Indigo, who placed third in the $205,000 NetJets Grand Prix CSI**** at the Winter Equestrian Festival this February with double-clear rounds. Margie and her husband of 23 years, veterinarian Steve Engle, are based at Gladewinds Farm in Wellington, Florida.
This article was originally published in the April 2018 issue of Practical Horseman.