This article is sponsored by Sentinel.
I don’t have a magic recipe for finding a distance and making a good jump. But I do have an exercise that will help you achieve the most important aspects of getting that good distance and good jump: straightness and rhythm.
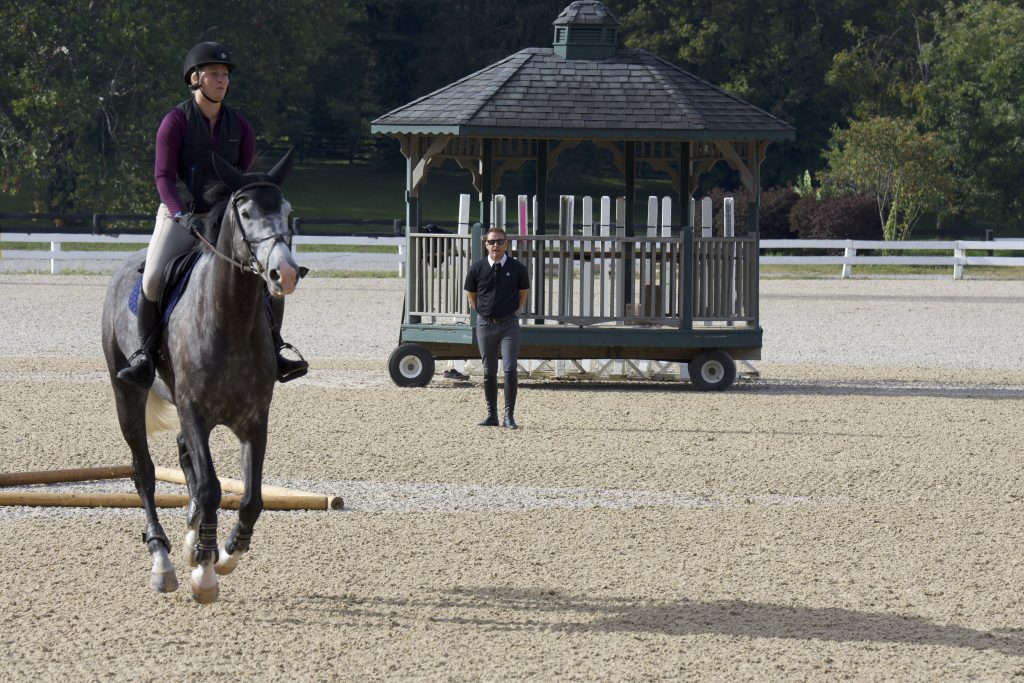
© Steve Heath
These are the most important qualities when you show jump because they are the two that our horses are most concerned about when jumping on their own. In a jump chute without a rider and with set fences, horses want to know: “Can I move up to the jump?” and “Is it straight in front of me?” They want to know the same things when we’re riding them.
Knowing this is the beginning of riding in a way that is most natural and complementary to the horse. No matter if you have a fast or slow horse, a small or big horse, they all need rhythm and straightness. These factors help to create any horse’s comfort zone from which he can jump with confidence.
When you can regularly achieve a good result in this exercise, you’ll have a super setup to ride a jumping course.
Set the Exercise
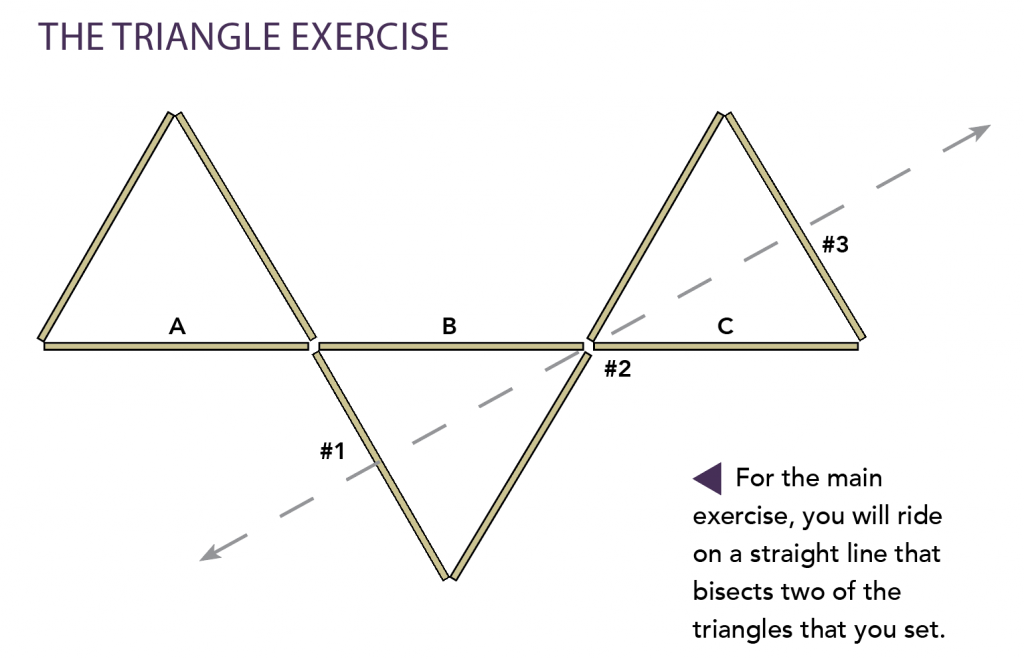
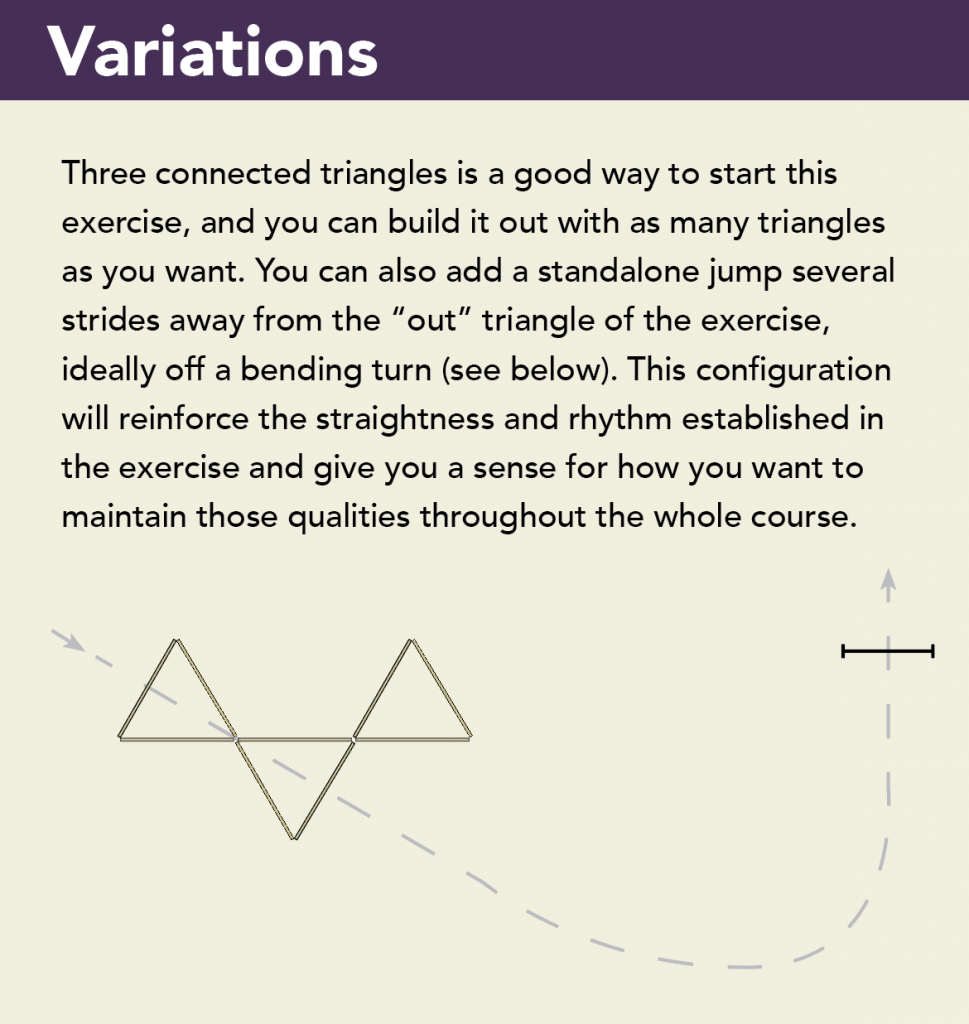
This exercise involves creating a series of triangles with ground poles (see the diagram). To set the exercise, place three ground poles—A, B and C— in a straight line so they are almost touching end-to-end. Set two more poles against pole A so the three poles form a triangle. On the opposite side of triangle A, build another triangle with two poles, using pole B as its base. Build a third triangle, using pole C as its base on the opposite side of triangle B.
For the main exercise, you’ll ride on a straight line that bisects two of the triangles: You’ll canter into the line over one side of triangle B (#1 in diagram). Then you’ll canter over the spot where the tips of the two triangles meet (#2) and then canter out over the side of triangle C (#3).
You can use 12-, 10- or 8-foot poles to set this exercise. The longer the poles, the more space your horse has for landing inside the triangle and for the takeoff into the next triangle. The shorter poles are better for shorter-strided horses.
Trot the Exercise
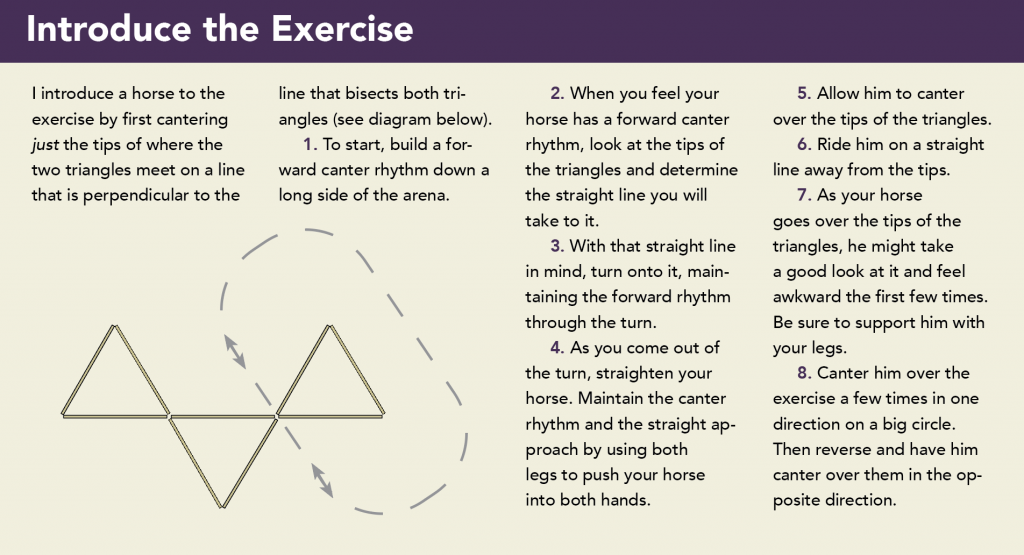
“Introduce the Exercise” shows how I introduce the exercise by having your horse canter over the tips of the two triangles. Once your horse is comfortable doing that, ask him to trot the straight line that bisects triangles B and C. Think about using the same aids that you used to set and maintain the rhythm and straightness previously.
- Establish a forward trot rhythm on the long side of the arena.
- As you ride through the turn, maintain the forward rhythm and look at the straight line that you will ride to approach the exercise.
- As you come out of the turn, straighten your horse on the line to the triangles. Maintain the trot rhythm and the straight approach by using both legs to push your horse into both hands.
- Allow your horse to trot over the base pole of triangle B (#1).
- Keeping him between both your legs and hands, ask him to maintain the straight line over the tips where the two triangles meet (#2).
- Again, focusing on straightness, ask him to stay on the straight line and trot over the pole that is the base of triangle C (#3).
- Trot the exercise in a big circle in one direction several times and then reverse and repeat the exercise in the opposite direction.
- You can use this exercise to measure your horse’s rhythm: If he had to stretch out his step a little to get out of triangle C on a natural trot stride, then you know that you need to increase your horse’s pace and rhythm coming in to triangle B (#1).

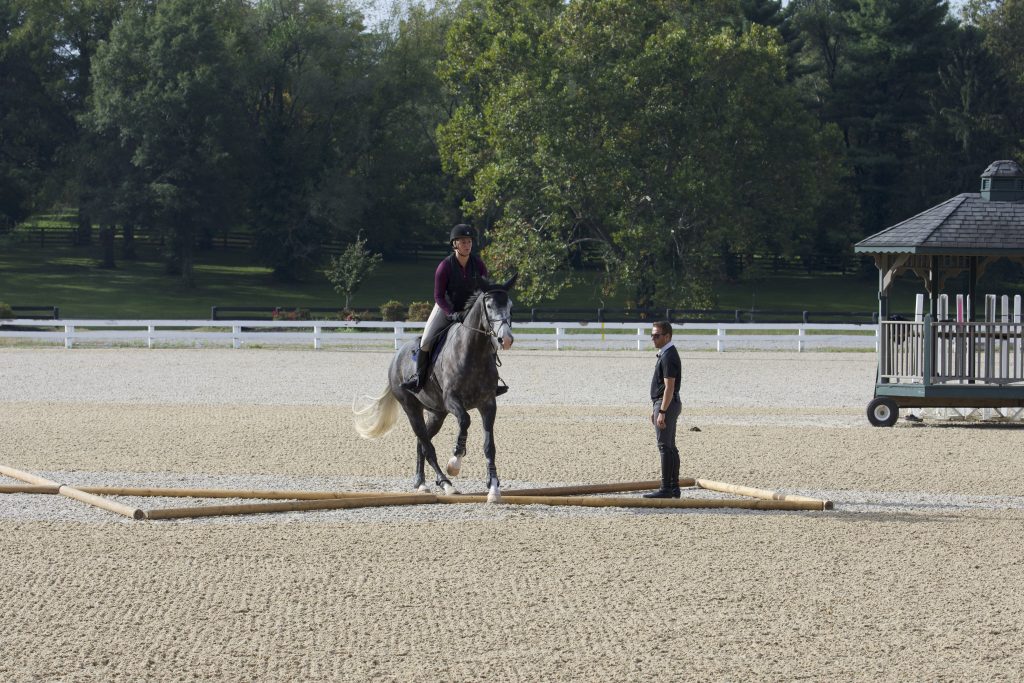
© Steve Heath
Canter the Exercise
Once you and your horse are comfortable trotting the exercise as you approach it from both the left and right and the opposite direction, move on to the more difficult challenge of cantering the bisecting line over the two triangles.
Think of your “takeoff” and “landing spots” as being the same as if there was a jump at the first pole at triangle B in the line (#1). This will set up how your horse rides over the second two elements of the exercise—the spot where the two tips of the triangle meet (#2) and the base pole of triangle C (#3).
To the first pole (#1), you want the takeoff at a point where the middle of your horse’s stride is centered over the pole. This would be the same as a .90-meter jump. That way he will land inside the triangle at a comfortable spot in his natural stride where he will have enough room for his feet for the takeoff and landing before and after the narrowest spot of the exercise where the tips of the triangles meet (#2).
Here is how to ride the line:
- Establish a forward canter rhythm on the long side of the arena.
- When you feel you have a forward canter, turn toward the exercise.
- Hold your horse out throughout the turn: Sink weight into your outside stirrup, and keeping a lot of inside leg, use a direct outside rein plus a soft opening inside rein to bend your horse in the turn.
- Maintain the bend in the turn while keeping his rhythm. Be careful not to block it with your hands. You want a soft inside hand throughout the turn.
- Set up your straight approach to the exercise: As you exit the turn toward the jump, shift the weight from the outside stirrup so your weight is centered over the saddle. Leaning even slightly either way will impact your line.
- Look through your horse’s ears. When you have the exercise lined up straight through his ears, close your inside rein against his neck. Also, close your hands on the reins but stay soft with them. Push with both legs to move your horse into your hands. This is how you keep the horse centered between you as you keep moving forward.
- At the same time, start to sit up tall in your upper body. As you approach the exercise, no matter when you see your distance to the base pole of triangle B (#1) or what that distance is, sit up. Do not tip forward and drop the reins.
- As your horse canters over the pole into triangle B (#1), maintain your soft arms and even feel. Use both legs evenly, stay centered and remember not to tip forward with your upper body. Maintain this feel and position as your horse canters the tips of the two triangles (#2) and the pole that is the base of triangle C (#3).
I want to stress the need to sit up tall on the approach and throughout the exercise. Not doing so is why I fell off a horse twice. I saw the distance, and I tipped forward and chucked everything at the horse. It was a horse that had just come from Germany where everybody rides with their bodies in very upright positions. As soon as I leaned forward and dropped him, he was like—“Woo! There’s no pilot here anymore. I guess nobody really means to be jumping, then I’m just going to take an exit.” - Ride your horse over the exercise in the same direction. When he is comfortable, you can canter the same line off the opposite lead or in the opposite direction. You can also ride the line that bisects triangles A and B. Introduce that line the same way as the previous line. When your horse is comfortable over both triangle lines separately, you can ride over one line, ride a large rollback turn and canter over the second line.
© Steve Heath
Troubleshooting
- If your horse is fighting with the bit as you approach the exercise, let him fight with it, but don’t let him fight with your hands. Keep your legs on for straightness, even if you need your horse to come back—just lean back a little to get that.
- You can tell if you’re straight when approaching the exercise by looking through your horse’s ears. If you can see the exercise, you’re good. But if you don’t see it through his ears, then you’re not on a straight line to it or you must have a kink (bend) in your horse’s neck.
- If your horse stepped outside the poles, it could be a problem with your straightness or aids. For example, if you came in on a right-lead canter and your horse stepped out to the left of the poles, it could be because you were pointed a bit left on approach. It also could be that you were not using enough left leg and hand to keep him straight. (And if you’re wondering whether or not your horse stepped outside the poles at any point in the exercise, go back and look at his hoofprints around the exercise. See if they are on the outside of the triangles.)
More on the Comfort Zone
This exercise teaches you how you want to get your horse to a jump. Rhythm and straightness are your number one friends on any horse, young or old. Once you have those over this exercise, it’s just a matter of putting in the jumps.
A big benefit of jumping with a forward rhythm and straightness is increased confidence for the horse. If you ride forward on the approach to a jump, maintain your horse’s straightness and stay out of his way by sitting centered and tall, he gets to the point where he feels he’s a little bit more in charge of himself, which boosts his confidence.
To a certain extent, what determines how high a horse wants to jump is his comfort zone. And when you master the forward rhythm and straightness consistently, you’ll be putting your horse right where he wants to be.
Why the Exercise Works
This exercise demonstrates whether you have the correct rhythm and straightness for a good jump. If you have a forward rhythm approaching the exercise, you have set yourself up for your horse to meet the first pole into the exercise at an appropriate distance. This will help your horse keep his feet inside the two triangles throughout the exercise.
If your rhythm has not set you up for the right distance, several undesired results can happen:
- If your takeoff distance over the first pole into the exercise is too close, your landing from that pole will be very close to the tip of triangle B. There won’t be much space for your horse’s feet, so he may need to step outside of the triangles as he goes over the narrow section of the two tips, which you don’t want.
- If you take off too far away from the first pole, your horse will land too far away from the tip of triangle B. He’ll have to stretch over it and, again, might step outside the triangle because he is not organized.
Similarly, if you’ve established and maintained straightness on the approach to the exercise and throughout it, your horse will have an easier time keeping his feet inside the two triangles as you ride the line. If you haven’t ensured his straightness, he may be forced to step outside the triangles. If you’re just a little bit off center, your horse might have to step outside the poles at the tips.
Forward for Straightness
A forward rhythm is critical for straightness. If you look at racing horses, you never see them cantering crooked or fishtailing toward the finish line. At least not the good ones, anyway!
There is a big misconception about where straightness comes from. A lot of times if a horse is swimming through a combination or through a distance, the rider is trying to correct it by steering. But there you have the same problem as you have when driving your car on ice. If your car’s rear end goes off one way and you are yanking the steering wheel the other way, the steering problem is just going to get worse and worse.
It’s the same problem you have with your horse. Your horse is drifting to the left and you pull on the right. Then your horse overshoots the correction and you’re pulling on the left rein. And then, “Oh! There’s still a jump there!” This is where, instead, you need to sit down and push your horse forward with your legs. A forward-moving horse can never be crooked.
About Ronny Riemer
German native Ronny Riemer is a skilled grand prix rider and trainer with more than 20 years of experience in the sporthorse industry. Riding for German greats like Franke Sloothaak and Paul Schockemöhle, Riemer made a name for himself as a rider and trainer in Germany and other parts of Europe and North America. Riemer and his wife, Chanel, now have a training and sales business in Ocala, Florida. Riemer gives clinics throughout the country, and he also gave demonstrations at the 2021 EQUITANA USA forum at the Kentucky Horse Park in Lexington. While Riemer takes horsemanship very seriously, he also sees the lighter side of life with horses in his @GermanRidingInstructor social-media persona.
This article originally appeared in the Spring 2023 issue of Practical Horseman.
This article is sponsored by Sentinel.